Tuesday, July 31, 2012

Martha Stewart Knit & Weave Loom


Beginners and experts alike can create square, rectangle and circular pieces, and even rosettes.


The first step to knitting is casting on...


How to Purl stitch...
To finish your project, you need to bind off...

 
Take a look at this video tutorial on how to create a rosette...
To find more how to videos, scroll down here to find Martha Stewart Crafts Loom Videos.

You can now find the Martha Stewart Knit and Weave Loom at your local Craft Warehouse!

Monday, July 30, 2012

State Fair


1. My Mind's Eye The Sweetest Thing Collection Coming Soon!;
2. Echo Park Paper Company Eclectic Collection;
3. The Gingham Owl 4. Studio Calico Mister Huey's Mist Sunshine

Friday, July 27, 2012

Tim Holtz Distress Inks, Stains, and Markers


Tim Holtz Distress Inks, Stains, and Markers are a collection of acid-free, non-toxic, fade resistant, water-based dye inks, stains, and markers. They're perfect for the new vintage, stained, aged effect crafters are creating in their altered books, scrapbook pages, cards and paper craft projects.


Tim selected the colors and helped develop these inks to produce a realistic, weathered look on paper, photos and decorative fibers. All the colorful Distress Inks afford added versatility when photo tinting and color layering with the original, award winning tones.

 •Acid free
 •Non-toxic
•Fade Resistant
•Water-based Dye Inks

There are many fun techniques you can do with your Distress products. Here are some video tutorials by Tim that features how to use each product.

Distress Inks:


Distress Stains:
Distress Markers:
 
* Entire stock of Tim Holtz Idea-ology Embellishments 25% off. Distress Markers $2.88 (reg $3.49), Distress Stains $3.88 (reg $5.99), and Distress Ink Pads $3.88 (reg $5.99). Sale ends, Sunday August 19, 2012.

Thursday, July 26, 2012

Tillandsia Floating Garden


Tillandsia (“air plants”) are members of the bromeliad family, numbering over 500 species. Most are epiphytes, using their root structures to attach themselves to tree branches and rocks. They are found in rain forests and deserts, in elevations from sea level to mountain peaks in Central, South and the warmer climates of North America. They absorb all moisture and nutrients through suction scales (trichomes) on their foliage. They can be displayed mounted on driftwood, or in glass terrariums as a contemporary easy care terrarium.


Caring for your Air Plants:

Light:  Tillandsia prefer medium to bright filtered light.  As a rule, the silver/grey varieties can tolerate full sun, while the green varieties prefer some shade.  Ideally, Tillandsia should be placed within 3 feet from a window.


Watering:  Thoroughly soak Tillandsia by heavy misting till the water runs off the foliage 2-3 times per week in hot climates, once a week in cooler ones.  Submerging Tillandsia underwater for 30-60 minutes is also acceptable, although care must be exercised to keep the bloom as dry as possible.  Place in a location with good air circulation to ensure they dry within 4 hours after watering.  Water in the morning to ensure the plants are dry before nightfall.  If the leaves begin to curl or roll, the plant is dehydrated.  Its health can be restored by submerging in water for 6-8 hours, then resuming the regular watering schedule.

Fertilizer:  Feed once a month with a water soluble fertilizer at 1/4 strength.  Nitrogen should be in the form of ammonium or nitrate (urea requires bacteria from soil to break down, which is absent in air plants).  A good mix is 10-15-20.  Phostrogen works well.

Flowering:  Tillandsia normally flowers once a year, with blooms lasting a few days to more than one year.  They are very slow goring, but the mother plants produce up to 4 “pups” or “offsets” from their base when they are finished flowering.  These pups grow slowly , with each producing 4 offspring that will all eventually flower.  The large clumps or colonies that are produced in time are quite spectacular.

Temperature:  50 to 90 degrees F, with good circulation.

Pests:  Use a mild insecticidal soap to remove the occasional mealy bug.  Never use white oil or any sprays containing copper.

These are now available in Craft Warehouse stores!

Tuesday, July 24, 2012

Creating With Heidi Swapp Memory Files

I love Heidi Swapp's concept behind Memory Files. I have several piles of lovely photos sitting waiting to be scrapbooked but have never made my pages yet. Why not?

For example, take last year's camping trip. We spent almost a week of taking amazing photos. There were so many with so many stories to tell that I just couldn't get very many on even a double page spread. I didn't have a lot of the right sized photos that worked with a page and honestly, didn't find paper that would go with so many different photos.


So, they just sat. 

Until now...


It is even better than a Smash book because your file is just that. A file. You're done when you say it is. You can make it as many pages as you like. Or keep it a single file like I did.


My husband took a day to climb that mountain, so I knew I was adding those photos! The Instaframes make it pop off the file!


This photo is priceless... but I knew I couldn't do a whole spread on my son's reaction to sitting in a hammock for the first time. ;) This is a whole lot better.


Our family has some pretty awesome traditions. I love how I can share them in little envelopes through out the file.


I still kept my "Smash" style of adding paperclips with tags through out the file.


This was so fun! I have several piles of pictures that I will be creating more files with!

Friday, July 20, 2012

Echo Park Paper & Lawn Fawn Stamped Journal by Guest Designer Lizzie Oakley

                                                                       Hello there fellow crafters, I'm Lizzie!  I am so excited to be a guest designer for Craft Warehouse!  This is such an honor and wow, I was completely gushing with joy when I was chosen! I have a super fun project for you using some Echo Park Paper, Lawn Fawn Stamps, and the totally amazing Chormatix Markers from American Crafts
 

We are going to be making a fun journal using the items above plus our sewing machine.  If you don't have a sewing machine, that's fine!  You can use a needle and thread!  I promise you, it's not as scary as it sounds.

We need 7 sheets of white card stock (or any color card stock that you want to use)
Cut all of the card stock down to 10 x 7 inches.  Our journal is going to be 5x7 inches.


Take one sheet of the cut card stock and score (on the 10 inch side) at 5 inches and then again at 5 1/4.  

I don't have a fancy smancy scoring board.  Instead I use my trimmer and a pair of scissors.  I lightly press along the guide so I'm careful not to cut the paper, but it will still leave a nice line that is easy to fold.


Take your card stock and fold along the scored line.  You should end up with something like I have in the above the photo.  This is going to be the cover to your journal.  Start to plan out and decorate your cover. 

Do not worry about scoring the other sheets.


Now it's STAMPING TIME!  I know that the Chromatix markers are alcohol based, but I wasn't too sure on what ink would work the best.  I do love my StazOn as it just produces such a nice dark solid image.  But my Versafine makes clear stamps so crisp!  I was torn to say the least.  So off I went to stamp with both inks!


You might be able to see that with the StazOn the colors seemed to bleed a little bit when using the markers.  I had an idea that this would happen, but wanted to make sure.  The Versafine worked great!

Another tip when using the Chormatix, the blender is more of an eraser.  It does blend, but I found if using a color lighter then one I'm working with, the blending effects pop out a bit more.


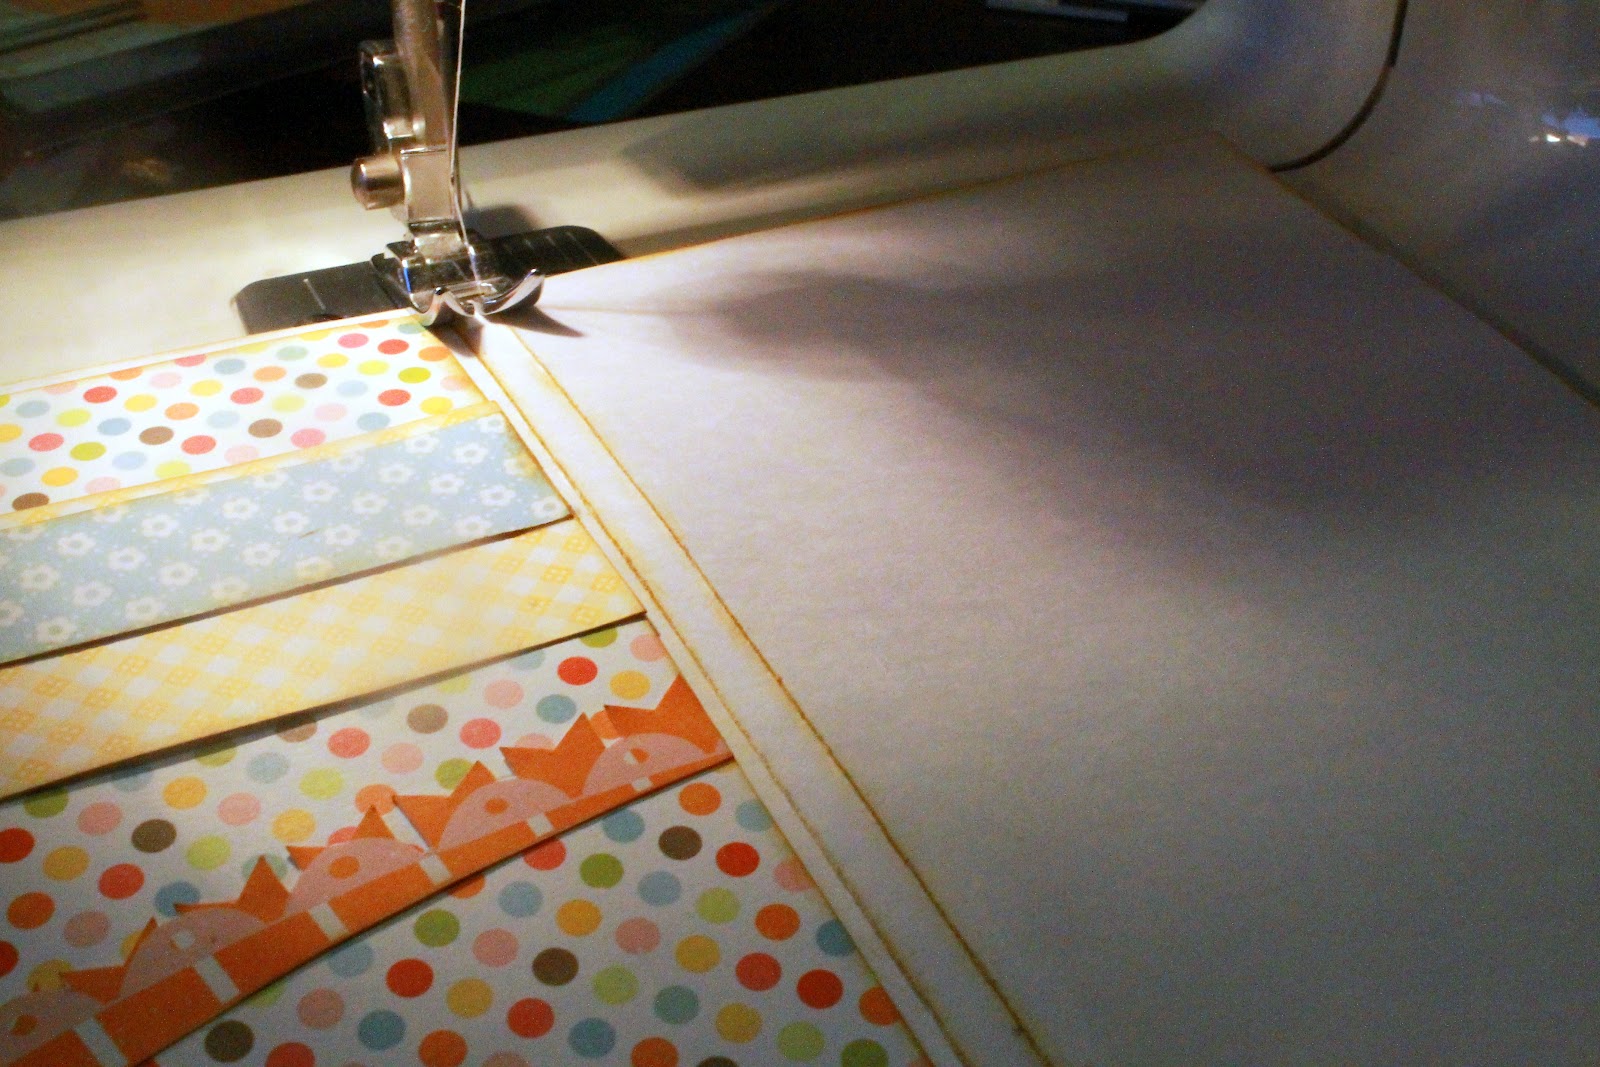
With the flat elements to my cover added, I began the sewing of the binding.  There are many binding tutorials you can find all around the interwebz.  I like to sew the binding.  It's easy and I don't have to wait hours for glue to dry.  I'm an instant gratification kind of a girl, what can I say?
Take all 7 sheets of your paper, with your cover on the outside and sew down the center of your scored lines.

Once sewn together, fold the journal in half.


What's that?  You see a few uneven pages?  This happens here and there.  Take your trimmer or handy dandy scissors and just trim away the naughty edges.
Finish decorating your cover and VIOLA!


A very lovely, one of a kind journal!

By using the card stock, this journal is nice and sturdy and can withstand tons of doodles and coloring!  Even if you just need a fun play to practice your coloring techniques!  You could substitute the inner pages with regular weight paper and have a fun writing journal.  It's up to you! 

Thursday, July 19, 2012

Guest Designer Lizzie Oakley


Welcome today's guest designer, Lizzie Oakley! Lizzie loves to , stamp, color (her favorite medium is watercolor), scrapbook, knit, and sew!

How long have you been crafting?

I have always been a crafter.  One of my favorite things to do when I was a kiddo was to go to Fred's with my granny and pick out a new craft for me to work on for the week.  She was a knitter and I believe that she sewed as well.  She loved to bake and cook and I loved being with her.  I was only with her for summers and it was the best time of my childhood.  It's safe to say that I have always been a crafter and it's totally because of my granny!

What inspires you to be creative?

 I am the most creative when I am alone.  In ways I think I get sensory overload with Pinterest and Facebook.  Even the crafty magazines make me go crazy!  I find that I will compare my work to those I see online or in print and then end up hating what I do.  So when I feel the itch to make something, I turn off the computer, put the phone on silent and just let it flow!

What Craft Warehouse products do you love to use?

I love crafting!  Pretty much any product that works it way into my hands I'm going to love.  I do love stamping and coloring

How can you encourage others reading this column?

Be yourself and never give up on you.  As crafters we are always comparing what we do with others.  We love the inspiration from other projects but all too often look at our own and think it's not as good.  It is!  You are you and you can only do the best that comes from your heart.  So don't get frustrated and keep up the great work!

Visit Lizzie's blog, Oh Snap, Lizzie and her Facebook page! Make sure you come back tomorrow to see her step by step art journaling tutorial!


Do you love scrapbooking, card making, stamping, jewelry making, paper crafts, quilting, or fiber arts? We would love to invite you to submit photos of an original project, telling us something about it. If your project is picked, you and your artwork could be featured on the Craft Warehouse blog for our new Designer Spotlight column! Click here to see how to apply!

Tuesday, July 17, 2012

Best Friends Quilted Panel by Guest Designer Elaine Byrum


designed and created by Elaine Byrum

Fabric line was designed by Tarcy Lizotte for Elizabeth’s Studio
BFF Panel ( Best friends )


All you need to create this stunning quilted piece is this fabric panel. Cut the panel into a center square to equal a 17”. Also cut a 17” square of backing fabric and batting.


Quilt as desired. Using invisible thread, I quilted the umbrella, coats, and boots. I added bugle beads randomly for rain and seed beads for the water splash on the hand. 


I used Darice extra fine beading needles and followed the direction on the package for beading.

I then finished it off by framing the picture with a 16” frame from the Craft Warehouse frame department.

Friday, July 13, 2012

Canvas Corp and Heidi Swapp Mini Album by Elizabeth Wiederspohn


Hi, my name is Elizabeth Wiederspohn and I am thrilled to design for Craft Warehouse!  I love Craft Warehouse.  They not only sell crafting products but they sell inspiration that sparks my creativity.  Just walking into their store is a wonderful experience for me.

I am excited to show you my Craft Warehouse inspired mini book today.  This project was a ton of fun.  I had a blast spraying and staining Heidi Swapp Color Magic papers and Banner Delights with all sorts of Studio Calico Mister Huey's Sprays and Tim Holtz DistressStains.  There is nothing like being able to create your project not only in design but being able to style and dye your own paper to go with it.  I also used the Canvas Corp 6x6 Stitched Book.  It's thick canvas pages and the design of the book was so much fun to alter and play with.  I enjoyed this project from start to finish. 


Supplies Used:
Canvas Corp 6x6 Stitched Book
Heidi Swapp Color Magic Paper& Banner Delights
Studio Calico Mister Huey's Sprays-Sunshine, Pinstripe,& Plum Thumb
Studio Calico Mister Huey's Mask-Chevron
Tim Holtz Distress Stains-Fired Brick&Wild Honey
Doodlebug Red Envelope
My Mind's Eye and Queen& Co. Washi Tapes
Lawn Fawn Stamps-Jessie's ABC's
We Are Memory Keepers Black& White Baker's Twine
K& Company SMASH Label Maker
Ribbon
Cardstock
Toothpicks
E-6000
ATG Adhesive
Three Dimensional Adhesive


To show you how I put together my album I made a quick video.  Be prepared to move fast.  There was a lot of information to include.   Enjoy!


or view it at YouTube http://www.youtube.com/watch?v=2R5JvU4avdc 

Thursday, July 12, 2012

Guest Designer Elizabeth Wiederspohn


Welcome to another Designer Spotlight! Today we are featuring the all around talented Craft Warehouse Scrapbook Alumni Member, Elizabeth Wiederspohn. We have always loved Elizabeth's unique paper crafting style! She likes clean lines but isn't afraid to try new things. She not only creates stunning layouts but also dabs into home decor, cardmaking, and mini albums.


How long have you been crafting?

I have been crafting as long as I can remember.  Paper was the craft of choice at our house because my mom had a hatred of play dough.  I was a 4-H cutie and started sewing and crafting for fairs and competitions before I was ten.  I started stamping in high school and then started scrapbooking shortly after that.  Almost eighteen years of scrap booking later and I still love it.  Recording moments and times to remember is something that never grows old. 


What inspires you to be creative?

Everything God makes inspires me to be more creative.  I love to collect ideas from magazines, sales ads, Craft Warehouse store displays, spring flowers, websites and anything around me. 


What Craft Warehouse products do you love to use?

I love my ATG tape dispenser.  I can't see crafting without it.  It holds my projects together in a permanent way and is cheaper than other adhesive if you use tons of adhesives like I do.  I also love my We Are Memory Keepers Corner Chomper, Tim Holtz Tiny Attacher, and Making Memories cutting board. 


Embrace your mistakes.  Mistakes are chances to learn, grow and be more creative. Also, find something you love to do and keep with it.

Do you love scrapbooking, card making, stamping, jewelry making, paper crafts, quilting, or fiber arts? We would love to invite you to submit photos of an original project, telling us something about it. If your project is picked, you and your artwork could be featured on the Craft Warehouse blog for our new Designer Spotlight column! Click here to see how to apply!

LinkWithin

Related Posts Plugin for WordPress, Blogger...
Blogging tips