Friday, August 31, 2012

On the Edge Weekend Giveaway


It's weekend giveaway time! This weekend we have Teresa Collin's Designs On the Edge Collection to giveaway! In this paper and accessories pack there are 18 12x12 double sided cardstock papers, 2 die cut sheets, 1 transparency, 1 set of brads, 1 chipboard elements sheet, 1 album cover, 2 sheets of reflective paper, and 1 set of trims. Over $40 retail value!
 
To enter to win, comment here to be entered to win this collection! Click "share" our link on Facebook and come back and comment again saying you did to be entered to win again! We ship in the US only, thank you.
 
Thank you, our giveaway is now closed! Our winner picked via Random.org is...
 
love this one thank you so much for the chance HEATHER HOWARD!

Canvas Corp Mixed Media Canvas Tutorial

Hello again everyone!

Today it is my pleasure to show you the basics behind creating a mixed media canvas. Historically, I have focused my crafting efforts on scrapbooking; however, mixed media recently caught my eye and piqued my interest. After seeing endless amounts of beautiful projects online, I decided to go WAY out of my artistic craft zone and attempt to do a canvas.

If you are a true beginner and have not made anything of this sort, it is very helpful to search for videos online and watch tutorials to navigate the many products and their purposes.

My latest creation, thanks to Craft Warehouse gifting me with awesome product, is a 12 x 12 canvas that utilizes Canvas Corp Black & White and Black & Kraft patterned scrapbook papers and chalk paper; Studio Calico masks, Mister's Huey Color Mists, and wood veneer shapes; gesso; molding paste; acrylic paint; adhesive; a Sharpie, and a word processing program and printer.


Keep in mind that there are many layers involved that must be allowed time to dry, so this is a project that may take an entire day or several if you work on it a little at a time. Granted, you can always use a heat gun to speed up the process, but I usually let mine dry naturally.

The first step is to paint the canvas the color of your choice with an acrylic paint. For this project I chose black. Next, I chose to use the Kraft theme papers as the base of the project, and I decided to tear them up so I could create a mosaic with them. During this process, I coated the backside of each piece of paper with Mod Podge and placed it on the canvas. I repeated this process until the entire canvas was covered and then put a coat of Mod Podge on the entire surface.


Once the Mod Podge had dried (it will dry clear), I dobbed gesso in various places to give the canvas more depth. When the gesso was dry, I applied another coat of Mod Podge and let it dry. Finally, I began coating the canvas with Mister Huey's Color Mist in Dark Calico. This was a process of trial and error (as most of my projects are), but I eventually discovered a technique that worked. This involved spraying one pump of mist very close to the canvas to create a puddle and then rubbing it into the canvas with a paper towel. This allowed me to create the patina I was hoping for by spraying one area at a time and making it lighter or darker as I saw fit (Once the Mod Podge dries it is glossy so there is some glare in the pictures).


Applied gesso is shown in the photo above.


Figuring out a way to incorporate the chalkboard paper was a challenge because I didn't want to use it as simply something to write on. What I ended up doing was using two Huey's Masks and Mister Huey's Color Mist in Inky Black to alter it. First, I misted the chalkboard paper using a chevron mask, let it dry, used the ampersand mask as a stencil, and cut it out.


Next, I adhered the ampersand cutout to the canvas and laid the Huey Mask over the top to protect it while I applied molding paste around the edges. Once I was finished applying the molding paste, I lifted the mask and again waited for everything to dry. When it had dried, I used a paintbrush and painted the molding paste with Mr. Huey's Estate Green. While the paint was drying, I began cutting out heart shapes using the remaining patterned papers and Mod Podging (technical term) them to the canvas along with the sentiment I printed using Microsoft Word.


At this point I applied another layer of Mod Podge and stained the hearts and sentiment with Mr. Huey's Plum Thumb and a paint brush. The wood veneer shapes were next, and they were sprayed with the same Mr. Huey's Color Mists, doodled on with the Sharpie, and adhered to the canvas. Again, Mod Podge was applied to the newest additions and allowed to dry.

The final steps involved using the Sharpie to go around the edges of the hearts, wood veneers, sentiments, and the dried molding paste. I did this several time, blending as I went, until I has achieved a look I was happy with.

Last, but not least, I coated the entire canvas with a healthy layer of Mod Podge and allowed it to dry over night. The next morning, I had the following results.


Thank you so much for looking and I hope you are inspired to get out of your crafty comfort zone and create amazing art!

~ Jennifer

Thursday, August 30, 2012

Guest Designer Jennifer McMurtrey


Welcome today's guest designer and Craft Warehouse Scrapbook Design Team Alumni, Jennifer McMurtrey!

How long have you been crafting?

Crafting has been ingrained in me from a young age thanks to my mom who has always loved to sew and create various projects. I can remember a period of time when she was frequenting the craft bizarre circuit and I would help her make popcorn balls to sell at shows in the park. One of her hot sellers that I specifically recall is the scissor holders Mom made by sewing pot holders in half. They were so awesome and you could hang them from the loop!

I started scrapbooking about ten years ago when a friend introduced it to me; however, I have been seriously crafting for the past four years. What I mean by seriously is that I have been working on pushing myself creatively and going out of my comfort zone with my designs and processes. This push is what motivated me to venture into mixed media, and I totally hooked.


What inspires you to be creative?

Being creative is very long process for me unfortunately. When working a project, I have to think about it and process it for several days before I can even start. It can be quite frustrating. My time on the Craft Warehouse Design Team definitely forced me to work under pressure and deadlines.
My family is my biggest source of inspiration when crafting and I love capturing the everyday moments in our lives. It is so fun to remember those random, funny moments that we all experience. I have never been one to scrapbook from birth to present and do everything in order. Other people I know use this method, but it seems more like work than fun. My crafting is focused on what I am feeling at that moment and what is important to me at that time. More importantly, being creative soothes my soul and restores peace in my very hectic life.


What Craft Warehouse products do you love to use?

Oh goodness! What products don’t I use should be the question! Craft Warehouse has been my very favorite craft supply store for years. I love that I can find new product as well as the tried and true staples in my supplies.

My longtime favorite products have always been My Mind’s Eye and Cosmo Cricket. These two satisfy my need for pretty and quirky in one stop. My newest favorites are Echo Park, Crate Paper, and Jillibean Soup products. These lines are just plain awesome and I am now a hoarder of anything I can get my hands on. If I could only list one more product that is my favorite, it has to be the Mr. Huey paints. I was introduced to these by my design team friends at a retreat last spring and I now own every color! These versatile paints can be used on my paper crafting as well as my mixed media projects – I love them!

 
When it comes to crafting and creating art, the biggest lesson for me has been to appreciate my style and stop trying to be like other designers. I have a bad habit of comparing myself to other people and I can’t do that. I am who I am and what I create is the best for me and my ability. Trust me, I have very talented friends who are recognized nationally and it can be somewhat intimidating. However, I just keep plugging along, learning from others, and creating what pleases me.


You can read more about Jennifer on her blog, Capture the Everyday Moments, and Facebook! Make sure to join us tomorrow with her step by step mixed media canvas tutorial!

Teresa Collins and My Mind's Eye Advent Calendar


Designed and Created by Sarah Owens for Craft Warehouse


Teresa Collins


Shopping List

· Kaiser Craft drawer organizer

· Americana Mississippi Mud Acrylic Paint

· Terissa Collins “Christmas Cottage” paper collection choose one of each paper.

· Terissa Collins “Christmas Cottage” Chipboard Elements No2

· Tim Holtz Scissors

· Sanding block

· Beacons 3in1 glue & Pioneer glue stick

· Rubber bands

· Foam brush

· Marvy 1” circle punch (this helps cut the half circle at the top of each box)

· Tim Holtz Distressing vintage photo ink

Instructions:

1. Start with assembling your a drawer organizer. Tim Holtz scissors work great for taking pieces apart or a small saw.

2. Once you have assembled the frame of the organizer, paint wood with acrylic paint.

3. The easiest way to assemble the boxes is to use Beacon 3in 1 And rubber band the sides together.

4. Once dry paint your boxes using acrylic paint.

5. Cut scrapbook paper to fit the front of boxes. Then using your Marvy circle punch, punch a half circle in the top of your paper. This saves a bunch of time!

6. Glue paper to the front of all boxes, embellish and add advent numbers to the from using Embellishment glue stick.

7. Cut you’re My Minds Eye “Bright” paper to fit the inside center of the advent calendar. Glue down using Pioneer glue stick.

8. Use Tim Holtz Distressed vintage photo ink around the edges of each drawer front.


My Minds Eye

Shopping List

· Kaiser Craft Advent Calendar

· 5x7 White Frame (LFA/471)

· Americana Country Red Acrylic Paint

· My Minds Eye “All is bright” paper collection. 12x12 chosen are “Bright”, “Ephemera Frames”, “Noel Banner” & “Merry” paper.

· My Minds Eye “All is Bright” Washi Tape & sticker accessory sheet .

· Tim Holtz Scissors

· TomBow Hook and Loop Velcro Strips

· Sanding block

· Beacons 3in1 glue

· Rubber bands

· Foam brush

· Marvy .5 in circle punch


Instructions:

1. Start with assembling your advent calendar. Hint: Tim Holtz scissors works great for cutting the mdf apart.

2. Once you have assembled the frame of the advent calendar, paint with acrylic paint and let dry.

3. The best way to assemble the mini boxes is to glue sides with Beacon 3in1 and rubber band together to dry.

4. Once the glue is dry, paint your boxes with acrylic paint.

5. Leaving your cardboard numbers in its packaging paint the numbers with acrylic paint and let dry. Once dry pop out the numbers.

6. Cut scrapbooking paper to fit the front of the boxes. Then using you circle, punch out a half circle in the top of the square.

7. With embellishment glue stick, glue paper then numbers to the front of the boxes.

8. Cut, then glue a piece of scrapbooking paper to fit inside center of the advent calendar.

9. Place a photo in your white frame. Decorate the outside using washing tape.

10. Use Tombow hook and loop Velcro to adhere to the middle of the advent calendar.

Wednesday, August 29, 2012

Back to School Teacher Gifts


                                               Designed and Created by Sarah Owens for Craft Warehouse

From home decor to gift baskets, clear pails are versatile and customizable! It's just as fun to decorate as it is to fill it up! Make your child's teacher a gift for the first day that tells them how much you support what they do.

Tuesday, August 28, 2012

Laugh Often Canvas Corp Banner


designed by Danielle for Craft Warehouse
 
Ingredients:

· Canvas Corp 3 Natural cotton large banners, 2 Burlap large banners, 2 Natural cotton mini banners & 3 Burlap mini banners

· Canvas Corp large clothes pins, black & natural jute string, round chalk board tag, cotton ribbon strip,

· Canvas Corp B&W newsprint paper, B&I damask paper and B&W fresh words paper

· Tim Holtz Soot Distressed ink pad

· Ranger blending tool & foam blenders

· Crafters Workshop 6x6 mini brocade stencil

· Marvy scalloped 2” punch and Ek Success 1 1/4” punch

· Making Memories shimmer card stock letters

Monday, August 27, 2012

Echo Park and Authentique Black Damask


1&2 Echo Park For the Record 2 Tailored;
3. Source 4. Authentique Peaceful
 
 
Thank you all for making our giveaway transition a success! lizierae is our Stamp and Glitter Weekend Giveaway picked via Random.org! Email me at jenevans(at)craftwarehouse(dot)com with your address to claim your prize by September 1st! Thanks again!

Saturday, August 25, 2012

Heidi Swapp Memory File Class


I am so excited to finally share that I will be teaching a Heidi Swapp Memory File class at the Salem Craft Warehouse, October 13th at 1pm!                                                               Don't know what a Memory File is? See my post here. You will leave this class with this filled Vintage Chic Memory File along with even more Heidi Swapp products to make your file in a style all your own. This class is free with the purchase of the kit, which means you get $40 worth of product to create with!


You will get your own sheet of Heidi Swapp Buzz Word Stickers to make your title unique.


The File will open up and have a Mini Memory File inside, sewn together by yours truly. ;)


How cute are these journaling cards created with the brand new Heidi Swapp Vintage Chic pattern papers?!


The inside of the Mini Memory File will have a double page layout with enough journaling cards to add your captions later.


What is so beautiful about this collection is that it goes with any photos you may have. Boy, girl, holiday, vacation, school, baby, heritage... you bring photos of an event and it will get scrapped! I used this file to showcase this year's annual family camping trip. You are welcome to come even if you don't have photos because when you are finished you will have an excuse to take some!


This Fotostack will hold even more photos!


And yes, those are my white legs in this picture. Although, there are a few more along with mine. ;)

To sign up for the class, you need to pre-pay and register for the "Heidi Swapp Memory File Class" by calling the Salem Craft Warehouse at 503-589-1377. I look forward to seeing you there!

Echo Park Layout Tutorial by Guest Designer Steffanie Seiler

Welcome our Guest Designer, Steffanie Seiler back today with a Echo Park Everyday Eclectic layout tutorial.
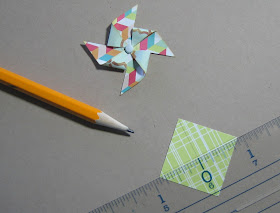
I think pinwheels are so cute.  I have been wanting to make them for the longest time and keep forgetting!  This was my first real try at them and here is my how-to...
  • Punch out a few squares from double-sided patterned papers that coordinate with your project.  I used 2 sizes:  1 1/4" and 1 3/8".
  • Using a ruler, draw light pencil lines from corner to corner, both ways.
  • Cut in from corners to about 1/4" from center.  Erase pencil lines.
  • Place a glue dot at center of square.  Begin curling in same corner toward middle on each of the 4 wedges, sticking to glue dot.
  • Add button or other decorative element to center.  Done.  So simple and so cute!

 I love the feel that stitching adds, whether it be by hand or by machine.  In this instance, I chose machine.  With this paper collection and the layout I had in mind, I knew I wanted to be more playful with my stitching.  So rather than create straight stitch lines, I moved my cardstock back and forth under the needle to create wavy lines.  I went around 3 times to get the effect I wanted.  It also serves to frame my layout.


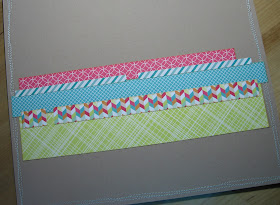
The remainder of this layout is mostly just about cutting strips of paper in varying widths and lengths and layering them. This created a "foundation" for my photos and journaling block to sit on.


One thing I love about Echo Park collection kits is that just about everything you need is in the kit.  Patterned papers, sticker embellishments and at least a couple of different alphas.  All I added was a cardstock base, a few small buttons, dimensional adhesive, a bit of baker's twine, some lined paper for  journaling and a decorative border punch.  One thing I have learned about pre-made embellishments or stickers---don't be afraid to alter them.  The "today" sticker on the clouds was embedded in a larger sticker embellishment.  It didn't work for me, so I just cut out the part I wanted.

Here is the finished layout along with some close-up views...


I have enjoyed sharing my projects with you and I hope that I have inspired you to create TODAY!!  Now go have some fun!!!

Visit Steffanie at her blog, Life of a Brown Eyed Girl, and follow her on Pinterest!