Friday, August 30, 2013
Project Life with Craft Warehouse Design Team Member Melissa Whittaker
Hey there! My name is Melissa Whittaker, and I'm very excited to share one of my Project Life layouts here on the Craft Warehouse blog. I have been documenting my family's memories using Becky Higgins Project Life for over two years now, and I am still so in love with this method. I can record what's happening in our everyday lives quickly and easily.
This week, I am using the Project Life Wedding Edition mini kit. One of the great things about the Wedding Edition mini kit is that a majority of the cards are not specifically wedding related. There are plenty of black, white, and gray patterned filler and journaling cards that can be used for any purpose. Here is how I used this kit to complete my layout.
When I start working on a layout, I like to place both of my page protectors on my work surface, and lay my photos on top. Once I get my photos in place, I will pick out the Project Life kit I want to work with, and then narrow down which journaling cards I want to use.
When I was looking through the Wedding Edition mini kit, I found that 3x4 "You + Me" card and knew it would be perfect to go with a photo of my husband and son walking together on the beach. You can see how a card that would appear to be wedding related could be used for an everyday photograph.
Other cards I chose from the kit were one with a key at the top, an ampersand, and patterned filler cards.
Another great thing about the Wedding Edition mini kit is that there are cards with label boxes that can be cut out to make labels for your photos. I cut this label from one of the cards.
Once I have my photos and journaling cards chosen, I will usually pull out embellishments that coordinate with the colors in my layout. I say usually because I don't always add things to my layout. The beauty of Project Life is that it can be as simple or embellished as you want it to be, so I tend to embellish when I have a little extra time to be creative.
For this spread I am working with a few products you can find at Craft Warehouse: American Crafts Rockabye glitter thickers, embellishments from Melissa Frances, and Fancy Pants Chalk Tape and Chalk Label Stickers.
After I have all of my products and photos ready to go, it is time to pull it all together. Here is what my finished layout looks like using the Project Life Wedding Edition mini kit:
I love the black, white and gray mixed with my colorful photographs.
Here is a closer look at the left side:
Starting at the top, the ampersand card was perfect to link two photos of my son Austin that I received from his daycare teacher. On the upper right card, I punched out some chevrons and added some of the American Crafts Rockabye thickers as a little title for those photos. I used more of the thickers over a chevron patterned filler card to label the photo from when I had sushi with my best friend Shannon.
The way I used the key card might sound a little cheesy, but I thought it was a good way to talk about finally finding a bathing suit that fit after several failed attempts. I wrote that I "unlocked the secret" to finding a great suit. On the bottom left I have a title card with some journaling about the week as a whole, and I used some of that Fancy Pants Chalk Tape and a white gel pen to put the dates onto my layout.
On the bottom right photo I used the label that I cut out:
Here is a closer look at the right side of my layout:
For this page I used a design F page protector. Generally, I stick with Design A (like the left side of my layout), but sometimes I do like to change things up with a different design. And with plenty of new configurations about to be released, I have a feeling I may be trying different designs more often.
This page was all about our trip to the beach in Ogunquit, ME. I had a few photos that I wanted to keep 4x6 but use in the 3x4 slots that this design has. The easy solution was to cut my photo in half (it's not as scary as it sounds as long as you have the ability to reprint a photo). I like the 4x6 photo spread over two pockets, and I've done this in the past in a few of my other layouts.
I used a Fancy Pants Chalk Sticker that I trimmed on the top right photo of Austin running from Brad. More of those American Crafts Rockabye thickers were placed on the photo of Austin jumping off of a rock into the water, and on the bottom I stapled the parking ticket right on to my photo.
Of course, my favorite part of this page was that "You+Me" card:
I cut little arrows out of the chalk tape to point to the photo of Brad and Austin, and just added my journaling at the top. How sweet is this card?
Thanks so much for letting me share my Project Life layout with all of you today!
Thursday, August 29, 2013
Project Life Design Team Member Melissa Whittaker
Welcome to our first Project Life Designer Spotlight, Melissa Whittaker! Once a month, you will meet a new design team member and they will inspire you with how easy it is to use Project Life to document your everyday! We love Melissa's beautiful way of recording her family. You can tell through her pages that she loves the concept of Project Life!
I have been a scrapbooker since around the year 2003. I started scrapbooking after attending a Creative Memories party. My best friend Shannon and I would get together and create scrapbooks in my basement. During 2005, I picked up a starter jewelry maker set at a local craft store and the two of us started making jewelry. We turned this into a hobby business called The Perfect Loop and started attending craft shows. When I got married in 2009, I started scrapbooking again to get my wedding photos into albums. Then I became pregnant with my son and scrapbooking turned into card making and the jewelry business was put aside to focus on these new fun crafts.
My friend Lindsay turned me on to Project Life just after my son was born in 2011 and it rocked my world! I stopped traditional scrapbooking and only do Project Life now. I have actually mixed in a few traditional pages, because I love the creativity I can express with those, but Project Life makes getting my memories documented easily and quickly. I now have books documenting my son from birth through today, and I will cherish these forever.
Lots of things inspire me to be creative. I love looking at products and visualizing what I might do with them. I enjoy browsing through Pinterest and online galleries for ideas. My favorite thing is to see a card and put my own spin on it using my own stamps and papers and tools. I have a strange obsession with watching people unload their "scrapbook hauls" on YouTube as well. It's like shopping without spending money! :)
My favorite products are stamps, alpha thickers, chipboard embellishments, glitter pens and, of course, Project Life. I love tags and pennants and anything that helps me add to my layout.
I would love to encourage others to do Project Life. I am a big believer in Becky Higgins' system for documenting your memories simply and easily (and I love that her method also allows for me to be creative in my spreads as well). I love to mix and match journaling cards from different kits, add little extras to the layout and use digital brushes on my photos. But I also love that on weeks when I don't have much time, I can simply print my photos, slide them into the album, write out my journaling and be done. I would love to be able to show off my layout and encourage others to give this a shot for their own photographs.
Make sure you visit our blog tomorrow, where you will see Melissa transform a Project Life kit into easy pages that you can replicate at home! You can check out more of Melissa's pages at her blog, A Vegas Girl at Heart or follow her on Facebook, Pinterest, Twitter, and Instagram @mswhittaker23!
Would you like to design for Craft Warehouse? We would love to hear from you! Send an email with your name, blog address, and a sample of your work to jenevans at craftwarehouse dot com.
Wednesday, August 28, 2013
Project Life Schedule Board
Love Project Life? So do we! Keep track of your hectic week with a super easy to make family schedule board!
Directions:
1. Open your Black Float Frame.
2. Place Project Life Cards inside.
3. Close your frame.
4. Use a dry-erase pen to write on the frame.
It's as easy as that!
Tuesday, August 27, 2013
Melissa Frances Mini Glass Domes
for displaying tiny works of art, for creating little scenes under glass, for displaying tiny keepsakes, for use in home or party décor, fun for holiday decorating. 4 styles to choose from.
* On sale for $4.88 (reg $5.99) and $5.88 (reg $6.99) August 29th through September 22nd, 2013
Monday, August 26, 2013
Melissa Frances Replica Antique Frogs
New to Craft Warehouse are these Replica Antique ‘Frogs’ or flower spike. They are perfect for displaying photographs cards or for creating projects!
Give it a coat of paint or adhere it to the top of a painted candle stick to personalize it more!
* Choose from 1", 2" or 3" sizes. On sale $3.88, $6.88, and $8.88 (reg. $4.99, $8.99, and $11.99)
On Sale from August 29th until September 22nd, 2013.
Friday, August 23, 2013
Carry All by Design Team Member Jenifer Cowels

Hi!! It's Jenifer Cowles again and I am so excited to be back with you today!
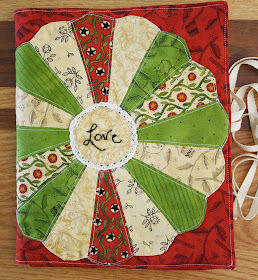
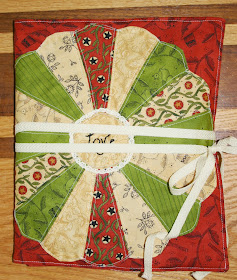
I have fun project for those of you that likes to take your projects on the go. With this project carry all you can put everything you need for you project in one convenient place. Make a few for multiple projects.
Let's get started.
Supplies:
Fabric
Multiple fat quarters
Decorative trim and ribbon-May Arts
Fusible batting -ThermOWeb
Templates or pattern for cover
Cut 3-11x30 pieces of fabric (these can be different fabrics if you choose) and also cut one of the fusible batting.
Decorate one of the 11x30 pieces as desired. I put a Dresden plate on mine, this is a good project to try something new.
Iron the fusible batting to one of the 11x30 fabric pieces, this will be the inside fabric if you are using multiple fabrics.
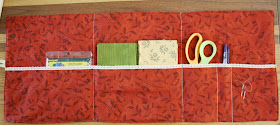
Fold the last 11x30 fabric in half long ways and iron. Giving you a piece 5 1/2x30. Baste to the fabric with the batting to the folded piece. This is the pocket.
Stitch desired pocket sizes on the right hand side, 1 at 6" and 1 at 7 1/2.
Pin ribbon to short side right at the pocket making sure it is not going to catch in the seams.
Sew right sides together leaving a 3" opening for turning.
Turn right side out. Hand stitch the opening.
Stitch 9 1/2" on both the left and right sides.
Fill with necessary supplies and you are ready to work and travel with everything all in one place.
Thursday, August 22, 2013
60 More Quick Baby Knits Book and Giveaway
Create this darling sweater using Cherub Yarn, a super soft sport weight yarn in bright, bold colors!
This pattern was from the book 60 More Quick Baby Knits and can be found at your local Craft Warehouse! Visit us on Instagram, where we are giving two books away to one lucky winner! One for you and one for a friend because it is always better to knit with a friend!
* Cherub Yarn on sale 3 for $10 until August 25th.
Wednesday, August 21, 2013
Home Sweet Home Sign Created by Katie Stilwater
Directions:
1. Stain the pre-made slat board using American Gel Stains in Walnut
2. For "Home", cut out letters using the Silhouette, and using a removable
adhesive, trace the letters one at a time with a chalk pen. (So, put the H
down, trace it and let it try, then put the O down, etc.)
3.Then go over each letter with white paint and a small paint brush. Using both chalk and
paint was a lot faster/easier than having to paint 2-3 coats to get an
opaque finish.
4. For "sweet", print it out on the computer and quickly cut it out as one
piece (not the individual letters) so it will fit on the slat. Next,
rub chalk all over the back of the paper, place it face up on the slat
(so the chalk-y side is against the wood), tape it down and trace each
letter with a pen.
5. When the paper is removed, there is an outline of each letter in chalk and
just fill it in using a chalk pen. Then, cover over it with white paint
and small paint brush.
6. For the heart, first cut out a bunch of squares from burlap (they are
probably about 1.5 or 2 inches square). Then free-hand draw a heart
directly on the pallet using a pencil.
7. Use hot glue to attach the pieces of burlap. Put a dot of hot glue and
kind of smoosh the burlap into a little bunch and stick the "tip" of the
bunched up piece into the hot glue and hold it for a second until it is
secure. Start at one side of the heart and work in sections across
until the whole thing is filled in. A few pieces need trimming at the
end.
Tuesday, August 20, 2013
Porch Rules Display by KC Edmunson
* Unfinished Wood Slat Board $8.99 (Reg. $14.99) Sold undecorated. Vinyl House Rules Sayings $15 (Reg. up to $21.99) on sale until August 25th!
Monday, August 19, 2013
House Rules To Fit Your Life!
 Come check out our New House Rules! We also just got in Marriage Rules,
Laundry Room Rules and more! Vinyl created from Decorating Your Life is
easy to apply to any surface. You can even place directly on to your
wall.
In the photo I painted the slat board with acrylic paint then added the vinyl. If you want to protect it from outside elements add 2 coats of Modge Podge and seal it with a clear acrylic spray.
* Unfinished Wood Slat Board $8.99 (Reg. $14.99) Sold undecorated. Vinyl House Rules Sayings $15 (Reg. up to $21.99) on sale until August 25th!
Friday, August 16, 2013
Monogram Lit up Sign DIY
Letters, Numbers & Symbols are hot in Home Décor right now. Create your own master piece using 10 simple steps!
Supplies:
- Unfinished 12"x12" wood hollow board (Don-95)
- 10 count string lights
- Montana Gold red acrylic spray paint
- Tim Holtz Distressed vintage stain
- Drill bit 13/16"
- Glue Gun
- Tape
- Heavy card stock paper or stencil sheet.
- Wood letter to trace
- Start by creating your letter stencil (we used a wood letter and traced it to our stencil plastic sheet)
- Cut out your stencil. you can use the inner stencil or the outer stencil.
- Decide where you want your lights to go on the board using the stencil as a guide and mark 10 locations.
- Drill 10 holes into your board.
- Then stain your board using Tim Holtz Distressed Ink. Let dry.
- Lay stencil on your board and tape underneath stencil to hold in place.
- Spray paint your letter on to your board. Let dry.
- Take light bulbs out of your sign and place them in the holes of the board.
- Glue the backside of the board with your glue gun to hold the light socket in place. Hold for about a minute to allow the glue to dry. Tip: if you have a mini fan this would speed up the process of the glue drying.
- Once all your light sockets are secure put lights back into socket and plug in!
Thursday, August 15, 2013
Pedistal Photo Calendar Display
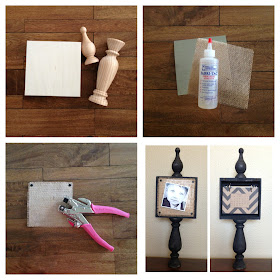
This photo holder could have a dual purpose! One side a photo/memo holder and the other side a calendar! Or create three to give you a great mantel or shelf center piece!
Supplies:
- Wood hollow board 5"x5" (don-92)
- Unfinished wood curtain finial
- Unfinished wood candle stick (don-132)
- Metal sheet & Burlap fabric
- Black acrylic paint
- Sanding block
- Extra strong mini magnet
- Elmer's wood glue
- Beacon 3in1 glue
- Beacon fabric glue
- American Crafts medium black brads
- Tim Holtz 1"binder rings
- Canvas Corp paper
- Paper Accents mini calendar paper
- Start with connecting all your wood surfaces together using Elmer's wood glue. (finial to wood board & wood board to candle stick base) Let dry for 6 hours.
- Paint wood surface using acrylic paint. Let dry
- Sand wood around edges to give it a worn look.
- Drill small holes in the inside of your wood board to hold your binder rings.
- Install binder rings.
- On the front of your board glue your metal sheet using Beacon 3 in 1 glue. Press down while it dries. (this with cover up your binder ring brads)
- Cut burlap to fit the front of the metal, place brads in all 4 corners. Glue fabric to metal using beacon fabric glue. Let dry.
- Create your calendar by cutting small pieces to fit on the binder rings. Then glue calendar on each piece of paper. Punch holes in the top to go through the rings.
- Use a super strong mini magnets to hold your memo or photo on the front of your metal sheet.


