Monday, June 16, 2014
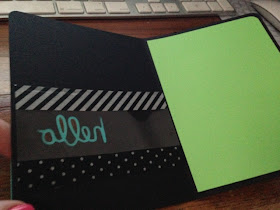
Hello Peek A Boo Card
Miss out on our free card make and take last week? No problem! We have the step by step so you can make your own from home right here! For more of this month's make and takes, check out our Facebook event page!
Supplies:
•Big Shot die cut machine- Ellison (Sizzix)
•Hello script die cut - Technique Tuesday
•Black cards and envelopes (A2 size)
•Hot pink card stock, lime green cardstock, bright yellow card stock, aqua card stock
•Ribbon
•Corner Rounder
•Scor tape, Sticky thumb, or Tombow Xtreme tape (strong tape)
•Mini Xyron adhesive Sticker Maker
•Clear acetate sheets
•Washi tape - Studio DIY black and white mix. or similar,
•Signo (uniball) white gel pen
•Rhinestones, pearls, or sequins to match
Directions:
1.) Die cut the precut aqua card stock (2” x 1”) with the Technique Tuesday Hello script die and big shot. Set aside.
2.) Use corner rounder to round the to ‘open side’ corners on black card. and also 2 right corners of the precut lime green card stock. - then use strong tape to adhere to inside of card. The Lime
green will show through to the front later.
3.) Next use washi tape (any kind) to position the same script hello die cut onto card front- where you want the peek a boo to be. and then die cut. - remember to die cut with the card laying open so you are only cutting a Hello shaped hole in the front of the card- and be sure you are cutting so that you can read the hello- you will be die cutting DOWN. - you don't need the black hello die cut that this cuts.
4.) Next use the black and white mix washi tape on the pre cut clear acetate sheet and attach to INSIDE of front of card. This creates a clear window through the Hello die- now when you close
the card you can see the lime green through the hello shaped hole. Make sure to place this strip of acetate over the Hello shaped hole in the card.
5.) Now layer the 4 1/4” x 1” bright card stocks- aqua, bright yellow, hot pink to each other using strong tape. Offset these just a little so you have narrow stripes of bright color showing under the hot pink. Use strong tape again to secure ribbon around this stacked layer and tie in a knot on front.
6.) Use the Xyron sticker machine to add sticky to back of hello die cut and carefully insert this into the hello shaped die cut hole on front of card- onto the clear acetate. You will still be able to see through the holes in the letters to the lime green inside card- yet the aqua die cut hello is secure in place.
7.) Use strong tape to add the be-ribboned layered bright card stock border to card- just under the die cut so it looks like the strip of aqua card stock is part of the aqua hello die cut.
8.) Embellish with rhinestones, pearls, or sequins. !
We suggest the white Signo Uniball gel pen for addressing the envelope!


No comments:
Post a Comment
Thank you for your feedback! We love hearing from you!