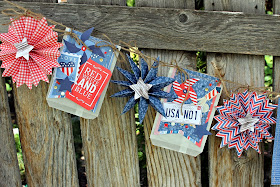
Everyone loves a good celebration and I can’t think of a better day to celebrate than the 4th of July. I love our country, our freedoms, and our troops that protect them both. Independence Day is my second favorite holiday (right behind Christmas.) so I am honored to create for Craft Warehouse on such a special day.
God Bless America Banner
Supplies Used:
Pebbles Americana 48 Piece Paper Pad
Pebbles Americana Dimensional Stickers
Pebbles Americana Phrase and Accent Stickers
Pebbles Americana Printed Cardstock Shapes
Doodlebug Sprinkles Blue Jean, Ladybug, & Lily White
Doodlebug Washi Tape Air Mail
Hazel & Ruby The Makery Shine and Sparkle
American Crafts Thickers Maple White
Paper Accents Glassine Bags
Die Cutter
Sewing Machine
Scoring Board
Flag Banners
1.
Cut 72 2.5” stars using your favorite punch,
Silhouette die
cutter or your Sizzix die cutting machine.
36 should be out of red pattern paper and 36 white pattern
paper. If your paper is
single sided, you may want
to cut enough stars to double side each star.
2.
Sew twelve red stars together into a banner making
sure to make one continuous string and immediately hang your star banner to
avoid tangling.
3.
Continue to sew strings
of stars together making a total of three white strings of 12 stars and
three
red strings of 12 stars and hanging them alternating colors.
4.
Cut a square 7.5” and glue a 4.5” star or
rosette in the center.
Using Thickers
write “God Bless America” over the top and bottom of the star Punch
three holes across the top and tie in
front of the left corner of stars.
Rosettes

1.
Cut 14 3x12” strips of cardstock making sure you
have two of each color. Next, using a scoring board, score the
strips in 1”
increments and fold the strips back and forth alternating directions of the
folds.
2.
Bunch the folded strip together and cut the end
at different angles much like you would a paper snowflake. Make sure that you cut the
matching cardstock
strip in the same pattern to make sure the pennant is the same all the way
around then staple the ends of each pair of strip together creating a
circle
3.
Gather and push down the center of each
pennant. Glue a punched
circle to the
back using a hot glue gun or a strong adhesive like E-6000 to keep the rosette from folding in on
itself.
Let dry then
flip over and glue a star to the front.
4.
Punch a hole in the top and tie to banner.
Pennants

1.
Cut 4 4x6” rectangles and 4 3.5x6” rectangles. Stack
all rectangles together centering the smaller rectangles and cut the bottom
shape of your pennant to make sure all pennants are the same shape. I cut mine with a traditional
triangle
pennant style but don't be afraid to get creative.
2.
Assemble the pennants by sewing or gluing paper
pennants across the top
placing a glassine bag on the bottom, the 4x6” rectangle in the middle
and the
3.5x6” rectangle on top making sure to raise the final layer high enough
to show
the second layer of cardstock at the
bottom of your pennant.
3.
Even off the top of your pennant by cutting off
1/8- 1/4” with your cutting board.
4.
Embellish pennants using stickers,
embellishments, sequins, and sprinkles.
Create dimension using double sided foam tape and layering different
embellishments. Punch
holes in each
corner and tie onto the banner.


Land That I Love Layout

Thank You for Your Service Card & Operation Write Home


No comments:
Post a Comment
Thank you for your feedback! We love hearing from you!