Monday, July 21, 2014
Party Mason Drinking Jars
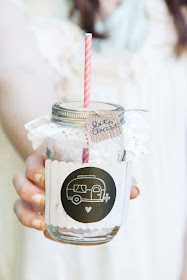
I thought that creating mason glasses for a party would be fun but I had no idea how much of a hit they would be! The adults thought they were darling and the kids felt super special! When the party was over, I kept mine to do it again, but these would make great party favors too!
Here are a few great tips to keep the project fast and simple to make!
Supplies:
Mason Jars with Rim (remove lids)
American Crafts Glitter Paper and Twine
Bo Bunny Press Doilies
We R Memory Keepers Nesting Dies - Homemade (six piece set) and Indian Summer Pattern Paper
Queen & Company or Sierra Pacific Crafts Paper Straws
Chalkboard Sticky Back Paper
Doodlebug Design Wood Grain Pattern Paper
Lawn Fawn Happy Trails Stamp Set and Love You S'more Set
Brilliance Moonlight White Ink
Ranger Archival Black Ink
Tombow Xtreme Permanent Adhesive
Embossing Heat Gun
Directions:
1. Use the Homemade die cut set and cut all your pieces needed at once. Cut the label from the Indian Summer paper, the tag from the wood grain paper, and the chalkboard circle from the sticky back chalkboard paper.
2. Stamp all your items at once. Stamp the camper and heart on the chalkboard circle. Use your embossing heat gun to heat the image before handling. The white will come off if you do not do this first. Stamp "let's toast" on the wood grain tag in black.
3. Place chalkboard sticker on the front of the label. Using the Xtreme adhesive will help keep the label on, but will give you an opportunity after the party to still remove the label to reuse the mason jar. Place adhesive all over the back of the label's edges and place on the front of the jar.
4. Trace the lid on the back of the glitter paper with a pencil and cut out. Glue the circle to the top of the doily. Punch out a hole in the middle of the circle for the straw.
5. Now that we have the pieces ready, assemble the jars. Place the doilies on the top of the jars and add a straw. Add the tag with twine around the rim.
Now fill the jars with your favorite party beverage and enjoy!


No comments:
Post a Comment
Thank you for your feedback! We love hearing from you!