Thursday, March 31, 2011

Giveaway Time


Who wants to win!  We have two items up for grabs and all you have to do is leave a comment revolving around our topic.  Let's discuss a specific Easter candy...marshmallow peeps...delightful?  horrible? or a great craft project?  My two cents...I think they're delicious.

You have until tomorrow (Friday at noon) to leave a comment.  Make sure you're signed in.  Up for grabs?  A seafoam green photo album from Pioneer Photo Albums Inc.  It holds up to 200 4x6 photos.  The second giveaway is a tinsel glitter set from Martha Stewart.  It includes 12 colors of tinsel cut glitter so you can add sparkle and dimension to any project. 


The album, perfect for all your memories.


The glitter, for all your projects!

We're selecting two random winners, good luck! 

Wednesday, March 30, 2011

Time To Shop


Ready to do some shopping?  We've got tons of great items on sale now!  Check out our site to see the entire ad.  Click here.

Oh, and we are thrilled that we're getting more followers.  Blog Candy giveaways tomorrow (Friday).  So stay tuned. 

Monday, March 28, 2011

Create a reversed canvas memory art


The idea of this project is using a canvas on the reverse side.

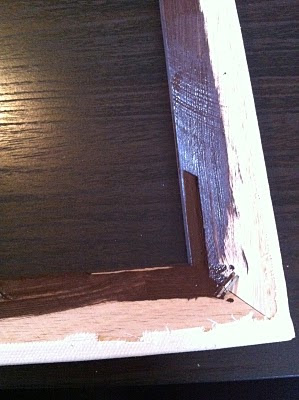
First Start with cutting the front out of your canvas.


Then paint the back of the canvas frame with your choice of acrylic paint.


Choose a 12x12 scrap booking paper for the background. I used a new line of paper from My Minds Eye called "Good Day Sunshine".

Place ruler on your paper and hold down while you rip paper in two. This gives you a ruff edge.


Cut coordinating paper to fit your vinyl words.


Then distress your paper using Heart Attack by We R Memory Keepers.


Distress ink the sides using Tim Holtz Vintage Photo Distressed ink.


Add a strip of paper from your coordinating collection and distress the sides.

Glue to the front of the canvas so that it shows through like a shadow box.


Add photo, vinyl words and embellishments using photo dots to give the picture dimention.


And you have completed your Canvas Shadow Box!


Create a decorative oval plaque memo board

Trio Metal Oval Plaque Memo Board
Supplies:

  • 3 metal oval plaques (yor 2106)

  • 3 12x12 papers from My Minds Eye, "Stella And Rose" Hattie paper collection.

  • My Minds Eye, "Stella and Rose" Hattie decorative brads.

  • My Minds Eye, "Stella and Rose" Hattie trims.

  • Your choice of floral embellishments

  • Vinyl words "Having some place..."

  • 6 small magnets

  • Tim Holtz Key embellishments

  • Pioneer extra strong glue stick

Directions:


  1. Start by tracing paper around metal plaques and cut out.

  2. Glue paper to metal plaques.

  3. Rub on vinyl words on to paper

  4. Punch extra holes needed to connect your plaques together.

  5. Put ribbon through holes and tie together.

  6. Create magnets out of embellishments.


Family Collage Tray


Create a Family Collage with Printer's Tray


Painter's tray has become one of my favorite surfaces to display photos and collectibles. Each box has a small space to work with and you don't have to be a scrapbooker to do this project. Just start with one cubby at a time. This particular painter's tray is already finished in a matte black. You can also tell a story, like this tray for example has the family's pictures with their home address and monogram. When choosing my paper I choose the My Minds Eye, "Stella and Rose" Hattie Collection. I love the prints, colors and embellishments in this collection. I used the 6x6 paper pad because it gives you all the great prints in a smaller scale. To add dimension I used Tim Holtz idea-ology collection.


My Minds Eye, "Stella & Rose" Hattie Collection


Tim Holtz idea-oligy Collection


Sunday, March 27, 2011

Spring Tweet- a card tutorial

Tweet.

is it spring yet? This new bird die set from Sizzex is so fresh and fun for springtime crafts. Here is a sweet little card using this set, and a step by step photo tutorial.


Supplies:
chocolate brown card (A2 size)
aqua blue cardstock cut to 3 1/4" x 5"
green print paper cut to 3" x 4 3/4" (specific paper I used is from Echo Parks springtime collection)
white cardstock cut to 2" x 5"
about 18" of ribbon
about 6" of aqua color floss
button
white cardstock for die cutting
aqua cardstock for die cutting
turquoise cardstock for die cutting


Required tools:
Distress ink tumbled glass color
Sizzlets die set bird #2 set
big shot machine (or cuttlebug)
embossing folder of your choice
corner rounder punch
scissors
glue pen
white and black gel pens


Step 1)
Gather materials, and cut papers to size
run white cardstock through big shot using the 'tweet' die
run turquoise cardstock through big shot using the solid bird die
run aqua cardstock through big shot using the outline bird die
emboss the 2" x 5" white cardstock through big shot with embossing folder


Step 2
cut the embossed 2" x 5" white strip into a 2" x 3" and a 2" x 2" piece
round 1 corner on each of these pieces
photo shows one before the cut and round, and after in same shot


then run the Distress ink tumbled glass blue ink pad directly over the raised embossed areas of these 2 cuts.
photo shows one set before inking, and one after...see how the pattern just POPS out?


and now adhere these inked embossed pieces to card front so that the 2 rounded corners are facing each other


Step 3
round all 4 edges of the green print paper, and the aqua cardstock mats.
then glue the green mat to the aqua mat


Next cut about 4" of your ribbon and using a tape runner adhere to front bottom 1//3 of your layered mat and wrap to back. And then glue to card front.


Step 4
with remaining ribbon tie a bow. trim ends to desired length
then run floss through holes of button to backside


place button over center knot of your bow and turn bow over. tie the loose ends of floss together- tying the button onto the bow.


adhere to card front with a glue dot


Step 5
use glue pen to adhere your die cut Tweet to bottom of card under the ribbon
use glue pen to adhere the bird, the outline of the bird and wing to card front


then use black and white gel pens to enhance your bird. draw birdy legs, and birdy feet, and color in the eye. I used a white gel pen to add some spots to the bird too.


Saturday, March 26, 2011

Collage tag 'sewing room' a tutorial

Sewing collage tag.


Playing with the new Tim Holtz alterations 'sewing room' die for use in Big shot or Cuttlebug die cut machines.


Supplies:
Canvas - about a 3" x 4" piece. (I used a sheet of prepared canvas sold in tablets for artists. This canvas is pre treated with gesso on one side - making it ready for painting on, I am using the other side- or raw side of the canvas. you can run un-treated canvas through your big shot machine as well.

Chipboard for die cutting
black cardstock - 6" x 3"
black tissue paper- a stack of 12 sheets or so all cut to about 3" x 2 1/2"
ledger or or choice of printed paper - cut to 6" x 3"
Lace- you'll need about a 1 1/2" x 1 1/2" piece
red ribbon- about 6"
Scrap of fabric- about 1" x 18"
cream ribbon- about 12"
decorative brad

Required tools:
paper trimmer
scissors
corner rounder punch
hole punch
Big shot die cutting machine
Tim Holtz Sewing room die (you'll use the mannequin and spool from this die)
Vintage sewing machine stamp (this is from a set of clear stamps by My Minds Eye- stella and rose collection
Tim Holtz distress ink in a brown color of your choice
foam blending tool (or make up wedge sponge)
Tim Holtz tiny attacher tool (mini stapler that can go through chipboard easily!)
Martha Stewart fringing scissors


Step 1
Gather materials
Cut papers to size
die cut the sewing room dies from chipboard
die cut the sewing room mannequin from the canvas
rip fabric to size
use corner rounder punch on the 2 top edges of the black cardstock 3"x6" piece, and then punch a hole between these rounded corners - creating your tag.


Step 2
tear about 1 - 2 inches off of one of the short sides of the 3x6 inch pattern paper.
use foam applicator to add distress ink to all sides of this paper
also use to add a little color to the canvas mannequin, and to the top and bottom portions of the chipboard mannequin and chipboard spool.


Step 3- dressing the mannequin
trim the top and bottom of the canvas mannequin if needed and then adhere to chipboard mannequin


next, trim lace to size and pull at loose ends to distress. then use the tiny attacher tool to adhere to the waist line of the mannequin
Wrap the waistline with the 6" red ribbon and tie in knot in front. trim loose ends to size and pull at ends to fray a bit.


Step 4- preparing tag
gather sheets of tissue paper.
line up at bottom edge of black cardstock tag and attach the tissue paper to tag using tiny attacher tool.
If your tissue paper is a little to long for tag shape you can trim to size with scissors.
then- looking at the backside of your tag- use fringe scissors to cut tissue paper in to fringe.
fluff with your fingers if you like
turn tag to front and adhere your torn, and inked pattern paper to tag front- covering up the staples used to attach your tissue paper fringe.
(if you have old tissue paper sewing pattern material left you might use that instead of the black tissue paper I used!)

ink the vintage sewing machine stamp and stamp off center onto prepared tag


Step 5- the spool
you'll need to wrap your chipboard spool with the torn fabric. hold back about 4" if the material as a tail and wrap the rest around the spool several times until you have about 4" left. you want to then tie your tail and your left over section together into a knot on the front side of your spool.
add a couple of small pop dots or foam tape to the backside of spool.


Step 6- putting it together
adhere your prepared mannequin to tag front- off center
adhere your prepared spool to tag front under stamped image
add a couple of decorative pens to waistline of mannequin
run cream ribbon through tag hole and tie off.
add a decorative brad to hole in tag


Creating on tags, or artist trading cards, or circle journals are all great ways to experiment with new techniques, styles, and products.

This sewing collage tag might be a fun embellishment on a scrapbook page about sewing, or fashion, or vintage/heritage themes. It might also be pretty as an embellishment on a frame or wood plaque or even inside a shadow box frame.


LinkWithin

Related Posts Plugin for WordPress, Blogger...
Blogging tips