Monday, March 31, 2014
DIY at Craft Warehouse all April Long!
Handmade projects don't have to be complicated to be impressive! Join us through out the month of April for ideas that are easy DIY, that will satisfy your desire to create, and will wow your family and friends!
Visit your local Craft Warehouse every Saturday in April from 12-3pm to DIY for only $2 per project!
April 5th: Chose your own letter and washi tape to create a Monogram that will dress up any space!
April 12: Make your own cork board with paint and washi tape—“Subway Style”.
April 19th: Make a gift box with cardstock using a gift box punch board and decorate with washi tape.
April 26th: Take a simple jar and decorate with washi and twine for an extraordinary gift container!
Friday, March 28, 2014
We R Memory Keepers Instagram Album by Design Team Member April Joy Hill
Hi everyone! It's April Hill, here again for Craft Warehouse. I got really lucky and was able to play with some newly released goodies from CHA Winter that are already at Craft Warehouse! The new items from We R Memory Keepers are awesome! The 4x4 Instagram Album is SO adorable and the Inky Rose collection was actually my favorite from their new collections, so yay!
In case any of you want to pick up the album, but aren't sure how to get photos sized to fit the pockets, here's a little tutorial on how I created a 6x4 print using an iPhone app called PicFrame and printing my photos wirelessly to my Canon Selphy printer.
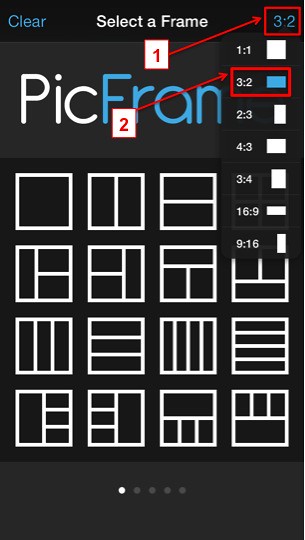
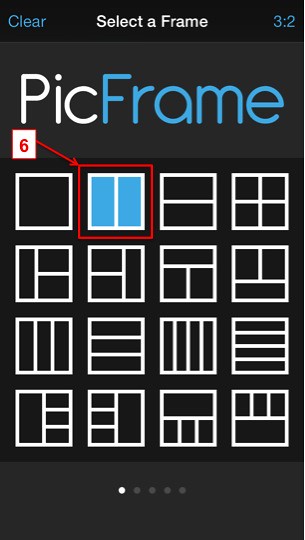
On the PicFrame start screen, the top right button defaults to 1:1, but if you click that button, you can select 3:2 (which is equivalent to 6x4).
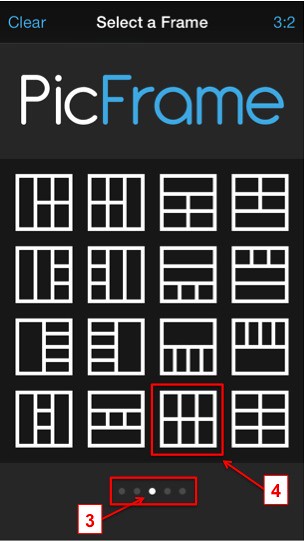
For 2x2 sized photos, swipe your screen from right to left to get to the third page of templates and select the template that has space for 6 photos.
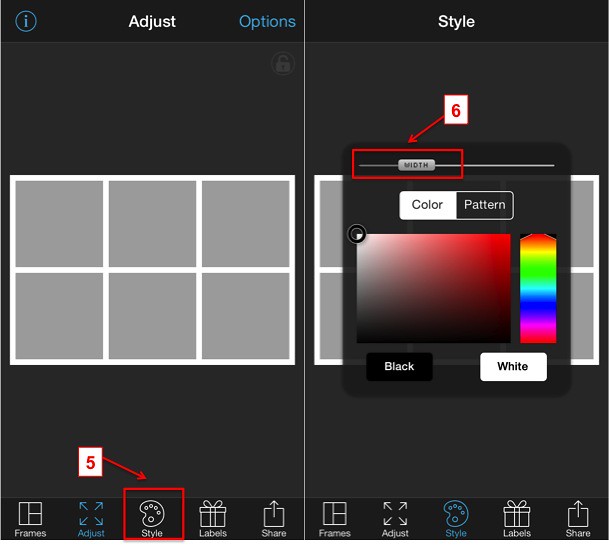
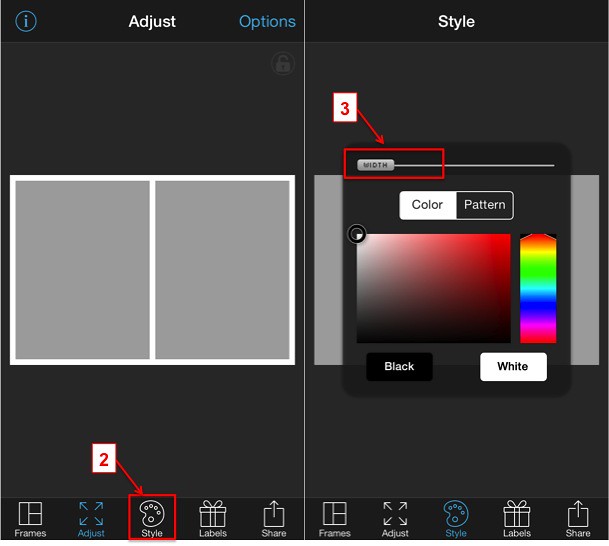
This template defaults with white borders (which I leave for my photos), but if you wanted to remove the borders, you can click the "Style" button on the bottom and slide the "Width" lever all the way to the left (and if you wanted to add a thicker white border, you can slide it to the right).
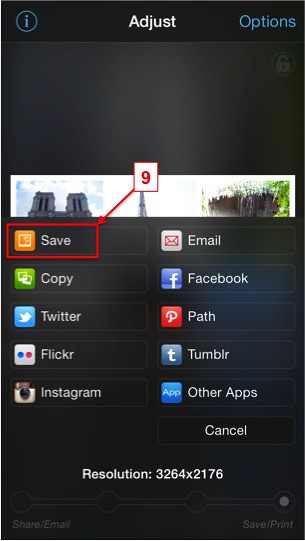
Double click into the gray areas of the template to add your photos. Once you have all 6 photos selected, click the "Share" button to save the photo to your camera roll so you can print it later.
For 4x4 sized photos, you will do something similar, but from the main screen, you will select the two-photo template from the first page of templates.
For 4x4 photos, I don't add a white border, so I move the "Width" lever all the way to the left.
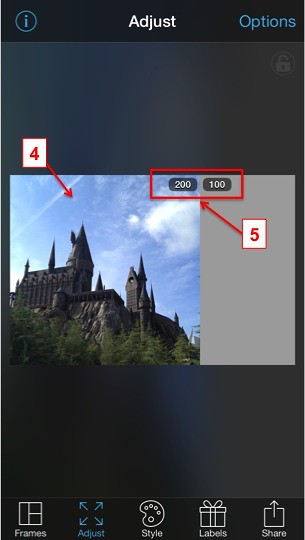
Here is where it will get a little tricky with this sized photo. After putting your photo in, you want to move the horizontal line so that it sizes the photo to 200-100. This is roughly equivalent to 4x4. [With a Canon Selphy printer, the photos are slightly smaller than 6x4, so it's not going to be perfect, but I promise.. it's close enough! ;)]
From there, you would save it like you did the 2x2 template. And hopefully you found that tutorial helpful, so you can head on over to Craft Warehouse to purchase a We R Memory Keepers album for yourself!
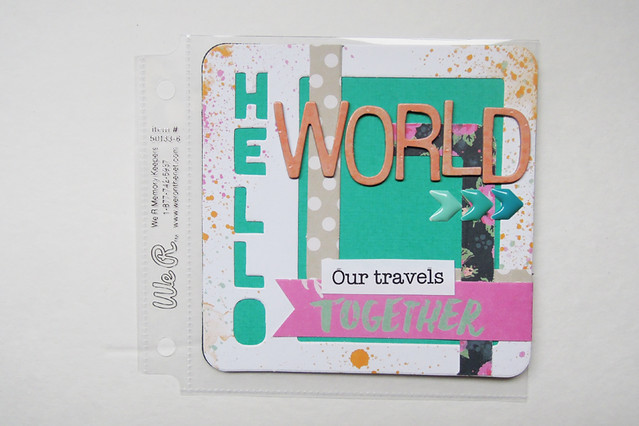
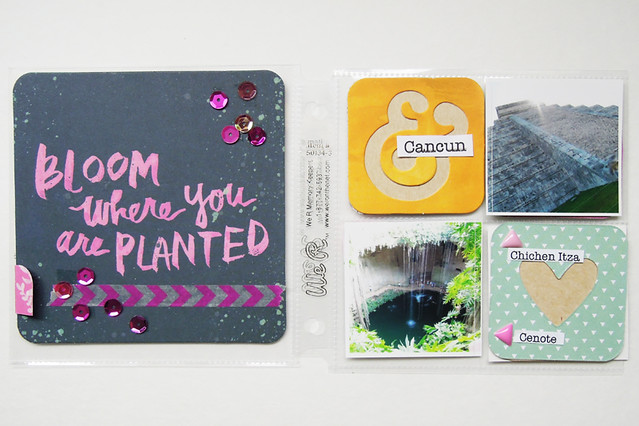
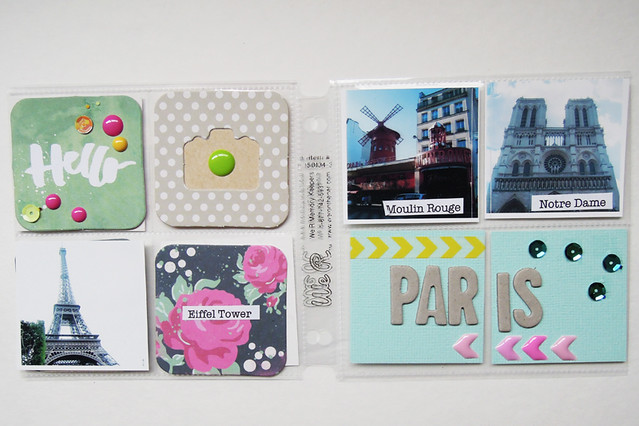
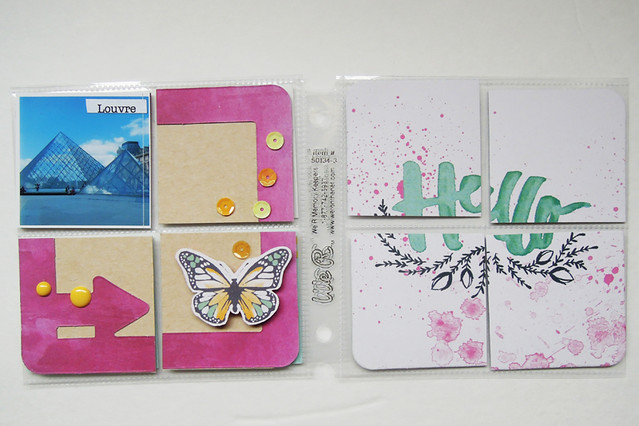
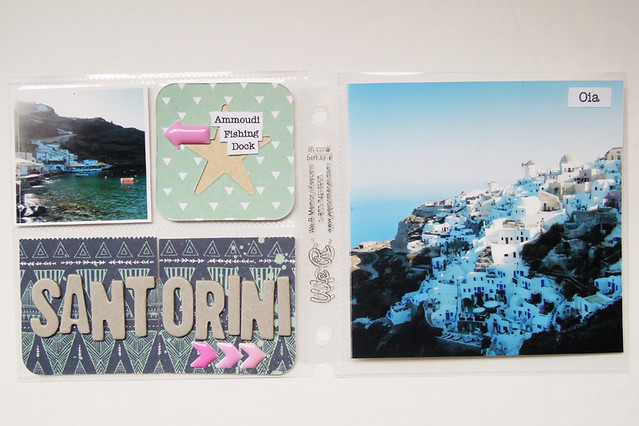
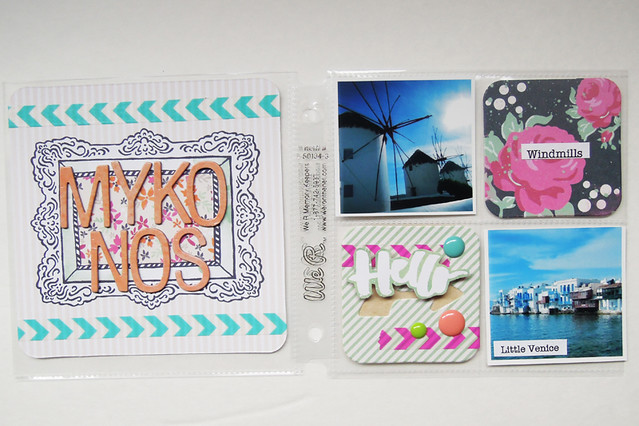
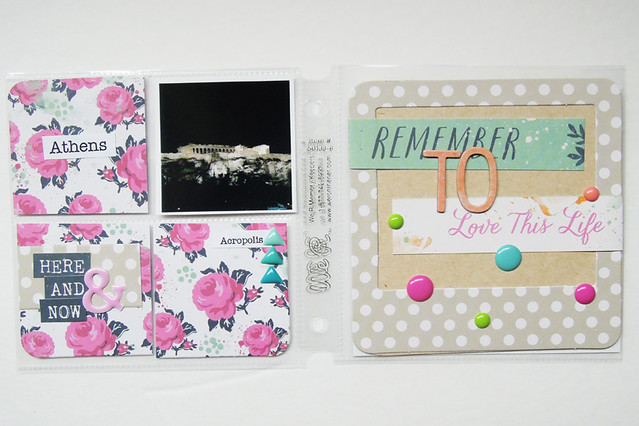
And now, here is the start of an album I put together to document the places my husband and I have been lucky enough to travel together to! It's titled "Hello World - Our Travels Together."
For the cover page, I loved the die-cut journaling cards that came in the Inky Rose collection, so I used the die-cut "Hello" as a starting point.
Thanks for stopping by! I hope you enjoyed my little album as much as I loved putting it together! :)
Tuesday, March 25, 2014
Arm Knitting a Cowel and Full Length Scarves
Directions:
Using 1 strands of Ecru Magnum, 1 strand Lumio Capri Blue, and 1 strand Eros II Jewel, 1 stand Berroco Kodak Snowy White. Cast on 6 stitches. AK (Arm Knit) strands of yarns together. Knit until desired length. Knot ends together to create a cowl.
Created by Patricia McBride from our Gresham Craft Warehouse store
Directions:
Using 1 strand of Lumio Lime, 1 strand of Lumio Capri Blue, and 1 strand of Eros II Blue/Green cast on 6 stitches. AK (Arm Knit) 1 strands of all yarns together. Knit until desired length. Cast off and to add fringe see below video.
How to Arm Knit:
How to Arm Knit Fringe:
Monday, March 24, 2014
Arm Knitting Aqua and Grey Chunky Scarf
Created by Patricia McBride from our Gresham Craft Warehouse store
Directions:
Using Cascade Summer Sky Magnum and Cascade Gray Pacific Chunky. Cast on 6 stitches. AK (Arm Knit) 2 strands of both yarns together. Knit until desired length. Cast off. To create a fringe watch the video below.
How to Arm Knit:
How to Create a Fringe on your Arm Knitted Scarf:
Friday, March 21, 2014
Framed Moss Bunny
Hi Craft Warehouse fans, I'm Steph and I blog at Crafting in the Rain. I'm so excited to be here posting this tutorial and I hope you'll enjoy my Framed Moss Bunny.
Here in the Pacific Northwest, we haven't had the crazy snow storms that much of the country has, but we've had some! And March is always the time we start itching for spring, even if we know we still have rain coming for 3 more months. It has to at least get warmer, right! Maybe we can force it a little with a bit of spring cuteness. To create this project I received a box with a cradled painting board and a Teresa Collins stencil in it. Then I headed to Craft Warehouse for the rest of my supplies:
Moss Fat quarter of floral fabric Blank wood tag White yarn Not pictured: acrylic paint (you could change up your own colors of course; I used white and yellow), chalkboard paint, brushes, glue gun These wood boards are really cool because you can use either the framed side or the completely flat side. I chose the framed side. Start by painting the board. White for the inside and yellow for the frame. You may need two coats to cover well.
When that's dry it's time to stencil. Tape down the stencil to the frame part and use a stiff stencil brush to apply small amounts of white paint. Dab a bit of paint on the brush, then tap onto a clean surface or paper towel to remove the excess. Apply paint with up and down motions, "pouncing" the paint onto the wood. These steps will make it seem like the stenciling will take forever, but it will keep paint from seeping under the edges, giving you a clean design.
When the first placement dries, match up the design, and finish stenciling the rest of the frame. Paint the wood tag with chalkboard paint. Use two coats, allowing dry time and changing the stroke direction on the second coat (ie, up and down first coat, then left to right second coat)
When that is completely dry, you must season the chalkboard by rubbing the side of a piece of chalk all over the surface, then wipe clean. Now it's ready to use.
Cut two strips of fabric. One at 15 x 3 inches and one at 6 x 1 inch. Iron flat. Flip strips so the right side it down and fold the edges to meet in the middle, overlapping slightly even, and iron down. This gives a nice clean edge without having to do any sewing!
Print out the following bunny silhouette shape.
Cut out the shape and trace onto the board, centered, but closer to the top than the bottom. Use scissors to cut out small shapes from the moss to fill in the design and attach with hot glue. Just be warned, the moss is messy! I recommend placing it on a cookie sheet for easy clean up.
With the moss bunny finished, it's time to add the tail. Wrap the white yarn around a fork about 12 times. Place a smaller piece of yarn through the center tines and tie around the wrapped yarn in a tight knot. Slide off the fork and cut the loops with sharp scissors.
Fluff it out and you now have a little yarn pom-pom for you bunny tail! Attach with hot glue.
Wrap the larger fabric strip around the bottom part of the board and secure on the back with hot glue.
Tuck the smaller strip under the large one, then push the ends up through the hole in the wood tag. Tie in a knot. Glue tag to the frame so it stays put.
Add a word or message to the tag with chalk and you're all done!
Now you have the perfect addition to your Spring or Easter decor.
If you enjoyed this, I hope you'll come visit my blog at Crafting in the Rain. You can also find me on Instagram, Pinterest and Facebook. Thanks for reading!
Thursday, March 20, 2014
Craft Warehouse Design Team Member Stephanie Paxman
Two things that makes Design Team Member Stephanie Paxman shine are the following: #1 she lives in the Northwest! She is local and loves Craft Warehouse! Stephanie has a heart for her community and it shows within her life. #2 is she is a die hard DIYer. She loves to do it all! She makes her house a home while also not being afraid to try out something new "just for fun!"
How long have you been crafting?
I've been making things for as long as I can remember, and have really just enjoyed opportunities to be creative. I used to sneak cross stitch projects into my middle school classes and my room had artwork I made myself. Now I try to make our home beautiful and encourage my kids to try new things, but not necessarily by sneaking it to school.
What inspires you to be creative?
I'm usually inspired first by a need, as in "I need to make a gift" or "I need something cute in that corner of the room" From there I love to incorporate great color combinations and sometimes work in a way to involve my children too.
What Craft Warehouse products do you love to use?
There are always great patterns of both paper and fabric to choose from. Plus all the unique extras like hooks, knobs and containers of all kinds!
How can you encourage others reading this column?
I used to be discouraged if a project didn't turn out just like the one I was using as inspiration. Then I realized that the differences were just my own creativity showing through! It helped me become a lot more confident in my own work, take more risks and be more original.
Make sure to come back tomorrow, where you will be inspired to make your own Easter home decor piece that will knock your socks off! In the meantime, make sure to visit Stephanie's stunning blog, Facebook, Pinterest, Twitter and Instagram pages.
Wednesday, March 19, 2014
Gold Stag Magnets and Paperweight
These Gold Stag vinyl pieces comes in 2 sizes. One to fit our paper weight and the other to create a magnet. Follow these simple steps to create your own!
Supplies for Paper Weight:
- Choose a paper you would like for your background. I choose Doodlebug new paper line.
- Ranger glossy accents
- Paper weight
- Vinyl stag (comes in a pack of 3)
- Scissors
- Place your stag vinyl on to your paper by following directions on the package.
- Squeeze a drop the size of a penny on to the middle of your stag.
- Place paper weight on top and smooth the glossy accents around, press out bubbles.
- Flip the paperweight over so the glossy accents will dry faster.
- After about 10 min. cut around your glass paper weight.
- You can add felt to the bottom (optional)
This magnet frame we sell at Craft Warehouse in cream, black and gray. Its about 2x1.5"
Directions:
- I placed the small stag vinyl onto a piece of scrapbook paper.
- Then glued it into the frame using glossy accents.
- Once it was dry cut around the frame.
- Then I put a thin coat of glossy accents on the inside of the frame to give it a glossy finish.
- Let dry for about an hour.
Supplies:
- Rectangle glass piece
- Scrapbook paper
- Vinyl arrows we sell them in mini packs of 3
- Ranger Glossy Accents
- Mini Magnets
- Scissors
- E6000 glue
- I placed 1 vinyl arrow on the paper.
- Place a small amount of glossy accents in top of the arrow.
- Place rectangle glass over the top and press down to get out the bubbles.
- Cut around the glass piece.
- Add 2 more arrows on top of the magnet. This gives it a 3d affect.
- Glue magnets on the back using E6000 glue
Supplies:
- Oval Glass Piece
- Mini Stag Vinyl (pack of 4)
- Scrapbook paper
- Ranger Glossy Accents
- Scissors
- Mini Extra Strong Magnets
- E6000
- I placed 1 vinyl stag on the paper.
- Place a small amount of glossy accents in top of the stag.
- Place Oval glass over the top and press down to get out the bubbles.
- Cut around the glass piece.
- Add 1 stag on top of the magnet. This gives it a 3d affect.
- Glue magnets on the back using E6000 glue
Labels:
gift,
paper,
ranger,
scrapbooking,
vinyl
Subscribe to:
Comments (Atom)


