Tuesday, November 15, 2016

We've Moved

We have a new blog on our website under the Create tab. We hope you will follow us there.


We also have a series of blog posts on Trends under Trending Now tab.


You can also follow us on Facebook, Instagram and Pinterest.


We have a lot more projects on the new site. As well as a schedule of events for our classes and activities for all 8 locations in Oregon, Washington and Idaho. Hope to see you soon!

Friday, October 16, 2015

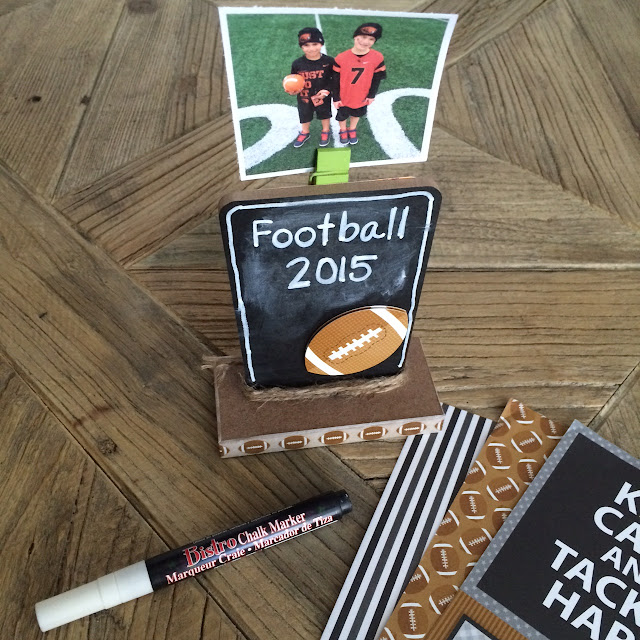
Sports Photo Holder


Do you get photos for every sport your child is in?
 
Now they can make this mini chalk board photo holder and change the photos out!
Sports Photo Holder @craftsavy
 

Coat the front of your plaque with Chalkboard Marker.


Choose a washi tape.
 
 
Wrap washi tape around the bottom.
 
 
Cut paper to fit the back of your stand.
 
 
Glue paper on the back using embellishment glue stick.
 
 
Glue a clip on using E6000 glue.
 
Sports Photo Holder @craftsavy
 
Wrap the bottom with jute string and ad photo! 


Saturday, October 10, 2015

OSU Beaver Light Up Block

 
OSU glass block can go where ever you go,
with a battery operated light set your tailgater will shine!
 
Create your own in minutes!
 
OSU Beaver light up block @craftsavy
 
1. Start with washing the block with soapy water and make sure it completely clean and dry.
Set up an area to spray outdoors.
 
  
2. Spray Design Master Tint it in Mango about 5 coats.
 Letting each coat dry in between spraying
 

 3. Once you have it the color you would like add Holographic Plastic Sheet to the front of your block. (This gives it that star light look)
4. Then add your team sticker or Letters over the top of the Holographic Plastic Sheet.
 
 
5. Then add your battery operated 30ct. Firefly lights  
6. Decorate it with ribbon or Tulle!
 
OSU Beaver light up block @craftsavy

Friday, October 9, 2015

Wire Wall Pumpkins

 
These Wire Wall Pumpkins are so easy to decorate!
 
Fall Wire Pumpkin @craftsavy

...add a fall floral stem to it!


...add Deco Mesh to it!
 
Supplies:
  • Pumpkin Wire Frame
  • Orange deco mesh
  • 1 small burlap bag
  • orange pipe cleaners
  • Dark green or brown pipe cleaners
  • Faux leaves
Directions for Deco Mesh Pumpkin:
  1. Take Orange deco mesh cut in 6" - 8" strips, then cut in half and roll each piece.
  2. Use orange pipe cleaners as twist ties (cut each pipe cleaner in 3 sections)
  3. Add to wire frame.
  4. Use small Burlap Bag as the stem, just tie it on with it's cinch ties.
  5. Make Brown or Dark green pipe cleaners to make a curly cue and tie on to top.
  6. Add leaves....


 ...or add Tulle to it!
Supplies:
  • Pumpkin Wire Frame
  • Orange regular tulle and orange sparkle tulle
  • 1 small burlap bag
  • Dark green or brown pipe cleaners
  • Faux leaves
  • Lights (Optional)
Directions for Tulle Pumpkin:
  1. Wrap regular tulle up and down side to side.
  2. Then add the sparkle tulle the same way.
  3. Use small Burlap Bag as the stem, just tie it on with it's cinch ties.
  4. Make Brown or Dark green pipe cleaners to make a curly cue and tie on to top.
  5. Add leaves....
Designed By Debbie at our Vancouver Location.
 

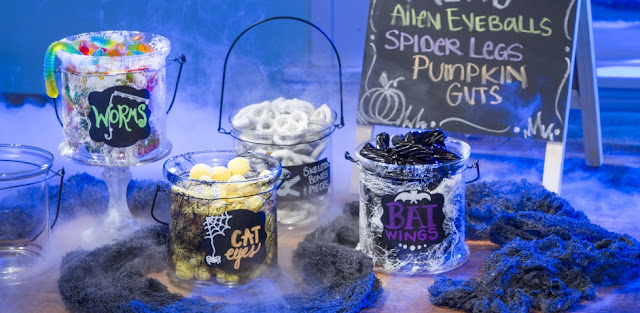
Chalkboard stickers makes labeling a breeze for Halloween!

 
 We have used chalkboard stickers to label our creepy table display!
 
Chalkboard Stickers @craftsavy #craftwarehouse, #chalkboard, #Lables #Halloween
 
 They come in all shapes and sizes!
 
 
Chalkboard Stickers @craftsavy #craftwarehouse, #chalkboard, #Lables #Halloween
 

Chalkboard Stickers @craftsavy #craftwarehouse, #chalkboard, #Lables #Halloween
 

Wednesday, October 7, 2015

Marble Chunky Yarn Afghan


Marble Chunky comes in dozens of colors, all with a self strip effect that makes each project unique. The chunky size of the yarn makes any project go quickly.....
 
 This is a Confident Beginner Crochet Project
 
What we used:
To create this "Waterfall" afghan we used
 "48 Hour Afghan" project book by Leisure Arts.
 
It took 5 Skeins of Marble Chunky by James Brett,
 shown in color 32 "Aquamarine"


Why we like it:
Each Skein is 341 yards of amazing color,
and it is machine washable and dryable.


Autumn Home Decor Block Set


Spell out your favorite holiday!
 
 flip the blocks over and spell our an everyday saying
 like "Family" or "Home"
 
Autumn Home Decor Block Set @craftsavy, #craftwarehouse, #diy, #Autumn,#Crafts


Supplies:
  • 6 different sheets of fall paper of your choice.
  • Sticker embellishments of your choice.
  • All Night Media Large Pop Dots
  • Zing Clear Embossing Powder
  • Clear Versa Mark Adhesive Pad
  • Your choice of acrylic paint
  • Darice Chipboard Letters
  • Embellishment glue stick
Tools:
  • Paper cutter
  • Embossing Heat tool


Start With cutting each paper to fit the front of the block.
Then glue using the Embellishment glue stick. 
 
 
Then paint each letter with acrylic paint and let dry.
 

Stamp Clear VersaMark pad into the front of your letter,
 then sprinkle with Zing Clear Embossing Powder. Shake off the extra powder.


Use embossing heat tool to crystalize the powder.

 
Its hard to see but know you have a shiny seal over the top!
 
 
Add large pop-dots to the back and then stick to the front of your block!


LinkWithin

Related Posts Plugin for WordPress, Blogger...
Blogging tips