Thursday, May 29, 2014

Distressed Clothes Pin Frame


This chic frame is perfect just the way it is! You don't have to assemble or DIY at all! Bring it home as-is and hang! It even comes with the clothes pins!

Here are FIVE creative ways to use this frame!

1. Hang in your home and add your family photos with some title cards from our selection of 3x4 and 4x6 cards. (As shown above using WeRMemory Keepers Albums Made Easy Card Kits.)

2. Use it to display your senior's graduation photos and invitation.

3. Hang your meal plan from the clothes pins along with any shopping lists you need.

4. Use it for a baby shower! Have guests fill out advice cards and hang with they are done.

5. Decorate a wedding with it! Add photos of the couple along with a banner or matching decor. 


Wednesday, May 28, 2014

Fiskars ProCision Rotary Bypass Trimmer


Fiskars12" ProCision Rotary Bypass Trimmer is our newest trimmer in Craft Warehouse stores and our number one tool at our scrapbook counters!


The dual-rail system stabilizes the blade for straight perfectly precise cuts. Never will you need to replace blades again! It cuts through thick materials - even chipboard - like butter!

Some of the features include:
  • Ideal for making straight, precise cuts through multiple sheets of cardstock and chipboard, plus more traditional crafting materials like paper and vellum
  • Dual-rail system eliminates blade wiggle for straight, precise cuts
  • Spring-action rotary bypass blade stays sharp so it never needs to be replaced
  • Built-in smudge guard keeps your crafting materials fingerprint-free while you cut
  • Grid line measurements on the top and bottom provide versatile use
  • Long-lasting work surface provides accurate measurements every time
  • Rubberized feet offer excellent stability
  • Folding design provides space-saving storage and transport
  • Lifetime manufacture warranty

Friday, May 23, 2014

DIY Washi Tape Coasters


I love how simple these are to make, just choose your favorite washi tape and decorate the top. I chose Hazel and Ruby Handmade because their washi tape adheres so well and wont peel off.


* Hazel and Ruby Washi Tape can be found at your local Craft Warehouse stores!

Thursday, May 22, 2014

Make a Wish Wooden Canvas


Our new wood canvas boards open a whole new world of possibilities! Since it is made of wood, the surface is more stable than a regular canvas which makes this project easier than ever!


Supplies

  • 16”x20” Wood Artist Panel Canvas
  • Vinyl Words Vinyl “Make a Wish”
  • Drill & Small Drill Bit
  • Darice Deco Teeny Lights Battery Operated
  • Hot Glue Gun
  • Black Paint
  • We R Memory Keepers Crop n Dile

Directions

  1. Punch holes with the small setting on your Crop n Dile where you will want the lights to be on your vinyl.
  2. Decide and measure where you are going to make your 20 holes and drill  a small hole through the wood board.
  3. Spray paint your canvas black. 
  4. Apply your vinyl according to package directions. 
  5. Poke teeny lights through the nail holes.
  6. Use a hot glue gun to hold the wires down in the back of the canvas. 
  7. Hang and enjoy!

Wednesday, May 21, 2014

Maggie Holmes Style Board by Crate Paper Frame


Have fun using Maggie Holmes Style Board Collection, on an unfinished frame to customize it! All you need to do is glue your paper, add stickers, and a glitter clothes pin to the side to finish it off! Just like that you have a beautiful frame to add your favorite photo to!

Tuesday, May 20, 2014

Wood Hearts DIY on Burlap Canvas


American Crafts' new 12x12 Wood Heart Veneer by Dear Lizzy, just made it a whole lot easier to create custom knock out DIY projects just like this burlap canvas! 


Supplies:

Burlap
Canvas
12x12 Wood Heart Veneer 
E-6000 Adhesive
Ribbon
Staple Gun
Red Glitter
Mod Podge

Directions:

1. Cut your burlap 2 inches larger than your canvas. Wrap the burlap to the back of the canvas and staple it to the back starting in the middle of each side, then working on the ends. Set aside.

2. Use Mod Podge glue and a foam brush to paint one heart.

3.  Shake red glitter on the veneer and then pour excess back into the container.

4. Use E-6000 to adhere the veneer to the canvas. Let dry completely.

Monday, May 19, 2014

DIY Chalkboard Embroidary Hoops


I just love this project! It's easy and oh so trendy! Create these hoops for either wedding, party, or home decor! Visit our stores to see even more chalkboard inspiration!


Directions:

1. Trace around the outside of the embroidery hoop on to our chalkboard fabric or paper roll with a pencil.

2. If you are going to re-use your chalkboard, treat it with regular chalk by rubbing it across the entire surface in one direction. Then, again in the opposite direction. This will allow you to erase your image with a chalkboard eraser. 

3. Cut along the traced line and glue along the backside of the hoop.

4. If you would like a clean "bistro" look, use our Bistro Chalkboard Markers (as shown above).

5. Add some ribbon to the top and hang!

Friday, May 16, 2014

A Wedding Album by Craft Warehouse Project Life Design Team Member Jessica Mihm


Hello all, I’m Jessica, I’m so excited for the chance to share with you today! Becky Higgins Project Life is a simple approach to scrapbooking that is all about documenting all the little (and big!) moments of our lives. I have been so grateful for this method of scrapbooking because it is so simple! It can be as easy as an album, a core kit, photos, pocket-pages, and a pen. But I also love to get creative when my schedule allows. Usually, I have VERY little time to work on my pages. I am a busy teacher, a wife and a new home-owner—my to-do lists feel never ending. I know that so many of us feel like that and that’s why I’m so passionate about spreading the word of Project Life! It really does allow you to complete pages, even complete albums in a short amount of time.
As I was brainstorming for what I wanted to share on the blog, I kept asking myself why Project Life matters to me. The thought that kept popping up was how simple it can be to document the everyday AND the big events. You can even complete albums for years past, which I’ve done, in short amounts of time! Then it hit me: my wedding album! If you’re married, and you’ve put your wedding photos into any kind of scrapbook you know it can be overwhelming! For me, I really wanted it to be special. I wanted it to tell our story and show off our beautiful photos. I wanted to look back on it fondly. I also wanted it to be cute, but classy and timeless. Project Life was definitely the way to go! So now, at one of the busiest times of my life—the end of the school year and literally the week we bought our first home, I am scrapbooking my wedding and sharing it with you. Am I crazy?! No. I’m not crazy, because Project Life makes it possible.
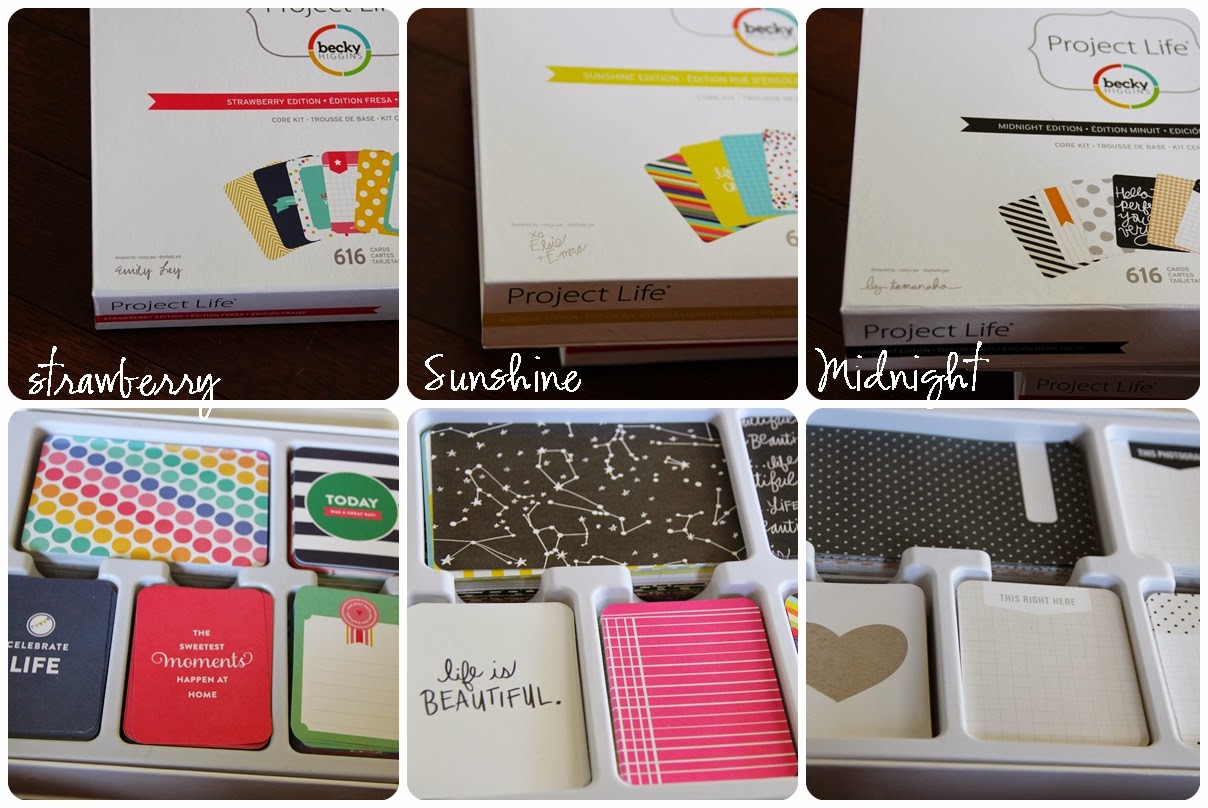
I started by deciding which core kit I wanted to use. None of them spoke to me singularly, but when I started mixing cards from multiple kits I saw my vision unfold. I really wanted to use our wedding colors and to achieve that I mixed cards from multiple core kits, all of which can be found at Craft Warehouse.
I used the new Strawberry Edition, it is a beautiful kit that is so perfect for documenting the little moments that matter most in life. I also used the Sunshine Edition, it is a fun, eclectic kit with a lot of bright colors. Lastly, I used the Midnight Edition, which is such a great core kit for keeping it simple. I also love to mix it in with other kits because the neutral colors and cute designs are so perfect for any layout. I pulled out some cards from my Blush Edition too, the pinks and grays, and sweet designs are perfect for a wedding, but I didn’t use any from Blush in the pages I am showing you today.

I pulled out my favorite cards from all of the kits to see what I liked and what I thought would work for the photos I was using.


My wedding colors were white and black, with pink, green and orange accents. By using these kits together I was able to create a custom wedding set of Project Life cards. I didn’t want it to feel generic; I wanted it to feel like it belonged with my wedding photos.
To get started I trimmed the corners of my photos with the ek tools mini corner rounders from Craft Warehouse. I used the 1 in. rounder for my 4x6 photos and the 0.5 in. rounder for the 3x4 photos. I like my photo corners to match the Project Life corners. I think it gives my pages a finished look.
Then I decided which cards I would use in the 3x4 pockets that weren’t holding photos. I knew I wanted to do some journaling, but that I also wanted some quote or design cards. I pulled cards from the pile I had created and once I liked how they looked I got started with my journaling. I always try to achieve a balance of negative and positive space.
To journal I use a Becky Higgins pen, which can be found in a three pack at Craft Warehouse. I like the pens because they come in three different sizes.
Here’s a look at my double page spread—these photos are from our First Look—when we saw each other for the first time on our wedding day. It was a really special moment. Our photographer, Rebecca Dryer, did a really nice job capturing the moment! Project Life really allows your photos to take center stage. The binder I'm using is a Becky Higgins album in white, you can find it and many other colors at Craft Warehouse.
On the left side, I used a card from the Strawberry edition to do my journaling. The wood grain looking card and the black and white quote card are from Midnight and the green geometric patterned card is from Sunshine.
  I also used some really great products from Craft Warehouse to embellish my pages a bit. On this page I used a pink Studio Calico Flag Clip and Studio Calico Alpha Stickers to add some details to the top right photo. The top left photo has an “awesome” sticker from Simple Stories. The sticker on the green card is also from Simple Stories. I wanted to keep my pages simple, but I also wanted to add some interesting details.
These embellishments together let me great creative, add some details but also kept it simple enough that I had the time to do it after work, before dinner.
 On the right side I used cards from Strawberry and Sunshine. The pink and white journaling card came from Strawberry and the quote card came from Sunshine. I printed two of my vertical photos 3x4 so that I could slide them into pockets as well—this makes the process go so smoothly!

Again, I added some simple accents to my pages with products that can be found at Craft Warehouse. I used some translucent washi tape with beautiful white lace designs right on one of my photos. This is one of my favorite ways to add detail. It’s so fast and it turns out beautifully. I also used another Flag Clip to tie my pages together and trimmed another Simple Stories sticker to add to the top right photo. I like to add journaling this way because I feel like I get to say a lot in a small space.


This is my process for completing my wedding album and telling the stories from one of the happiest days of my life.

There you have it—that’s how I’m using multiple core kits (including the gorgeous new Strawberry edition,) embellishments from Craft Warehouse and Project Life to document my wedding. You could use this process to document every event in your life because it’s THAT SIMPLE. Happy creating! If you haven’t checked out the Project Life section at Craft Warehouse I strongly urge you to do so. I LOVE it and know that you will too :)

- Jessica 

Thursday, May 15, 2014

Craft Warehouse Project Life Design Team Member Jessica Mihm


There is nothing better than finding a person online that not only loves to scrapbook, but lives near you too! Jessica Mihm is a Northwestern who loves to shop at her local Craft Warehouse! What we love about Jessica is that she doesn't hesitate to share her passion of Project Life with others and her excitement is contagious!

How long have you been crafting?

I have been a scrapbooker from the moment I was able to hold scissors and use glue! There has never been a time in my life I didn’t feel the need to create and document. Photos, journaling and little bits and pieces of life—creating scrapbooks and documenting my memories have always been a priority in my life. It’s always been something I enjoy doing and something I enjoy looking back on. I love the creative process and the product is something I love just as much—being able to keep my memories—for myself and to share with others.


My style of scrapbooking has of course evolved over time like everything does. I still use various styles: mini-books, SMASH* books, art journals, and the occasional 12x12 layout—but mostly I am all about Project Life these days. Project Life has changed everything for me. It’s all about documenting the everyday, which is what I’m most passionate about. I love the page protectors of all sizes—I can compartmentalize all the little stories that make up the big story of my life. I love that I have the freedom to print photos of all sizes—to use photos taken with my camera or to print the Instragrams from my phone. I love that I can tell my story every week. Project Life has helped me to see the beauty in all the little things. It’s amazing how much you have to be grateful for when you document the details of your everyday life.


 What inspires you to be creative?

I gather inspiration from so many places it’s so hard to pinpoint exactly what inspires me. I’m often inspired to create based on my passion for photography. I love that photos capture moments and emotion—they capture stories. I love using my photos on my Project Life pages and having a place to share them. I’m inspired to create also because of words—I like to write down my thoughts, things people say, words that I don’t want to forget.

One reason I’m inspired to create with Project Life is because I think about how fun it will be to look back on these albums with my husband when we are older. Also, I think how fun it will be to share them with my future children—to show them who their father and I were before we were parents and to show them the journey we took up until the point they were born, and after. Even more so, I think of how long these albums will be around—how many generations of my family will see them? How will life be different for them? I know I love looking at photos and journals from my great-grandmothers.

I’m often inspired by other Project-Lifers—I love reading blog posts and following the Instagram feeds of others who create Project Life albums. I’m inspired by the creators of scrapbooking products too—I love when new collections come out at Craft Warehouse and I can add new bits and pieces to my albums.

Really, I seek inspiration from everywhere I go—I soak it up from wherever I am, whatever I’m doing. There’s always a photo to be captured, a story to tell.


What Craft Warehouse products do you love to use?

Now that Craft Warehouse carries Becky Higgins Project Life products I am super excited to be adding more items to my collection. I’ve recently acquired a few new core kits, some new page protectors and some dividers. I love that Craft Warehouse has it all! I also love all the SMASH* book products carried by Craft Warehouse. I use the journaling pads in my Project Life pages a lot. I also like the various scrapbook collections carried by Craft Warehouse—they change frequently and they usually have the latest and greatest. I use my Project Life core kits a lot but sometimes it’s fun to make some of my own cards and use some of the other scrapbook supplies. I’ve noticed a lot of new products are geared towards the Project Life format and the “document the everyday” mentality—I love that!

How can you encourage others reading this column?

I want people to tell their stories and document their memories. The reason I am so passionate about Project Life is because in its simplest form it is literally a pen, a core kit, photos, page protectors and a binder. You don’t even need glue. Project Life is approachable. Yet, it has the ability to become whatever you want it to be. You can be as creative with Project Life as you want to be—and, you can be simple one week and more detailed the next—there are no rules! You can really go crazy and get creative if you want to. There are so many people who do and their albums are really fun to look at. There are others who keep it simple, their albums are beautiful too. With Project Life, it’s all good.
I think people need that freedom to choose how much they want to do with it, because we are all at different levels of confidence in our own creative abilities and we all have busy schedules. The most important thing to remember is that memory-keeping is priceless and significant. I want to encourage others to use Project Life to document their lives, for themselves and for their loved ones. It’s always the right time to get started and it’s so much fun!


Join us tomorrow when we see Jessica's Project Life pages in celebration of National Scrapbooking Month at Craft Warehouse! In the meantime, visit her Instagram feed and say hi!

*Project Life Core Kits and 60 pack Pocket Pages are only $15 (reg $29.99) until May 18th, 2014

Wednesday, May 14, 2014

DIY Chalkboard Bottles & Jars


Love the look of chalkboard? Well, it doesn't get any easier than this! Take a look at this new book or our in-store displays for inspiration!


To create these fun jars tape off your glass with painters tape or washi tape for easy removal without  residue. Use Deco Arts' new Glass Chalkboard Paint with a foam brush according to package directions. When dry, remove the tape to have a clean line around the glass! Then, use a Chalk Bistro Marker to label it!

Tuesday, May 13, 2014

Decorative Shelves


Use our new decorative shelves and customize them any way you wish! Add paper, a drawer pull, or even stencil the inside to create your very own shadow box! They come painted already, all you need to add is style!


1. Select a box.


2. Use a stencil, like NEW Teresa Collin's large stencils and modeling paste to give texture to the inside of the box.

3. Add a door pull to the top of the box for added style!


LinkWithin

Related Posts Plugin for WordPress, Blogger...
Blogging tips