Saturday, July 7, 2012
Crate Paper's Little Boy Blue
Take a peek at Crate Paper's Little Boy Blue line, now available in stores! Not only is it perfect for a baby boy's layout or announcement, but the patterns are timeless for those everyday projects too!
Take a peek at some of Crate Paper's design team projects! They really know how to rock this line!
Friday, July 6, 2012
Sweet Dreams Pillowcase by Guest Designer Jenifer Cowles
I was am so excited to be a Guest Designer here at Craft Warehouse. I have a soft spot for Craft Warehouse since they are the first ones to give me a chance as a designer. I have been on the Design Team twice and have moved on to other wonderful opportunities and Design Teams.
For my project I wanted to do some sewing and so I received the cutest fabrics from Moda, the Vintage Modern Collection. I decided to make a simple, but cute pillowcase for my Daughter.
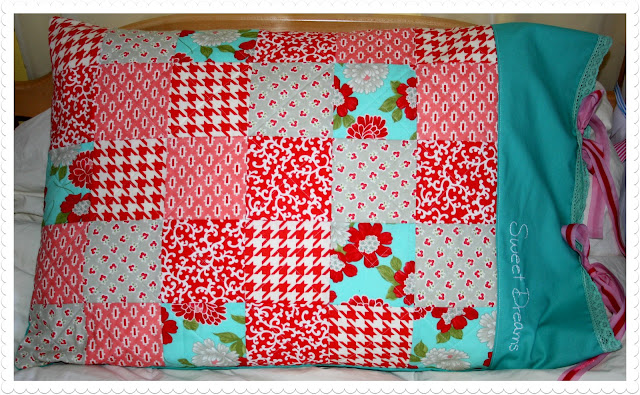
Supplies:1 yard of solid for back and end of pillowcase
4-5 fat quarters for your quilted part of the pillowcase
Embroidery Floss (Optional)
Trim of your choice
Step 1: Cut out 30 4 1/2" squares.
Step 2: Sew 5 rows of 6 squares.
Step 3: Press
Step 4: Sew your rows together.
Step 5: Press.
Step 6: Quilt as desired.
Step 7: Cut from your solid piece, a piece 20x12 and sew 1 end to the top.
Step 8: Embroider "Sweet Dreams" or other saying (optional)
Step 9: After Embroidering fold your solid piece in half and sew it down leaving a nice top stitch on the outside of your pillowcase.
Step 10: Take the solid piece 20x32 and on one of the longer sides sew a 2" hem leaving you with a piece that is 20x30 and with right sides together sew along the bottom and both long sides.
Step 11: Turn right side out.
Step 12: Add Trims. I added the Lace around the edge and I also added some ribbons to tie the pillowcase shut.
Stuff with your favorite pillow and put on your bed and admire.
Step 11: Turn right side out.
Step 12: Add Trims. I added the Lace around the edge and I also added some ribbons to tie the pillowcase shut.
Stuff with your favorite pillow and put on your bed and admire.
I hope you have enjoyed my easy project today. I would love to see what your working on leave me a link in the comments and I will check it out.
Thursday, July 5, 2012
Guest Designer Jenifer Cowles
Welcome, our guest designer and Craft Warehouse Design Team Allumni, Jenifer Cowles! She is a talented paper crafter and seamstress, designing for companies such as May Arts, Thermo Web, Wow! Embossing Powders, My Little Shoebox, Trinity Paper Arts, and Momenta Inc.
How long have you been crafting?
I have been doing some sort of crafting my whole life. When I was growing up we didn't have much money so when my mom was at work I would sneak into her sewing room and cut up some sheets and make shorts to start out with then it grew from there. Now I dabble in just about everything taking turns between paper crafts and sewing depending on my mood.
What inspires you to be creative?
Everything inspires me. I love to watch my children draw and do art projects because they just go all out. They haven't learned the "rules" yet, and they make the most wonderful things.
What Craft Warehouse products do you love to use?
I love going into Craft Warehouse and just walking throught the store and looking at all the displays. The projects are just so wonderful and they keep all the supplies handy so you don't have to search the store for the 1 thing you are looking for. I love the ribbons. I could just sit and get lost in the ribbons.
Make sure to check back tomorrow for Jenifer's sewing tutorial!
Think you've got what it takes to design for Craft Warehouse? We are looking for scrapbookers, fiber artists, quilters, jewelry designers, stampers, and
even mixed media artists! Check out our current 2012-2013 Guest Design Team call here.
Wednesday, July 4, 2012
Tuesday, July 3, 2012
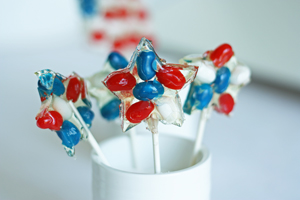
Patriotic Lollipops
Welcome back to our Fourth of July celebration! Today we have Shoshana, a talented chef from Couldn't Be Parve sharing these unique lollipops!
Flag Lollipops
(adapted from LorAnn Oils)Ingredients:
1 cup granulated sugar
1/3 cup light corn syrup
3/8 cup water
1/2 teaspoon super-strength flavoring (I used concentrated lemon oil)
Red, white and blue jelly beans
lollipop sticks
cellophane bags for wrapping the lollipops.
Have all ingredients and tools assembled and within easy reach of the stove. The use of metal spoons and measuring utensils is recommended. Set two silpat mats near the stove (cookie sheets lined with parchment paper and sprayed with cooking spray will work too). Space lollipop sticks approximately six inches apart on the prepared mat.
In a medium saucepan, mix together sugar, corn syrup and water. Stir over medium heat until sugar dissolves. Insert candy thermometer making certain it does not touch the bottom of the pan. Bring the mixture to a boil, without stirring. Early in the cooking process, you can “wash down” any sugar crystals that form on the sides of the pan with a wet pastry brush.
Remove from heat precisely at 300° F (temperature will continue rising), or until drops of syrup form hard, brittle threads in cold water. After boiling action has ceased, add flavor and stir.
Pour syrup into a heatproof pyrex measuring cup. Pour a half dollar sized circle of syrup over the end of one of the lollipop sticks. Working quickly place three blue jelly beans on top of the syrup on the left side. Be careful not to touch the syrup as it is very hot. Make rows of red and white jelly beans to complete the flag pattern. Repeat with the remaining syrup. If the syrup cools off too much to work with re-warm it in 15 second intervals in the microwave until it is pourable.
Once the lollipops are set enough to lift, but still warm, lift them off the sheet. Using a sharp scissors trim any excess lollipop from around the jelly beans to make the lollipops more flag shaped. (It helps to warm the scissors before doing this).
Wrap the finished lollipops in cellophane bags and secure with a twist tie.
Supplies available at Craft Warehouse:
Lollipop Sticks
Cellophane bags
Visit Couldn't Be Parve on Facebook and Twitter and take a look at her recipe list on her blog.
Monday, July 2, 2012
Chocolate Dipped Rice Crispy Popsicles
Welcome back to another day celebrating the Fourth of July with our guest designer Twig & Thistle's Chocolate Dipped Rice Crispy "Popsicles".
A little about Kathleen from, Twig & Thistle:
My name is Kathleen and I love to make things. I live with my husband and adorable Cavalier puppy Tula. We just bought our first home in Seattle. It’s a little house with a big tree and an even bigger to-do list. I spend my days as a graphic designer with a focus on print and packaging. Out side of work, I love to sew, design crafts and day dream about anything wedding related. I love all things sweet, letter-pressed and handmade. I started Twig & Thistle to share the things that inspire me and show the results of that inspiration.
The 4th if July is coming up this week and for folks in the states that means fireworks, friends and entertaining. I thought it’d be fun to make a week of it and share some of my favorite Independence Day themed projects and designs.
First up, Chocolate Dipped Rice Crispy “Popsicles” on a stick. I got the idea from Balancing Motherhood and thought it would be a fun addition to any 4th of July Celebration. The whole process is super simple, just make rice crispy treats (directions on the box), cut into 1″ x 1″ x 3″ rectangles, add a candy stick, dip in melted chocolate and enjoy! You could easily add sprinkles and wrap them in cellophane for portability too.
Supplies available at Craft Warehouse:
Ribbon
Lollipop Sticks
Follow Twig & Thistle on Facebook and on Twitter!
Sunday, July 1, 2012
Fourth of July Tissue Paper Sparklers
Welcome back to our Fourth of July celebration! Today we have Nathalie, from An Ounce of Creativity, showing us how to make these cute tissue paper sparklers. Perfect for little fingers!
For this, simply cut pieces of tissue papers roughly 8"X16" and fold them in half. Then cut fringes on them (don't cut all the way):
Next roll each one around a bamboo skewer or lollipop stick (you can paint them before hand). Apply glue at the start around the skewer and at the end to close it up.
Then I just stuck them into a jar I had previously altered and placed it as a center piece on our patio table.
I hope you feel a little inspired by these simple projects and I wish you all a wonderful 4th of July!
Supplies available at Craft Warehouse:
Color Tissue Paper
Lollipop Sticks
Glue
Paint
You can also follow Nathalie on Pinterest!
Subscribe to:
Posts (Atom)