


I started with a few basic products:
Kraft Cardstock (2 pieces of 12x12)
Paper Cutter/Trimmer
Scissors
Corner Rounder
Adhesive Foam Tape
3 Toothpicks & Twine
 And then bought these additional products for this project:
Simple Stories "Happy Day" Stickers
 Simple Stories "Happy Day" 4x6 Journaling Card Elements
 Simple Stories "Kraft Grid" paper (from Fabulous line)
Jillibean Soup "Stewed Cabbage" paper (from Sweet & Sour Soup line)

FIRST CARD:
Start out by making the card base out of the Kraft Cardstock. Trim to 12" x 4-3/8" and fold at 6".

Cut the banner journaling card out of the patterned paper. Trim the card to 5-1/2" in length x 4" in height (Note: trim a bit from each side)

Round the corners on the right hand side with your corner rounder.

Remove the "celebrate", "Good Times", brown scalloped border, red star and cupcake from the sticker sheet. Cut some small pieces of foam tape, and adhere them to the back of all except the brown scalloped border (make sure on your "celebrate" sticker you do not put any foam tape behind the "e" at the end).

Use adhesive to secure the journaling block to the card base. Then use foam tape and adhere the cupcake sticker and the "celebrate" sticker as shown below.

Next secure the brown scalloped border (no foam tape on back) to the upper left side as shown below. Layer the "Good Times" sticker on top.

To finish card off attach the star (with foam tape) on top of the cupcake flag. Wrap some twine (I wrapped 3 times) around the stem of the flag, tie bow, and trim ends. You are finished with your first card!

SECOND CARD:
Start out by making the card base out of the Kraft Cardstock. Trim to 12" x 4-3/8" and fold at 6" (just like the first card).
Cut the ice cream journaling card out of the patterned paper. Trim the card to 5-1/2" in length x 4" in height (Note: trim a bit from each side--to the end of each "bracket").

Trim a 2"(width) x 3-1/2" (height) strip from the Jillibean Shredded Cabbage paper.

Cut a 2" (width) x 1" (height) strip of paper from the Simple Stories "Kraft Grid" paper.

Use adhesive to secure the small "Kraft Grid" piece to the top of the "Shredded Cabbage" piece. Use the red scalloped border from your sticker sheet (see below), lay it on the tag (overlap a bit of the "Kraft Grid" piece) and trim end. Cut a triangle shape out of the end of "Shredded Cabbage" piece to form a banner.

Wrap a piece of twine around the banner tag, tie a bow and trim ends.

Remove the ice cream cone, blue striped star and "fun!!" stickers (not all shown below) from the sticker sheet. Put foam tape on the back of the banner tag and the stickers (except the "fun!!").

Round each corner of the journaling tag & use adhesive to secure to card base. Use the foam tape to secure the banner tag to the top center of the card.

Add the ice cream cone and then the "fun" sticker on top of it. Next add the star. Your 2nd Card is now complete!

THIRD CARD:
Start out by making the card base out of the Kraft Cardstock. Trim to 11" x 4" and fold at 5-1/2".
Cut out the scalloped tag journaling card out of the patterned paper. Trim to 5-1/2" (width) by 4" (height).

Use adhesive to secure the journaling tag to the card base. Use foam tape to secure the "Happy Birthday" sticker to the card (see below).

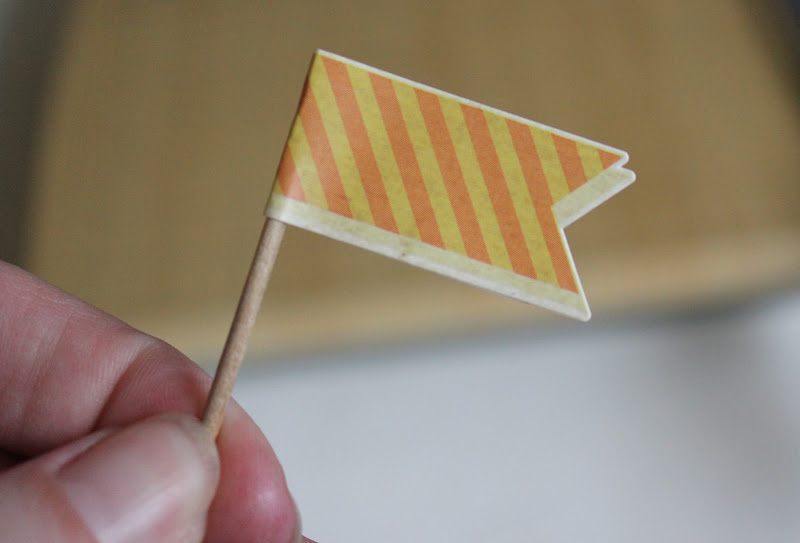
Use a toothpick and the orange striped banner sticker from the sheet...

...to create a toothpick flag by placing a toothpick in the center (a little offset to the right side) and folding the sticker over on itself.

Here is your finished flag.
Tuck the flag behind the "happy birthday" sticker.

Make another toothpick flag out of the blue striped banner sticker and another toothpick.

Cut the end off another toothpick to make a bit shorter. Then remove the pinwheel from the sticker sheet, and put two layers of foam tape on the back of the sticker (leaving a small space in the center for the toothpick).

Secure the pinwheel and the blue striped toothpick flag to the card (also tucked behind the "happy birthday" sticker).

Add the 3 dot stickers (see below...bottom left corner) to make the "confetti" on the card. Your 3rd card is now complete!

Hope you enjoyed creating these three easy cards with me today!


These are fantastic, Cara! Great step-by-step instructions, too!
ReplyDeleteCUTE!!! Thanks for the instructions!!
ReplyDeleteI seriously LOVE all of these!! Thanks for the inspiration Cara.
ReplyDeleteCara, these are great cards . . . so FUN!!! :)
ReplyDeleteWow! You always dazzle me with your darling card ideas! I might have to run out and buy the paper and stickers so I can play along. ;)
ReplyDelete