Saturday, May 4, 2013
National Scrapbook Month Guest Designer Amber Daigre
We are honored to have Amber Daigre from Damask Love as our guest! Amber's classic designs and fun personality is always a breath of fresh air! Plus, her motto is "I sweat glitter" and anyone who can sweat glitter is welcome at Craft Warehouse!
How long have you been crafting?
I'm not completely sure about the official start date, but I began crafting in late 2010. My husband needed a card for his friend's wedding and I had a cabinet full of old scrapbooking supplies. I came up with something handmade (although, I'm sure it was not that great to look at!) Soon after that project, I began researching card-making techniques...and I was HOOKED! I discovered the world of stamps, cardstock, and ink. I no longer have a cabinet full of crafting supplies - now I have a room full of them and I enjoy as much time as I possibly can creating with paper!
Handmade Envelopes created by Amber Daigre using the WeRMemory Keepers Envelope Punch Board, NOW in stores!
What keeps you motivated to document your life?
I'm not gonna lie. I do a TERRIBLE job of documenting my life. I'm embarrassed to admit it, but I have a box of graduation paraphernalia from 8th GRADE that is still waiting to find it's way into a scrapbook. Since I mostly make cards, I always manage to avoid scrapbooking. I look up to avid scrapbookers who do such a wonderful job at documenting daily life. I need someone to lock me in a room and refuse to let me out until I've completed at least a few layouts! I will give myself a teensy bit of credit though. From time to time, I will create cute little photo collages that I hang around the house with simple tags or labels that identify the event in the photos. Little projects like this keep our home "ours" and add important pieces of personality throughout.
What do you use the most to take photos with?
Point and shoot, Digital SLR, or your Phone Camera?
I am in a committed relationship...with my Canon Rebel T3. I love him so much. Yes...it's a him. I saved up for months to purchase him and I am so glad I did. I use my DLSR every single day. Since I maintain my blog, it's a necessity that I have a camera available at all times for beauty shots as well as step-out photos for tutorials. Since I primarily use my camera to photograph small projects, I generally stick to using my 50mm and 60mm macro lenses. Together they do the job perfectly. When I am out and about, I usually grab the 50mm since it is also a great portrait lens. If you're interested in more details on how I use my camera for blogging, you can check out a series that I did called "The Non-Photographer's Guide to Taking Blog Photos" - it's a fun and easy walk through how I photograph from beginning to end.
What is on your craft table right now?
So, you're gonna love this one. By the time this post goes live, I'll be back in the states, but as I type this I am in London and I've been away from home for about a week. Before I left, I cleaned up the craftroom - because no one wants to come home to a messy craft room, right? In addition to leaving a clean workspace, I also laid out a project for myself to come home to! For me, being away from home is a huge creativity suck. After a week away from home, It's really difficult to get back into the swing of creativity. To help myself through this - I usually lay out materials for a project. This way, I can sit right down and get to work without having to think about it! Before leaving on this particular trip, I laid out some supplies from Martha Stewart Crafts. I recently got her Self-Ink Stamp system and I can't wait to break it out. I have it sitting on my desk waiting to be used ...and I already have the perfect project in mind!
What do you do to celebrate National Scrapbook Day?
To be honest, I think I treat everyday like National Scrapbook Day! I try to do something creative each day! This helps me keep my creative wheels spinning and definitely helps me stay sane! Maybe, just maybe ...on this upcoming National Scrapbooking Day, I'll break out all that memorabilia from 8th grade and get it into a scrapbook!!
Watch this video Amber created to show you the step by step process for making the envelopes pictured above!
Join us TODAY in our stores and online at Facebook and Instagram for our National Scrapbook Day events!
Friday, May 3, 2013
My Greatest Blessings Call Me Mom Gift
With Mother's Day right around the corner, we will be featuring quick and easy Mother's Day gift ideas all week long! All you will need are the few supplies listed below and some love to create them for the Mother in your life!
Supplies:
- 12"x12" White Shadow Box (MCS/44)
- 5"x7" White Frame (LFA/471)
- Decorating Your Life "my greatest blessings call me MOM" vinyl
- My minds Eye "Collectable" paper collection - 12x12 "Perfect" paper
- E6000 or Tombow Velcro fasteners to hold 5x7 frame in shadow box.
Labels:
frame,
gift,
holidays,
home decor,
my minds eye,
vinyl
National Scrapbook Month Guest Designer Debbie Sherman
Craft Warehouse is celebrating National Scrapbook Day all month long! We have asked some of our favorite scrapbook designers to share with us what scrapbooking means to them! Debbie Sherman has always loved paper crafting! When she is not working away in her studio creating stunning mixed media pieces, you can find her on her blog, Creatively Speaking.
Seen above, Bo Bunny Press Anthem Collection NEW coming to stores in mid May!
How long have you been scrapbooking?
I started scrapbooking before it was really ever called scrapbooking...I was a young girl about 8. I was always interested in taking photos and I could spend hours looking through all the photo albums my mother kept. My very first scrapbook was made in Brownies, I kept all the memorabilia and documented my badges. I haven't stopped since, now I have taken in to a whole new level. To answer your question without giving away my age... it's been years!
What keeps you motivated to document your life?
My motivation comes from my long distance relationships with family and most importantly, my son and grand kids. They live 500 miles from me and it's my way of watching them grow up. I want to leave my family roots with my son. When I'm gone he will have a treasure to hand down to the generations. I also like to document events that have happened in my love so that my grand children can see how life was/is.
What do you use the most to take photos with? Point and shoot, Digital SLR, or your Phone Camera?
I shoot most of my photos with a Canon EOS 50D, but I always have a camera with me. I keep a point and shoot in my purse and believe it or not rarely use my phone camera. Every July my home town has an old west celebration and I am fortunate enough to obtain a press pass for that week. I have some fabulous photos of the rodeo, night show performers, fairgrounds, and parades. I get some fabulous photos doing this and then I get to scrap them! The press sits in the middle of the arena in a dugout and it's a photographers dream...to get that special photo. The photo on my layout is of a bull rider of a rodeo I was at.
What is on your scrapbook table right now?
I'm so blessed to be guest designing for the Flying Unicorn in May so right now on my scrap table is all their beautiful May kits. It's loaded with Prima, 7 Dots, Crate, My Minds Eye, Gesso, flowers, flowers, flowers and several new bottles of Dylusions! Can't wait to play with this!
What do you do to celebrate National Scrapbook Day?
National Scrapbook Day is a day of shopping for me...the reason being is I can't get anything done when I go to crops, so I shop for fun products instead. I do some scrapping but it's at home in my studio. I'm usually working ahead on projects, or taking photos for a future project...yes sometimes I take photos with a scrapbook page in mind.:)
Join us for our National Scrapbooking Event, May 4-May 6th 2013 (Wenatchee is on May 18th)! To help celebrate there will be in store giveaways, make and takes, and special sale prices!
You can also enter to win prizes the entire month of May on Instagram! This is how to play:
1. Take a photo in Instagram while you are in Craft Warehouse anytime during the month of May (no purchase necessary).
2. Tag your photo by typing "@craftwarehouse" and "#craftwarehouse" so we can see your photo!
3. Each time you post a photo between May 1st - May 30th and tag us, you can be entered to win prizes!
Thursday, May 2, 2013
Mail and Memo Board Organizer
With Mother's Day right around the corner, we will be featuring quick and easy Mother's Day gift ideas all week long! All you will need are the few supplies listed below and some love to create them for the Mother in your life!
Supplies:
- Burlap 12"x12" Frame (LFA/723)
- Metal basket (YOR/3046)
- Key Hook (YOR/3047)
- Clear push pins
- Zva Clear Rhinestones
- Ranger "Cloudy Day" alcohol ink
- E6000 Glue
- Crate Paper DIY Shop paper Collection & mail stickers
National Scrapbook Month Guest Designer Maggie Massey
Maggie Massey of Midwestern Girl, loves to get creative! Even though she is busy being "Mom" she still makes time to get crafty! Whether it is with home decor, a quick sewing project, or playing with paper, she makes time to create memories that last!
When did you start scrapbooking?
I started in high school (about 25 years ago!) by putting photos
into albums and then cutting out words and letters from magazines and
gluing them in...and then I made my first more "modern" scrapbook after a
girls' trip to Cancun about 16 years ago...I've
been hooked ever since!
My kids really keep me motivated. Unfortunately, my Mom didn't have the time (or inclination?) to keep a record of our lives growing up and I sometimes really wish she had. There are so many things that I want my kids to remember...and so many things I want to remember for them. Plus, I just really love the artsy aspect to scrapbooking...I love making something out of little bits and pieces and I really need to feed my desire to create.
What do you use the most to take photos with?
Well, that really depends. I guess lately I've been using my
cell-phone mostly to document everyday life. But for special occasions
(birthdays, holidays etc.) I use my DSLR.
What is on your scrapbook table right now?
Right now I have 2 projects that are in the works...some layouts
that need to be photographed...3 bottles of Color Shine...paper
scraps...an audio book (I love love love to listen while I scrap)...my
art journal...and a torn up t-shirt I use to clean up
messes.
What do you do to celebrate National Scrapbook Day?
I love checking out various scrapbooking sites on NSD...they
usually have tons of inspiration available! I also try to do something
creative...even if it's only working on a small project with the kids.
Join us for our National Scrapbooking Event, May 4-May 6th 2013 (Wenatchee is on May 18th)! To help celebrate there will be in store giveaways, make and takes, and special sale prices!
You can also enter to win prizes the entire month of May on Instagram! This is how to play:
1. Take a photo in Instagram while you are in Craft Warehouse anytime during the month of May (no purchase necessary).
2. Tag your photo by typing "@craftwarehouse" and "#craftwarehouse" so we can see your photo!
3. Each time you post a photo between May 1st - May 30th and tag us, you can be entered to win prizes!
Wednesday, May 1, 2013
Treasured Memories Mother's Day Gift
With Mother's Day right around the corner, we will be featuring quick and easy Mother's Day gift ideas all week long! All you will need are the few supplies listed below and some love to create them for the Mother in your life!
Supplies Family Treasured Memories Block (as shown on the left):
- Painted Cream Block (YOR/2989)
- Metal Flower (YOR/2742)
- Metal Frame (YOR/3045)
- Vinyl Words "Family" vinyl
- Your choice of washi tape and 12x12 patterned scrapbook paper.
- Pioneer embellishment glue stick
Echo Park and Project Life with Guest Designer Elissa Mantalas
I am so excited to be able to be a guest designer for CraftWarehouse. I am going to be putting
together a Project Life layout today.
I’m going to start with a little background on what Project Life is and
why I love this project!
Project
Life was created by Becky Higgins and you can read more about Project Life from
her website here. (NEW Project Life 2013 Collection will be in Craft Warehouse stores at the end of May!)
I first heard about Project Life a couple years ago, but
only started the project at the beginning of this year. Project Life was created to simplify the
memory keeping process – basically take the pre-made cards, the pocketed page
protectors, some pictures and journaling and put it all together. Project Life was designed to be done weekly so there are a lot of day to day bits of life included in the project. I was drawn to the project, because I love
the idea of documenting my everyday life and including little pieces of my life
that would probably never make it to a scrapbook layout.
The thing that is truly awesome about Project Life is that
you can do it however you want. There
are absolutely no rules. You can make it
really simple by just adding the pictures, journaling and the pre-made cards to the pocketed
page protectors, without scissors or glue and be done with it. Or
you can add embellishments, create mini scrapbook layouts in the pocketed page,
or use the cards as ways to try out new techniques. You can also decide to not add any journaling
or limit the amount of photos you use. Its all up to you!
I knew when I started this project at the beginning
of the year that I wanted to keep this project simple. The simpler I keep it, the more likely I'll be able to stick with it and complete the whole year.
Today I will be creating my layout using the Echo Park Photo
Freedom Happy Go Lucky collection pack.
I love these kits from Echo Park because they include everything you
need (and more) to create a weekly spread.
The pack includes five page protectors, a couple sheets of patterned
paper, and a few sheets of paper that can be cut apart into cards that can be
inserted in the pockets.
These collection packs make the Project Life process even more simple
(which I didn't think was possible!).
For this weekly spread, I will be using one
page protector with 6 horizontal 4x6 pockets and one page protector that has 4
horizontal 4x6 pockets and 4 vertical 3x4 pockets.
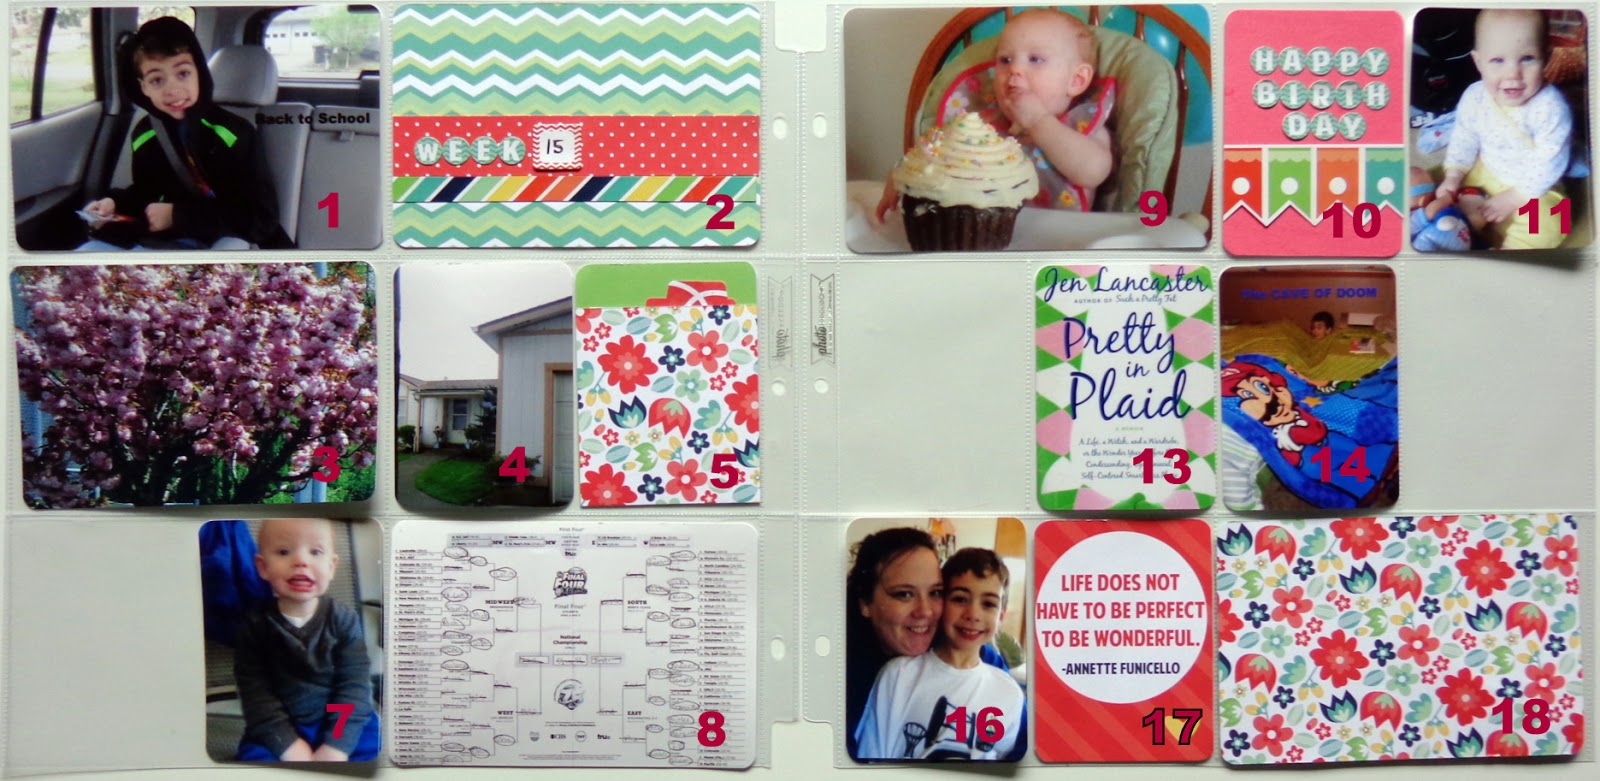
Step 1 is to select and layout the photos.
I
print my photos at 3x4 and 4x6. After I've trimmed my pictures and rounded the corners I
start to lay down the pictures on top of the page protectors. I don’t worry about putting them in any sort
of order. I just like to have the
pictures balanced somewhat evenly on both sides.
- #1 & #14 – I will sometimes add text, using Picasa, to the picture before printing the picture. #1 says “back to school” and #14 says “The CAVE of DOOM”
- # 3 – I love these pink flowers that bloom every year and thought this was the perfect place to document it, since I would probably never make it a scrapbook page about it.
- #4 – I went to visit my grandma and had wanted to take a picture of us together, but she wasn't feeling well so I took a picture of her house instead. Sometimes just be creative if you want a picture to document something.
- #13 – I really like to include pop culture/entertainment pieces – so maybe a book I’m reading, a movie I saw or a TV show I am really enjoying. I may also include a big news story or maybe something from Facebook. I think it’s fun to add these little details of everyday life that might be a big deal for a couple days but will easily be forgotten.
- #16 – Add pictures of YOU to your layouts. This definitely isn't the best picture of me but when my son looks back at this album when he’s older, he won’t care what I looked like, he’ll just like that it’s a picture of the two of us. PS – make sure you are take pictures of yourself
- #18 – This was the week of the final game of the NCAA college basketball tournament. So I scanned my bracket, cropped it to 4x6 and had it printed it out. This is an example adding those daily activities into this project. I have filled out a bracket every year for a long time, but have never scrapbooked about it, but now it’s documented in my project life!
- #1 – I dyed my hair so I took a picture of the box. I chose not to include this because I figured I could just write a note on my journaling card.
- #2 – My son is on a program at school and fills up these charts and earns a prize. This is something could add to any week that I may be low on photos.
- #3 – My son and niece wrestling. I have multiple photos of them wrestling and have done scrapbook pages and included them wrestling in previous weeks so this was a no brainer to cut.
- #4 – I've been watching a lot of scrapbook process videos on youtube. Since I do this every week – I could add this picture a week that I am low on photos.
- #5 – I already have a picture of my niece with her cake. If I was low on photos, I would probably have included this picture, but I didn't need it, so I cut it.
- #6 – My son with a new toy. Again, if I was low on pictures I would have included it, but there were other pictures that I liked better, so I cut this one.
- #7 – I created this for my Facebook page and want to include it eventually, but again, its general so it could be included any week that I am low on pictures.
- #2 – Every week I do a weekly title card that I put in the same pocket.
- #8 – I moved my bracket from pocket #18 to pocket #8 just because I thought it looked a little better.
- #10 – It was my nieces birthday so I created a little embellished card using stickers from the sticker sheet.
- #17 – This was the week that Annette Funicello passed away, so when I saw this card with a quote from her, I knew I had to use it this week.
- #5 – At times there might be some journaling that I don’t want to be easily accessible so I will create a pocket to hide the journaling.
- To create a journal pocket:
- Cut two different papers – one at 3x4 and one 3x3.25
- Adhere the smaller piece to the larger piece on three sides, leaving the top open. You can use glue, staples, adhesive, sew or whatever else you’d like to adhere the two pieces together.
- Cut a plain piece of paper that you can journal on to 2.5x3. Cut out a tab and adhere it to the piece of the journaling paper.
- Slide the journal piece in to the pocket to make sure it slides in and out okay, and then add your journaling.
- #6, #12 – I added in filler cards that I cut out of the paper. I absolutely love patterned paper so I love to just include plain pieces of the patterned paper in the pockets.
- #18 – I changed the patterned paper from the floral print to this patterned with the days of the weeks.
Last step is to embellish, journal, make any changes and add any final touches. The sticker sheet in the collection pack makes the embellishment really easy.
- #6 – I changed the card and added a sticker and done.
- #7 – I liked the photo frames on the 4x6 sheet from the 4x6 piece, so I cut it down to 3x4 to fit in the pocket I was using and cropped down the picture of my nephew.

- #8 – I actually added the sticker to the outside of the page protector just for something different.
- #9 – I cut the little logo “happy go lucky” from the barcode strip and added it to the picture of my niece.
- #15 – I changed my journaling card and added my journaling. I made the card out of the bottom of this paper:
- #16 – Just added a little sticker.
Some final thoughts:
- There’s some talk about the idea of “staying up to date.” So far, I have stayed pretty current week by week, but I know that if I do get behind, my plan is to just start from the most recent week forward, and if I have time, I will go back to “catch up.” There’s no reason to give up on the project because you miss a couple weeks. Looking back on the album in 10 years, you and your family will love the weeks you completed, even if there are a couple weeks missing here and there.
- This project is all about what you want to do with it. There is endless inspiration out there, but don’t feel pressure that you “have” to do it a certain way. I see a lot of people including receipts, or packages or clothing tags in their project life. I don’t want to include those things and so I don’t. I see people using a variety of photo sizes as well as Instagram photos. I stick with primarily the two sizes because its easiest for me.
- I’ve shared with you what my process is. I want to stress that this is what works for me and this is how I like to do it. It’s not right or wrong it just is my way. If there are things you like about my process, use it for yours. If there are things you would change, change it for you!!!
Subscribe to:
Posts (Atom)