Friday, November 7, 2014

Authentique Christmas Bouquet by Design Team Member Michelle Philippi


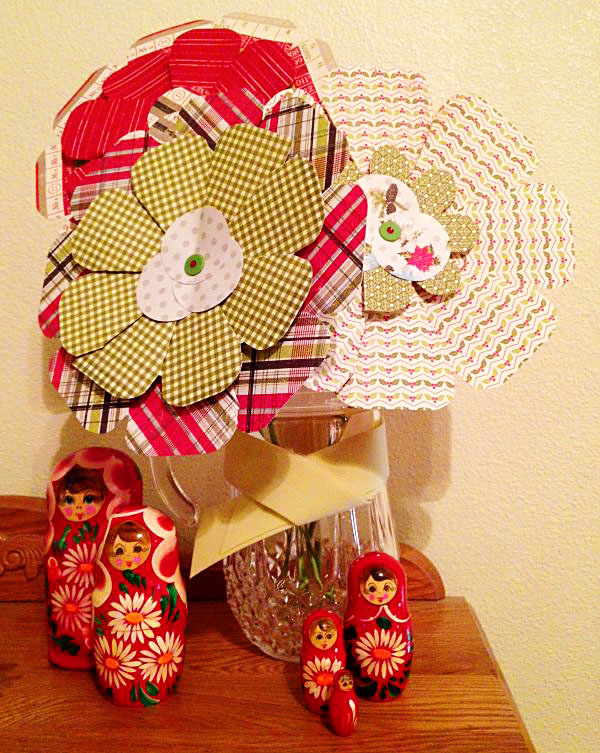
I’m so excited to be here with you today sharing some paper flowers I made for a fun Christmas arrangement.  I had this huge Authentique Three Christmases in One paper pack to work with (which is exclusive to Craft Warehouse), and this neat Flower Punch Board from We R Memory Keepers which made really easy work for this project.


Authentique Christmas Bouquet @craftsavvy #craftwarehouse #authenqiue #paper #flowers


The directions in the package and on the board make it easy to follow and keep you on task.  Cut paper strips (sizes are on the Punch Board) and then follow the guidelines for where to stop, punch, and score.
I’m kind of a go big or go home kinda girl, so I went for the biggest size (XXL).  And these flowers were huge!  One sheet of 12x12 paper cut down to (2) 6x12 piece, then punched and scored come together to make one big, beautiful flower.

Once you have your pieces, you just add some adhesive down at the bottoms and accordion fold.  The scores that you make on the Punch Board make it fool-proof.

I played around with different papers and sizes and found that my favorite combo was the XXL on the outside with the XL on the inside.

I used the Flower Stem Kit (also from We R Memory Keepers) to add stems for forming my flower arrangement.  I poked a hole in the center and had a back that looked like this where I would attach the long stem.  The long stems have wire in them so that you can form them to various angles and heights.
I coordinated my paper with a little red bling from Triveni Crafts that I would use to top my center stem-top with.
I had my daughter hold my bouquet so that you could see how big these are.  They are so big, and so fun.  You could make them smaller too, but I love these!  They remind me of those accordion paper circles that you put on a wall for party décor.  I could totally see doing that with these larger size flowers.

Authentique Christmas Bouquet @craftsavvy #craftwarehouse #authenqiue #paper #flowers
If you’re a papercrafter, and love doing some custom crafty decorating for parties and such, you’ve gotta get this flower maker!

Craft Warehouse Design Team Member Michelle Philippi


Local Northwest paper artist Michelle Philippi has always been a part of the Craft Warehouse "social media" scene. We love her enthusiasm on Instagram, her obsession with Mod Podge, and her love for our store! Here is what she says inspires her as a crafter...

How long have you been crafting?

I got in to papercrafting about 5 years ago.  I had a friend in Canada who had a blog and would post her cards and I thought “I can do that!”  So I dove in head first.  My early cards were not great.  It took me a while to figure out my personal style, but when I did, I felt so good, and happy creating cards, and then moving on to tags and other fun papercrafted things.


What inspires you to be creative?

Getting crafty is like therapy for me.  It’s my own personal time.  I’m a working mom, with a husband and 2 littles, and there’s always so much going on.  But when I have that quiet time when the kids are outside playing, I love sitting at my craft table and making special things for birthdays, holidays, and other special occasions.


What Craft Warehouse products do you love to use?

I get my liquid adhesive – Tombow Mono Multi (the green and white bottle) at Craft Warehouse (can’t live without it – LOL), and My Mind’s Eye papers and embellishments.  This is what I go there for often.  But somehow, when I leave, I have more than one bag?  LOL!  I often pick up things for kids crafting – like wooden or foam shapes.  I’m starting to get more in to mixed media and I only have ever had a white and a cream craft paint on my craft table but today actually I’m heading down to Craft Warehouse to get some of those Americana Décor chalk paints.  The ad said they have 29 colors; say what?!
 
How can you encourage others reading this column?


You know, Hazel & Ruby have a great tagline:  live handmade.  That really speaks to me.  Whether you can fruits and put fabric on top of the jar and tie it off with some jute, or you sew and make fun coin purses, or you’re a painter and you make beautiful canvases, living and giving handmade is so so so special.  We are so busy these days and I think taking that time and thought to give something extra special and personal to someone is a beautiful thing.  And giving handmade doesn’t have to cost a million dollars, and it doesn’t have to take a lot of time – and that’s sort of how I roll....fast and cheap – ha ha.

Come on back and join Michelle as she shows off Authentique Paper's Three Christmases in One paper pad exclusive to Craft Warehouse stores only at noon today! In the meantime, visit her on Instagram, Twitter, Pinterest, and her blog to find more inspiration!

Thursday, November 6, 2014

Authentique Joy to the World Banner


Christmas is such a special time and I had a ton of fun putting this banner together thinking about all the different types of people in their cozy little houses and apartments.  Singing “Joy to the World” with a smile on my face.  It defiantly got me into the holiday spirit. 
I loved the way these turned out.  Put one together yourself to start your holiday season with a smile on your face.
Supplies Used:
Authentique Paper Three Christmases Paper Stack (exclusive to Craft Warehouse stores!)
Jen Hadfield Gold Letter Stickers
Stickles
SPC Jute Ribbon
Hazel and Ruby Sequins
Paper Accents Chipboard Pennants
Darice Stickerz
Darice Trims Gold
Marvy Snow Maker
Vellum
Twine
Directions:
Step One-Cover the Pennants:  Cover the pennants with Authentique paper making sure to glue paper down close to the edges of the pennant.  Then cut a strip of Vellum 3 ½ inches and glue it to the top of the pennant and cut it to the same shape as the pennant. 
Step Two-Cut Snowdrifts:  Cut some white cardstock into 5x6” pieces and then cut them from corner to corner creating a abstract triangle.  This gives you the perfect angle to glue into the point of your pennant.  Hand cut the tops of the snowdrifts to make every drift look different.  Carefully outline your snowdrifts with Stickles.

Step Three-Make Trees and Houses: Hand cut small houses, trees and buildings.  Add Marvy Snow Maker ink to the tops of the buildings and trees. Heat to make the snow puff up. 

Step Four-Assemble the Pennants: Glue down the snow drifts leaving a small border around the pennant to see the pattern paper.  Using the Jen Hadfield Letter stickers and the Darice Stickerz spell out “Joy to the World.”  Slip small houses and trees under the snow drifts and using the Marvy Snow Maker add snow to the vellum. 
Step Five-Hang the Pennants:  String the assembled pennants onto the SPC Jute Ribbon.  Tie Darice Gold Trim, twine, and SPC Jute Ribbon between the pennants. 

Grab yourself an Authentique Paper Three Christmases Paper Stack on sale until November 27th and have fun 'decking the halls'!

- Elizabeth 

Wednesday, November 5, 2014

Simple Authentique Christmas Cards!


Hello Craft Warehouse fans! Michelle back today with a quick tutorial for a basic card that anyone can make. But I’m not only going to show you how to make one card, I’m going to show you how to use the same two base pieces to make several cards using the awesome patterned paper from Authentique’s Three Christmases in One pad, an exclusive to Craft Warehouse!
Each of these cards start with a 4 ¼” x 5 ½” piece of patterned paper and a 3 ¾” x 5” piece of patterned paper.
Simple Authentique Christmas Cards @craftsavvy #craftwarehouse #authentique #christmas #cards #diy
You can either use a premade card base or create your own by trimming a piece of cardstsock to 8 ½” x 5 ½”, score in half lengthwise to create a card base that is 4 ¼” x 5 ½”. Attach the 4 ¼” x 5 ½” piece of patterned paper to the card base. Then attach the 3 ¾” x 5” piece of patterned paper centered on top of the larger piece. This is the start for all of the cards I’m sharing today.
Simple Authentique Christmas Cards @craftsavvy #craftwarehouse #authentique #christmas #cards #diy

For this card I used a couple of the die cut pieces that come with the paper pad. Just punch them out and attach them to the card as desired.
Simple Authentique Christmas Cards @craftsavvy #craftwarehouse #authentique #christmas #cards #diy

For this card, I used pop up adhesive to attach the Very Merry Christmas piece, which is from one of the patterned papers in the pad. I love this card because it’s festive without being a traditional Christmas colors.
Simple Authentique Christmas Cards @craftsavvy #craftwarehouse #authentique #christmas #cards #diy

For this card, I added ribbon and some Stickles. I love this ribbon from American Crafts, thick and shimmery. Make a bow to make this look like a gift ready to give.
Simple Authentique Christmas Cards @craftsavvy #craftwarehouse #authentique #christmas #cards #diy

This card is about as simple as it gets. Start with the two base pieces and add a sentiment from the patterned paper. I trimmed the sentiment with some red Stickles to add some dimension to this card.
Simple Authentique Christmas Cards @craftsavvy #craftwarehouse #authentique #christmas #cards #diy

For this card, I chose two stickers from the sticker sheets included in the pad. Then I added a little red Stickles to enhance the poinsettia's on the patterned paper.
Simple Authentique Christmas Cards @craftsavvy #craftwarehouse #authentique #christmas #cards #diy

Another simple card, with a twist, for this card, I attached a sentiment, but left the top open to be a gift card holder.
Simple Authentique Christmas Cards @craftsavvy #craftwarehouse #authentique #christmas #cards #diy

This final card is made using a fussy cut Santa piece from the patterned paper. I used pop up adhesive to attach the oval piece. Then I lined the edge with dots of Stickles and accented Santa’s hat and suit with a Snow Marker Pen.
Thanks for looking, I hope you enjoyed these cards and how easy it is to create a variety of cards and looks with two base pieces and lots of patterned paper.

Tuesday, November 4, 2014

Authentique Christmas Tree Cards


Hello Craft Warehouse fans, Michelle back today to share with you a couple of fun cards perfect for Christmas and the upcoming holiday season. For these cards I used a variety of paper from the Authentique Three Christmases in One paper pad. Have I you heard how awesome this pad of paper is? There are tons of different patterned papers as well as sticker sheets and die cut sheets. And it’s an exclusive to Craft Warehouse! Follow along to see how you can make these card for yourself.
Authentique Chistmas Tree Cards @craftsavvy #craftwarehouse #authentique #christmas #cards #diy
First up is a Christmas tree shaped gift card holder. The best part about this card is that you can shape your tree anyway you want to, it just needs to be large enough to hold a gift card.
Authentique Chistmas Tree Cards @craftsavvy #craftwarehouse #authentique #christmas #cards #diy

Start making a template for the tree shape. Using a 5” x 7” scrap piece of paper, fold in half lengthwise. On one half of the paper sketch a tree shape and cut it out with scissors, make sure you cut both halves while the paper is folded in half. Unfold and you have your tree shape template. Trace this template on the back side of the card base (the inside of the card) and cut it out.
Authentique Chistmas Tree Cards @craftsavvy #craftwarehouse #authentique #christmas #cards #diy

Once the inside is cut, take your template and cut it into three separate pieces for the tree. Trace these three pieces on the backside of the paper for the front of the card. Once these are traced, I used a paper trimmer to cut a straight edge a little above the top of the traced image, then cut out the image. The extra bit on the top helps with the layering of the tree and makes it easier to adhere the middle piece to the top piece. You don’t need extra for the top piece, cut that just as is.
Authentique Chistmas Tree Cards @craftsavvy #craftwarehouse #authentique #christmas #cards #diy

Once your pieces are cut, adhere the bottom piece of the tree to the base of the card. You only want adhesive on the bottom and outer edges so you can slide the gift card in. Next Adhere the middle and top of the tree together. Then with a little bit of adhesive, attach the gift card to the inside of the middle piece of the tree, then the card will slide in and out when the card is opened. For the edges of tree I used the Snow Maker pen from Marvy to add the appearance of snow. Just draw it on the card, let it dry and then heat set it until it becomes puffy and looks like snow. Then to add some sparkle to the snow I used Stickles in Icicle.
Authentique Chistmas Tree Cards @craftsavvy #craftwarehouse #authentique #christmas #cards #diy

I love the finished look with the faux snow and icicle shimmer on top. Add a few spots of Christmas bling and your ready to go with a fun shaped gift card holder.
Authentique Chistmas Tree Cards @craftsavvy #craftwarehouse #authentique #christmas #cards #diy

Next up is an easel card. I have two cards to share with you but the base of the card is the same.
Authentique Chistmas Tree Cards @craftsavvy #craftwarehouse #authentique #christmas #cards #diy

To make the easel card base start with a 4 ¼” x 8 ½” piece of cardstock.
Authentique Chistmas Tree Cards @craftsavvy #craftwarehouse #authentique #christmas #cards #diy

Use a scoring tool to score the cardstock, lengthwise at 4 ¼”and 6 3/8”. Prefold the score lines, they will be folded in opposite directions as shown in the picture. Then place a strong adhesive, like this red line tape, on the end with the smaller flap. This is where the front of the card will be adhered to.
Authentique Chistmas Tree Cards @craftsavvy #craftwarehouse #authentique #christmas #cards #diy

Trim a piece of cardstock to 4 ¼” x 4 ¼” for the front of the card, decorate and adhere to the card base where the adhesive is.
Authentique Chistmas Tree Cards @craftsavvy #craftwarehouse #authentique #christmas #cards #diy

For the front of this card, accordion fold strips of paper that are one inch in width. Use a quick dry liquid adhesive to attach to the card front in the shape on an upside down arch. Continue to add layers adhering each new layer as you go. This takes a little patience as the higher you go on the tree, the smaller the folds become and you need to work them into place. Well worth it for the look! Top the tree with a star or a glittery bow from Darice. To allow the card to stand up, like an easel, you need to add something to hold the card up to the bottom portion of the card. I love these strips of adhesive crystals, just attach a strip to the base and stand the card up.
Authentique Chistmas Tree Cards @craftsavvy #craftwarehouse #authentique #christmas #cards #diy

For the front of this card I used small strips of a various papers from the pad, cards like this are great for pads because you can use a mix of papers for a variety of cards. Trim a piece for the trunk, then trim pieces for the tree, these are about ½” wide and taper up from about 3 ½” length to about ¾” length at the top. On this card I used some of those strips of crystals as garlands. Just cut them down to the size needed. You can even cut them into individual pieces and use them as ornaments (like I did on the other cards). The star on top is a wood veneer star from Studio Calico. I stamped it in embossing ink and embossed it with a metallic Zing embossing powder from American Crafts.
Happy Crafting and be sure to share any cards you creating using any of the goodies you find at Craft Warehouse!

Monday, November 3, 2014

Authentique Christmas Countdown Advent Calendar


Hi Craft Warehouse fans, Michelle here to share a unique take on a Christmas tradition. I love Christmas, I love the lights and the trees and how my home looks all decorated for Christmas. This year I get to add this fun new Christmas countdown to my wall.


12 Days of Christmas Countdown Advent @craftsavvy #craftwarehouse #authentique #christmas #diy #advent #calendar

To start you need to pick up one of these awesome frames. These frames are so fun and could be used for so many different projects. The frame I used has three openings, one with a glass insert. On this particular frame the glass can be placed in the center opening of the top opening as I have done here. I used a pair of pliers to remove the tacks that were in the center opening to hold the glass. I didn’t need them so I just removed them, they pull out easily and you can’t even tell they were there. Next I removed the glass and added my vinyl sentiment.

To add the vinyl, start by using a credit card or gift card to burnish the vinyl while it is still between the sheet and the tape. To do this, just rub the card over the vinyl. Then peel back the tape and place it where you want it to be on the frame. Then use the card to burnish the vinyl to the frame.

Once you burnish the vinyl to the glass, peel back slowly and you have a beautiful new vinyl sentiment on your glass, ready for your frame. I used some patterned paper from this awesome Authentique paper pad, Three Christmases in One, an exclusive to Craft Warehouse. This pad of paper is amazing! So I chose a not too busy pattern and added some other patterns around the top. This way I didn’t distract from the sentiment and it’s got a cute festive background to go with the countdown boxes below.

I made the boxes using two different punch boards from We R Memory Keepers. First I used the candy box punch board which creates the boxes with the tied ends. And the box punch board which allows you to easily create a variety sizes of boxes. These boards make it so easy to make these boxes, choose your size, punch, and score all on the same tool. And these are the perfect sizes for little Advent calendar goodies. Be sure to fill the inside of the boxes before you seal them.

I used 12 different patterns from the Three Christmases in One paper pad and made 6 candy boxes in different sizes and 6 square / rectangle boxes in different sizes. When my boxes were ready I added rows of jute ribbon across the back of the frame to hang the boxes on. Then I hung them with these lovely gold glitter clothespins from American Crafts. The candy boxes are simple to hang from one end. To hang the regular boxes I attached ribbon hangers from the top to attach the close pin to.

To attach the ribbon to the boxes, whether for hanging or just to dress up the boxes, I used red line adhesive. This stuff will hold anything so It’s great for something like ribbon that needs a good hold. Or you could use a strong quick dry wet adhesive.
When all my boxes were where I wanted them I added numbers to the boxes with an assortment of stickers from American Crafts and Darice. I think this gives it a fun look and helps bring out the paper.

12 Days of Christmas Countdown Advent @craftsavvy #craftwarehouse #authentique #christmas #diy #advent #calendar
I hope you enjoy this 12 days of Christmas countdown as much as I enjoyed making it. It is a fun twist on a traditional countdown and the possibilities are endless. Plus with using a sentiment that is about family and not some seasonal you can reuse this frame for some many things.

LinkWithin

Related Posts Plugin for WordPress, Blogger...
Blogging tips