Showing posts with label fall. Show all posts

Friday, October 9, 2015

Wire Wall Pumpkins

 
These Wire Wall Pumpkins are so easy to decorate!
 
Fall Wire Pumpkin @craftsavy

...add a fall floral stem to it!


...add Deco Mesh to it!
 
Supplies:
  • Pumpkin Wire Frame
  • Orange deco mesh
  • 1 small burlap bag
  • orange pipe cleaners
  • Dark green or brown pipe cleaners
  • Faux leaves
Directions for Deco Mesh Pumpkin:
  1. Take Orange deco mesh cut in 6" - 8" strips, then cut in half and roll each piece.
  2. Use orange pipe cleaners as twist ties (cut each pipe cleaner in 3 sections)
  3. Add to wire frame.
  4. Use small Burlap Bag as the stem, just tie it on with it's cinch ties.
  5. Make Brown or Dark green pipe cleaners to make a curly cue and tie on to top.
  6. Add leaves....


 ...or add Tulle to it!
Supplies:
  • Pumpkin Wire Frame
  • Orange regular tulle and orange sparkle tulle
  • 1 small burlap bag
  • Dark green or brown pipe cleaners
  • Faux leaves
  • Lights (Optional)
Directions for Tulle Pumpkin:
  1. Wrap regular tulle up and down side to side.
  2. Then add the sparkle tulle the same way.
  3. Use small Burlap Bag as the stem, just tie it on with it's cinch ties.
  4. Make Brown or Dark green pipe cleaners to make a curly cue and tie on to top.
  5. Add leaves....
Designed By Debbie at our Vancouver Location.
 

Friday, October 2, 2015

Log DIY Pumpkin


Log Diy Pumpkin @craftsavy, #craftwarehouse, #pumpkin, #diy, #log
 
 Project created By Jessie from our Gresham Store!
Supplies:
  • Wood log Slices
  • Chipboard Leaves
  • Wired leaves
  • Americana Tangelo Orange Acrylic Paint
  • Americana Bitter Sweet Chocolate Acrylic Paint
  • Americana Pebble Acrylic Paint
  • Balsa wood for the stem
Directions:
  1. Paint 2 layers of Tango Orange acrylic paint on the top of the wood log leaving a .2" of an edge so you don't paint the bark.
  2. Cut your balsa wood to make a stem, create a light score line using a sharp object.
  3. Paint Balsa wood with Pebble acrylic paint.
  4. Once dry glue to the back of the log.
  5. Paint chipboard maple leaf with Bitter Sweet Chocolate paint.
  6. Punch hole in the top and add it to the wired leaves.
  7. Glue leaves and chipboard to the front of your project.
 
How did we take this project one step further?
We added 2 clear coats of Deco Art Chalkboard coating
 then used a bistro marker to create a message!


Tuesday, September 29, 2015

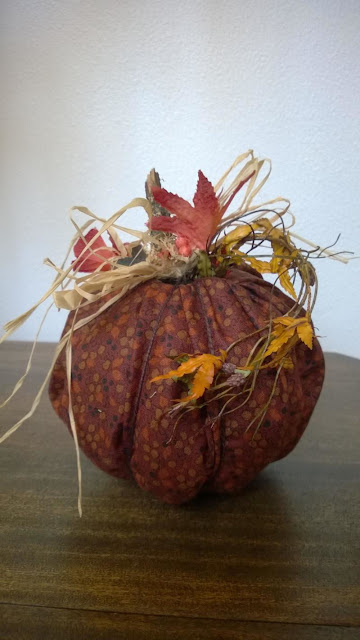
No Sew Pumpkin


Did someone say "No Sew"?
 
 Yes! These pumpkins are only 6 steps and you don't need a sewing machine!
 Great project to get the kids involved with.
 Have them search for sticks to add to the tops of each pumpkin!


No Sew Pumpkin @craftsavy, #craftwarehouse, #Fall, #Fabric, #homedecor, #pumpkin
 
Supplies:
  • 16" - 18" square of fabric (a fat quarter works well too)
  • 1 cardboard tube from an empty roll of toilet paper.
  • Polyester fiber fill.
  • Piece of quilt batting the width of your toilet paper roll.
  • A few straight pins
  • Low temp glue gun
  • 2 yards of twine, ribbon, raffia or yarn
  • Embellishment items like knobby twig, leaves, berries ect...
 
Directions:
  1. Using your low temp glue gun, glue poly fill to the TP roll.
 
 
2.  Securely wrap the batting around the fiberfill, but not too tight you want to be able to squish it to make pumpkin sections. Glue outside end into place.
 
 
3. Lay fabric square flat on your work area. Center the tp-batting roll on top of the fabric. I listed a range of 16" - 18" for your fabric square as my toilet paper rolls ranged from 4.5" to a bit over 6".

4. Bring Fabric up over the edge of the top roll and tuck inside the tube. Don't grab a lot of fabric at once, small pleats work best. If the fabric doesn't want to stay in the tube, stick a straight pin though the fabric into the cardboard tub to hold it. Continue making your way around the tube until all fabric is tucked into the tub and the fabric is relatively smooth. If it looks a bit lumpy or uneven, pull the fabric out and smooth or massage the fiberfill around and try again.


5. Center your twine, ribbon or whatever you are using under your pumpkin. Bring the ends up, cross them over on the top, down and up several times creating the pumpkin sections. I rearranged them several times before I was happy with the outcome. You can tie it off on the top or underneath. Trim off the excess or tie a bow.

6. Embellish as you wish with twigs, moss, artificial leaves, berries ect... Then glue into place using glue gun.
 
No Sew Pumpkin @craftsavy, #craftwarehouse, #Fall, #Fabric, #homedecor, #pumpkin
 

Tuesday, September 15, 2015

Paper Mache Pumpkin

 
The Paper Mache Pumpkin crop is in!
 
Love vintage?- decoupage them with newsprint!
Prefer your pumpkins glamorous? (and shiny) Spray paint them with mirror paint spray.
Traditionalist? Paint them orange with craft paint.
OR- what if you painted them with chalkboard paint!!! - Whoa!...


Paper Mache Pumpkin Diy @craftsavy, #craftwarehouse, #diy, #chalkypaint, #papermache
 
Here we painted the Paper Mache Pumpkins with Americana Black Chalkboard Paint.
 
Then "Seasoned" the pumpkin ( this is when you take a piece of white chalk and rub it all over the surface, then lightly whip off the extra chalk flakes, this makes it look like a chalkboard instead of just black paint)
 
Then we used a white Bistro Marker to add the white lines.
 
Finish off with a burlap ribbon tied to the top!
 
Tip: You can also use regular chalk and right words like "SPOOKY" for Halloween and "THANKFUL" for Thanksgiving.
Or if you are a Zentangle Art Doodle fan you could Zentangle it!
 
 
Paper Mache Pumpkin Diy @craftsavy, #craftwarehouse, #modpodge, #diy, #glitter
 
For a Vintage Look: we decoupage newspaper on to the Paper Mache Pumpkin.
 
Rip your newspaper or tissue into 1" squares.
 
Paint a layer of Mod Podge all over the pumpkin and allow to dry.
 
Then place another layer of  Mod Podge and place paper over the wet Mod Podge adhesive.
 
Continue this technique until your pumpkin is covered.
 
If you would like it to look a little more rustic add Tim Holtz distressed ink with a distressed dabber.
 
 
Or Glitter It! Just cover sections with Mod Podge and glitter it! We used super fine glitter but any glitter is sure to sparkle!


LinkWithin

Related Posts Plugin for WordPress, Blogger...
Blogging tips