Showing posts with label home decor. Show all posts

Tuesday, September 29, 2015

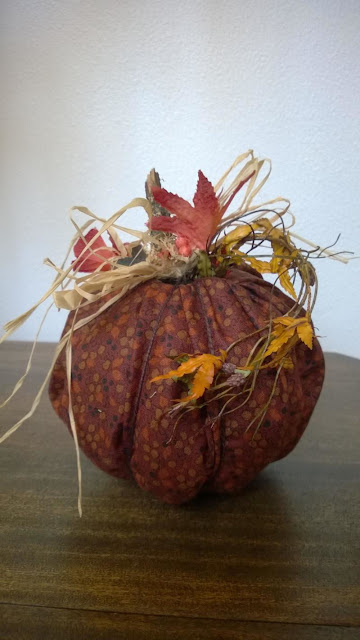
No Sew Pumpkin


Did someone say "No Sew"?
 
 Yes! These pumpkins are only 6 steps and you don't need a sewing machine!
 Great project to get the kids involved with.
 Have them search for sticks to add to the tops of each pumpkin!


No Sew Pumpkin @craftsavy, #craftwarehouse, #Fall, #Fabric, #homedecor, #pumpkin
 
Supplies:
  • 16" - 18" square of fabric (a fat quarter works well too)
  • 1 cardboard tube from an empty roll of toilet paper.
  • Polyester fiber fill.
  • Piece of quilt batting the width of your toilet paper roll.
  • A few straight pins
  • Low temp glue gun
  • 2 yards of twine, ribbon, raffia or yarn
  • Embellishment items like knobby twig, leaves, berries ect...
 
Directions:
  1. Using your low temp glue gun, glue poly fill to the TP roll.
 
 
2.  Securely wrap the batting around the fiberfill, but not too tight you want to be able to squish it to make pumpkin sections. Glue outside end into place.
 
 
3. Lay fabric square flat on your work area. Center the tp-batting roll on top of the fabric. I listed a range of 16" - 18" for your fabric square as my toilet paper rolls ranged from 4.5" to a bit over 6".

4. Bring Fabric up over the edge of the top roll and tuck inside the tube. Don't grab a lot of fabric at once, small pleats work best. If the fabric doesn't want to stay in the tube, stick a straight pin though the fabric into the cardboard tub to hold it. Continue making your way around the tube until all fabric is tucked into the tub and the fabric is relatively smooth. If it looks a bit lumpy or uneven, pull the fabric out and smooth or massage the fiberfill around and try again.


5. Center your twine, ribbon or whatever you are using under your pumpkin. Bring the ends up, cross them over on the top, down and up several times creating the pumpkin sections. I rearranged them several times before I was happy with the outcome. You can tie it off on the top or underneath. Trim off the excess or tie a bow.

6. Embellish as you wish with twigs, moss, artificial leaves, berries ect... Then glue into place using glue gun.
 
No Sew Pumpkin @craftsavy, #craftwarehouse, #Fall, #Fabric, #homedecor, #pumpkin
 

Tuesday, September 15, 2015

Paper Mache Pumpkin

 
The Paper Mache Pumpkin crop is in!
 
Love vintage?- decoupage them with newsprint!
Prefer your pumpkins glamorous? (and shiny) Spray paint them with mirror paint spray.
Traditionalist? Paint them orange with craft paint.
OR- what if you painted them with chalkboard paint!!! - Whoa!...


Paper Mache Pumpkin Diy @craftsavy, #craftwarehouse, #diy, #chalkypaint, #papermache
 
Here we painted the Paper Mache Pumpkins with Americana Black Chalkboard Paint.
 
Then "Seasoned" the pumpkin ( this is when you take a piece of white chalk and rub it all over the surface, then lightly whip off the extra chalk flakes, this makes it look like a chalkboard instead of just black paint)
 
Then we used a white Bistro Marker to add the white lines.
 
Finish off with a burlap ribbon tied to the top!
 
Tip: You can also use regular chalk and right words like "SPOOKY" for Halloween and "THANKFUL" for Thanksgiving.
Or if you are a Zentangle Art Doodle fan you could Zentangle it!
 
 
Paper Mache Pumpkin Diy @craftsavy, #craftwarehouse, #modpodge, #diy, #glitter
 
For a Vintage Look: we decoupage newspaper on to the Paper Mache Pumpkin.
 
Rip your newspaper or tissue into 1" squares.
 
Paint a layer of Mod Podge all over the pumpkin and allow to dry.
 
Then place another layer of  Mod Podge and place paper over the wet Mod Podge adhesive.
 
Continue this technique until your pumpkin is covered.
 
If you would like it to look a little more rustic add Tim Holtz distressed ink with a distressed dabber.
 
 
Or Glitter It! Just cover sections with Mod Podge and glitter it! We used super fine glitter but any glitter is sure to sparkle!


Monday, September 14, 2015

Lanterns, Lanterns, Lanterns!


We have made decorating for the Fall a breeze!
 
 Start with choosing one of our metal or reclaimed wood lanterns, add a candle and floral filler then set in a tray! Makes an easy center piece or shelf display. Keep all year around just change out the foliage!


Friday, June 26, 2015

Eat Heidi Swapp Marquee Love Lights


light it up! Marquee letters are so easy to make with the Marquee Love Letter Kits! Just choose your letters- each is it's own kit including template, lights, and bulb covers. You get to decorate them to fit your style.


Eat Heidi Swapp Marquee Love Letters @craftsavvy @heidiswapp @sarahowens #heidiswapp #craftwarehouse #hsMarqueeLove #marquee #lights

Supplies:
Marquee Love Kits- in E-A-T
Marquee Love washi tape in gold
Paper
pencil, scissors
bone folder


Directions:

  1. Remove Letter kit from box and find letter shaped template, place this on the pattern paper you want for the inside of your letter and trace with a pencil and then cut out. The template includes marks for where you need a small hole or X cut so that the lights can poke through. Set aside. 
  2. Use the Marquee love gold glitter tape to decorate the outside of each letter. This tape is perfectly sized to fit the outside dimension of your letters! Please note, this tape is EXTRA sticky, in fact for really tight spaces like on the letter A it can be a bit tricky. We found that if you pounce the sticky side of the tape on your clothing to pick up a little lint it makes the tape a little less sticky and easier to work with. We like to use a bone folder to help negotiate the tape in and around edges of each letter and help smooth it into place.
  3. Place the cut out paper inside the letter. Next- following the light 'map' included in your kit place the lights in the correct holes- they only fit one way so follow the map- each letter has it's own unique set of lights that fit that particular letter. Once the letters are inserted- add the bulb covers over the lights- they just pop on!

The beauty of the Marquee Love Kits is that you don't have to glue your paper inside the letter- once you lay your cut out paper inside the letter and poke the lights through, put the bulb covers on- the paper will stay in place nicely... this way you can change the paper later as you change your decor)


Thursday, June 18, 2015

Travel Block Set


Spell out your love of T-R-A-V-E-L with this fun project. Or change up the letters to spell what speaks to you. We love the beautiful Journey Collection of papers and embellishments, ideal for trendy home decor projects!


Supplies:

  • 6pk unfinished wood blocks
  • acrylic craft paint in your choice of color (and foam brush to apply it with)
  • Journey Collection of Papers and embellishments by Crate Paper
  • Large alphabet stickers- we liked these large gold stickers from American Crafts
  • foam tape or pop dots for layering and adding dimension
  • embellishment glue stick by Pioneer for adhering paper to front of wood blocks


Directions:

  1. Paint edges and back side of each wood block
  2. cut your choice of patter papers to fit each block and adhere in place with embellishment glue stick- we LOVE this glue stick, it gives such a strong hold but it's easy to use, and really affordable!
  3. We used our foam brush to brush a little of the same paint from painting the blocks over the edges of the paper to distress them a little. 
  4. Next cut smaller rectangle pieces of paper to layer alpha stickers to - and spell out your message. With 6 spaces- what will you spell? T-R-A-V-E-L or F-A-M-I-L-Y ?
  5. Layer your letters to blocks using dimensional foam tape, and add embellishments. 


* 6 Piece Wood Block Set 40% off regular prices (reg. $15.00) and Travel Themed Papers and Embellishments  30% off regular prices until June 22nd, 2015

Thursday, June 4, 2015

Hazel and Ruby Watch Them Grow Display


Get inspired with our NEW Hazel and Ruby Handmade DIY Decor Tape! In just minutes you can stick this tape right on the wall! If you move, no problem - take it with you! Coordinating numbers, shapes, and years included to celebrate their development.


Hazel and Ruby Watch the Grow Display @craftsavvy @sarahowens @hazelandruby #craftwarehouse #frame #washitape #hazelandruby

Supplies:

Hazel & Ruby DIY decor tape 'Growth Chart'
Sharpie or other permanent marker

Directions:

Choose location in your home for your growth chart
Start at the floor and work your way up smoothing the growth chart DIY decor tape up the wall until you want to stop, or you run out of wall or tape! This tape goes all the way to 10ft!

Won't damage your paint, peels off clean when you don't want it anymore.

Use sharpie to mark height, name, and date
BONUS! - This growth chart roll of DIY Decor tape includes fun extras! You get colorful shapes and alphabet stickers to use on your growth chart if you like.

TIP- If you prefer, you can apply tape to a 8"wide x 6' tall (up to a 10' height!) wood panel like we did. Then you can move the wood when and where you want.

Tuesday, June 2, 2015

Glitter Heidi Swapp Marquee Love Lights


Recreate the glamor of vintage marquee signs and bring high design and great conversation to your space! 

Glitter Heidi Swapp Marquee Love Letters @craftsavvy @heidiswapp @sarahowens #heidiswapp #craftwarehouse #hsMarqueeLove #marquee #lights

Watch this video to learn how to glitter these Heidi Swapp Marquee Love Light Up Letter Kits!

Monday, June 1, 2015

Mr. and Mrs Heidi Swapp Marquee Love Marquee Lights


Here's an easy marquee light project! Use the Heidi Swapp Marquee love letter and shape kits to create your own message. The kits are finished in a beautiful matte white. Decorate the inside of each letter or shape with paper to match your personal style.


How to create easy wedding @heidiswapp marquee lights! Created by @sarahowens for @craftsavvy


Supplies:

Heidi Swapp Marquee Love letter or shape kits of your choice
Pattern papers of your choice
Pencil
Scissors
Paper Adhesive- we like Pioneer embellishment glue stick

Directions:

1. Each Marquee Love letter or shape kit includes a light set, bulb covers, and a template.

2. Trace the template for your letter or shape onto the pattern paper of your choice. Trim with scissors. Be sure to allow for each light bulb. To make it easy- the template includes markings for each light.

3. Adhere the trimmed pattern paper to the inside of your letter or shape using the embellishment glue stick.

4. Now follow the light map- included in your Marquee Love kit to add your lights. Then simply snap on the included clear bulb covers over each light.

Now just add batteries and light up your project!

* Heidi Swapp Marquee Love Light Up Letter Kits $9.93 (reg $14.99) and 30% off regular prices of Marquee Love Accessories until May 25th, 2015

Friday, May 29, 2015

Washi Tape Insta-Display


Get inspired with our NEW Hazel and Ruby Handmade DIY Decor Tape! Frame it or stick it on the wall! This tape comes with chalk drawings already on it! All you need to do is add your pictures! If you tape the pictures to your surface you can change them out like a fun message board!


Washi Tape Insta-Display @craftsavvy @sarahowens @hazelandruby #craftwarehouse #frame #washitape #hazelandruby

Supplies:

Choose a decorative open frame
Choose chalky finish paint
Foam brush
Sand paper
Hazel & Ruby DIY Decor tape


Directions:

1. Paint your frame with chalky finish paint.

2. When dry, use sand paper to sand away in some areas for a distressed look apply the chalkboard look DIY Decor tape to frame backing and insert into frame. (no glass)

3. Add any photos you like (we attached with washi tape so we could change them anytime). Use chalk to write messages if you like

Thursday, May 28, 2015

Movie Night Heidi Swapp Marquee Love Lights


Show Stopper! These Faux metal marquee lights will WOW your family and friends alike! Just a few simply supplies and an afternoon and you can make your own. What will YOU spell?


Movie Night Heidi Swapp Marquee Love Letters @craftsavvy @heidiswapp @sarahowens #heidiswapp #craftwarehouse #hsMarqueeLove #marquee #lights

Supplies:

Heidi Swapp Marquee love letters or shapes (spell whatever you want!)- each letter or shape kit includes a battery operated string of lights and clear bulb covers.
Black spray paint
1" to 2" wide paint brush
Acrylic craft paint in silver, white, and pewter colors
Paper plates
Paper towels

Directions: 

In a ventilated area- lay down cardboard or other protective backdrop
Lay out each of your letters/shapes (save the lights and bulbs for later)
Spray paint each letter or shape, inside and out with black spray paint
After black paint is dry, use a dry brush technique to add streaks of silver, white, and pewter craft paint over each letter. This creates the look of old metal.

Dry Brush for Faux Metal technique- squeeze a bit of each color of silver, white, and pewter onto a paper plate or similar. Dip the edge of your dry brush into one of the colors of paint, and then wipe off most of the paint with a paper towel. Your brush will be mostly dry- with just a bit of the paint still on it. Now brush back and forth over your painted black letters. Layer colors over each other and blend more in some areas and less in others. Just continue layering colors in this fashion over your whole letter inside and out until you get desired finished look.

When dry, add lights to each letter/shape. Add bulb covers over each light. Add batteries and light up your project! Stand back and admire your work!

Tuesday, May 26, 2015

Chalkboard Heidi Swapp Marquee Love Lights


Two of our favorite trends in 1 fabulous project! Pair the fun of chalkboard with the flair of marquee lights! What name will you put up in lights?


Supplies:

Heidi Swapp Marquee Love letter kits (spell out whatever you want!) each kit includes battery opporated lights, and bulb covers

Krylon Chalkboard paint spray- black

Chalk

Directions:

1. In a ventilated area- lay down cardboard or other protective material. Lay out your marquee light letters (just the letters, don't add the lights or bulbs yet). Spray paint each letter with Chalkboard spray paint. Inside and outside. Allow to dry. 

2. Pre-treat the chalk surface by rubbing regular chalk all over surface until totally coated in chalk. Then wipe clean with cloth. 

3. Now decorate how you like with chalk. 

4. Finally, add your lights and bulbs! Each letter includes just the right number of lights and bulb covers for your particular letter. Follow the included map to be sure lights are strung in correct order. Add bulb covers.  Add batteries to light up your name! 


Friday, May 22, 2015

Dandilion Slat Board


Create your own ombre slat board with just a few colors of craft acrylic paint and a foam brush! Then, personalize it - I added a fun dandelion vinyl. What colors will YOU use?


 Supplies:

12x12 slat board unfinished sign
Jute cording
Acrylic paint - choose at least 3 colors that can blend together like the yellow, orange, and red shades
Foam brush
Vinyl of your choice

Directions: 
  1. Apply 1st color of paint to top of wood slat board - about the top 1/3 then, while 1st paint is still wet apply orange paint to the middle 1/3- blend the the space where the first and second colors meet to create a nice fade from one color to the next. then, while paint is still wet, apply the red paint to the bottom 1/3. Start at the very bottom and work your way up blending into the middle color. Blending the red and orange colors where they meet to create a fade from one color to the next. 
  2. Let dry. 
  3. Wrap jute cording around the metal wire hanger. 
  4. Apply the vinyl of your choice to slat board. If your vinyl design is larger then 1 of the slats, you can cut your vinyl into segments the same width as each slat so that you can apply the vinyl to more then one slat- as was done with the white dandelion vinyl pictured above.
  5. Tip- if desired you can distress the painted slat board a little before adding vinyl by sanding away some of the color.  
* Special Selection Unfinished Wood 40% off regular prices and Special Assortment 2oz Craft Paint 4 for $1 (reg 99 cents) on sale until May 25th, 2015

Thursday, May 21, 2015

Hello Heidi Swapp Marquee Love Lights


Here's an easy marquee light project! Use the Heidi Swapp Marquee love letter and shape kits to create your own message. The kits are finished in a beautiful matte white. Decorate the inside of each letter or shape with paper to match your personal style.


Hello Heidi Swapp Marquee Love Lights @craftsavvy @heidiswapp @sarahowens #heidiswapp #craftwarehouse #hsMarqueeLove #marquee #lights


Supplies:

Heidi Swapp Marquee Love letter or shape kits of your choice
Pattern papers of your choice
Pencil
Scissors
Paper Adhesive- we like Pioneer embellishment glue stick

Directions:

1. Each Marquee Love letter or shape kit includes a light set, bulb covers, and a template.

2. Trace the template for your letter or shape onto the pattern paper of your choice. Trim with scissors. Be sure to allow for each light bulb. To make it easy- the template includes markings for each light.

3. Adhere the trimmed pattern paper to the inside of your letter or shape using the embellishment glue stick.

4. Now follow the light map- included in your Marquee Love kit to add your lights. Then simply snap on the included clear bulb covers over each light.

Now just add batteries and light up your project!

* Heidi Swapp Marquee Love Light Up Letter Kits $9.93 (reg $14.99) and 30% off regular prices of Marquee Love Accessories until May 25th, 2015

Wednesday, May 20, 2015

Spell it Out Wood Plaque


Get inspired with our NEW Hazel and Ruby Handmade DIY Decor Tape! In just minutes you can customize a wood plaque in no time! I used two different tapes to cover this wood plaque; a solid and a floral pattern! Then I took black letters and painted them white to customize it with a name!


Spell it Out Wood Plaque @craftsavvy @sarahowens @hazelandruby #craftwarehouse #frame #washitape #hazelandruby


Supplies:

Unfinished hanging wood plaque sign with rope hanger
Choose black 4" wood letters
White craft acrylic paint, and foam brush
Choose 1 style of 6" Decor Tape by Hazel and Ruby
Choose 1 style of 4" Decor Tape by Hazel and Ruby
3in1 Beacon glue
Craft knife

Directions:

1. Smooth the 6" Decor tape across top of unfinished sign.

2. Smooth the 4" Decor tape across the bottom of unfinished sign- so that only a couple of inches are layered to sign.

3. Turn sign over and cut away any excess decor tape with craft knife.

4. Paint black letters white (or whatever color you like) using foam brush. allow to dry

5. Arrange the 4" wood letters how you like, and then use 3in1 Beacon glue to adhere in place.

* DIY Decor Tape 30% off regular prices and 40% off regular prices on Special Selection Unfinished Wood until May 25th, 2015

LinkWithin

Related Posts Plugin for WordPress, Blogger...
Blogging tips