Friday, January 13, 2012

Rosette & Twigs on Canvas!

Rosette & Twigs on Canvas!


Supplies:
2 - 12x12 Canvas
Bundle of sticks
Molding paste
Plastic painters spatula
Paint brush
GOLDEN fluid acrylics Cobalt Teal, Cobalt Turquoise & Burnt Umber Light
Book page paper
E6000 glue
Glue Gun
Instructions:
  1. Start by applying your molding paste to the canvas. I used a plastic  painters spatula to apply paste. I wanted the canvas to have dimension so I left lines in the paste.
  2.  Then let canvas dry over night
  3. Next I applied the fluid acrylic paint starting with the Cobalt Turquoise. I brushed on the color on both canvases.After the first color dries. Add your second color (Cobalt Teal) make sure your paint brush only has a small amount of paint and lightly brush scattered areas of the canvas.
  4. Wait about a hour and add your final coat using (Burnt Umber Light). In this last step you really want to have a very small amount on your brush. Lightly stroke side to side to give you canvas a rustic look.
  5. After all your paint dries you are ready to make your rosettes. Take a page out of a old book or you can also use scrap booking paper. Cut you paper in a 6" circle. 
  6. Cut your circle like a spiral
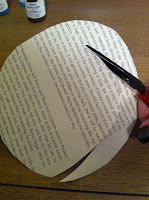
  7. Slowly coil your paper starting on the out side of your spiral until you get to the center of your circle. Hot glue flower to the middle of the circle.    
  8. Place your twigs on your canvas and glue down with E6000
  9. Then glue your flower rosettes on to canvas using E6000.


Thursday, January 12, 2012

Make realistic dimensional flower blossoms out of paper


Use paper punches to create amazing realistic looking flowers out of paper! We've got all the tools you need to create 16 different dimensional paper flowers, including dogwood, garden rose, tulip, pansy, sunflower, and more. It's easier then it looks, and the finished flowers are so impressive! Use markers or glitter to add little extra details for the ultimate wow factor!

McGill Punches are in stock, find them at your local Craft Warehouse and remember to get a free project sheet that shows each flower and tells you what you need for each one.


We've added the specific instructions on how to make each of the 16 flowers in the photo above to our website- check them out on our website craft warehouse

Here is a video that shows you the process for making the Rose - it's fun to see how you can manipulate paper to create these stunning flowers. And the same techniques for the rose are used in most of the flowers.


Try it out! On Saturday January 21 visit your local Craft Warehouse between 1pm and 4pm and make a Lily flower. You'll learn the techniques in the photo below and get hands on experience while you create a beautiful Lily blossom.


Tuesday, January 10, 2012

canvas mania


Join us for Canvas Mania!
Were hosting a fun $5 project each Saturday through Feb 4th.

Just show up at your local Craft Warehouse this Saturday afternoon (January 14th) and you can make the really cool 12x12 Light design canvas. (it actually has a strand of lights tucked in the back of the canvas, so you'll be able to enjoy your masterpiece day or night! It's really impressive when it's lit up.
Learn new techniques and try out some new craft products.Playing with canvas is only limited by your imagination, let us show you some fun ideas while you create your own canvas to take home.

Wednesday, January 4, 2012

Happy Birthday Layout by Design Team Member Amanda Sherman


Hi, I’m Design Team member Amanda. As scrapbookers, we all have our strengths of what we scrap.  Personally, I’m not much of a “theme” scrapbooker.  It’s easier for me to scrap book personalities and relationships than events.  But there are still those “events” in our lives that need scrapbooked.  I’d had this stack of pictures from my kids’ birthday party waiting to be used.  For the record, my kids birthdays are one day apart.  Two years and a day, those silly gooses.  So birthday celebrations in our house are two day events.  I’m sure they’ll grow up thinking its very weird that everyone else doesn’t have two days of birthday parties!  Wouldn’t that be pure bliss if we did??  As long as it means we don’t add two years to our age each year!   Then I might object LOL (of course, I’d have to remember how old I am in the first place.  I can’t remember if I’m 22 or 32 or 19!)


For this layout, I used the Simple Stories Happy Day products.  Everything put out by this company have been some of my favorite items of the last year.  I was struggling with these pictures because there was no similar color families in the picture (green, red, orange, pink & purple! – a hard combination to match!)  But I was very pleased with how well the bold (but still somewhat neutral) colors of the Simple Stories Happy Day line matched.  It toned down the chaotic colors and worked well.  I also really love the ability to use the Simple Stories as a quick way to use divided page protectors, or use them in a full layout.  Fun & versatile product!!

Adding a few 3D foam dots adds a lot more interest into the page.  Quick, easy and affordable way to add another design dimension.


Supplies:  American Crafts cardstock, Simple Stories (paper, stickers, title & ledger letters), misc (buttons, floss, bling & foam dots) chocolate ink

Tuesday, January 3, 2012

Charming Layout by Design Team Member Amanda Sherman


Hi, I’m Design Team member Amanda.  Today, I thought we should talk about something we all have.  Fears.  Yup.   Common fears are death, spiders, snakes, heights, water.  Those aren’t mine (oh, well, snakes & water are).  But back to scrapbooking.  What do fears have to do with scrapbooking?  A lot actually.  We all have fears in regards to our wonderful hobby. Want to know mine?

Yellow. I’m afraid of yellow. I’ll admit it. But this Fall I bought a few sheets of beautiful Authentique papers in yellow. What was I thinking? And they sat taunting me in the front of my paper files. Everytime I opened the drawer, they said to me “you’re afraid of us..ha ha ha ha.” Wait, you mean, talking paper isn’t normal? Well, then forget I said that.
Now fast forward to last night.  I was determined to get a page done.  I pulled out a couple photos I wanted to use and set to work. Then I opened the paper drawer to pull paper and again those yellow papers started to taunt me “you’re afraid of uh……………………..” But before they could finish their little taunt, I snatched them out and decided I was going to put an end to that. No more unruly papers in my stash.

I set to work, and an hour and a half later, I’m extremely happy. I don’t normally spend that much time on a LO because, well, I’m not very patient. However, if I’m always that happy, I’m going to start spending that much time!


Supplies:  Authentique, Martha Stewart punch & scoring board, Bazzill stitching templates,  Misc buttons, floss, letter dies & My Little Shoebox alphas

Monday, January 2, 2012

Art Layout by Design Team Member Michelle Wofford

Hi everyone, design team member Michelle here today to share one of my favorite layouts with you.

I have a favorite picture of my Aunt and I taken in San Francisco years ago that I knew it would work great with this unique color combination.


I started out with yellow cardstock for the base and spritzed it with a bit of orange Tattered Angels glimmer mist.  The papers I used are from the 6x6 pad of My Minds Eye's Lime Twist collection.  Because the background of the picture is busy I chose bright subtle patterns to accent it.  Tip: If you don't have a circle cutter trace a round object about the size that you want your circle then hand cut the circle.


I used simple accents like zippers, embroidery floss and the clear rubber piece in the top right corner.  These add dimension and interest without taking away from the photo.

The zippers are from Indygo Junction and are available at your local Craft Warehouse as well as embroidery floss.  Create a similar clear accent using glossy accents or a small acrylic stamp (check the dollar bins).

To get the look with the floss seperate individual strands and play with them until you get your desired look.

Thanks for looking

~ Michelle

Sunday, January 1, 2012

Monogram Art by Design Team Member Steffanie Seiler

Hello! I'm Steffanie, Craft Warehouse Design Team member.

Today I want to share a wall hanging that I made as a Christmas gift for my mom.


Here is a list of some of the supplies I used:
1. Unfinished wooden frame
2. Large monogram letter
3. Patterned paper of choice (Echo Park's For the Record)
4. Mod Podge
5. Strong dry adhesive
6. Hot glue gun
7. Black acrylic paint
8. Black satin spray paint
9. Martha Stewart scoreboard
10. Misc ribbon/buttons
11. Circle punches
12. Border punches


I will not go into making folded flowers here. Tutorials for them can be found easily on the web by doing a google search. I started by spray painting the frame edge. I did a couple coats allowing dry time in between.


I also painted the edges of the monogram with black acrylic paint. After making my paper selections, I traced and cut the paper for the monogram and adhered with Mod Podge. I sanded down any uneven edges.

I learned the hard way not to adhere your base paper to the frame with Mod Podge. It buckled so bad I had to peal it off. I originally was going to use the pretty red patterned paper from the paper pack but had to go with textured cardstock after I ruined it. Lesson learned. I write this so you won't have to sacrifice a piece of beautiful paper like I did!

I went with a good strong dry adhesive the second time around---the Scotch Advanced Tape Glider, or ATG for short. The rest is just assembly, much like a scrapbook page, until you achieve the look you want. I adhered the large monogram with hot glue...I didn't want to take any chances with this falling off! I added a couple of buttons to the flourish centers on the patterned paper for interest. The remaining letters in the name were cut with a die-cut machine.


I hope this will inspire you to make a monogram wall hanging of your own. Now I need to make one for myself!

LinkWithin

Related Posts Plugin for WordPress, Blogger...
Blogging tips