Showing posts with label martha stewart. Show all posts

Thursday, December 5, 2013

Lawn Fawn Holiday Cards by Design Team Member Michelle Wofford

                                                                          Hey there, Michelle back again to share a couple more fun holiday cards.  I am loving these fun stamps and coordinating die sets from Lawn Fawn.


Before you start you want to gently bend the individual pieces of the die to separate them.  If you have some pliers you can trim the excess metal pieces off the edges of the dies but they do not effect the end results of the die cut.


Start by making a card base from card stock, trim cardstock to 9" x 6" and score down the middle of the 9" side to create a card that is 4 1/2" x 6".  Trim a piece of patterned paper 4 1/2" x 6" for front of card.


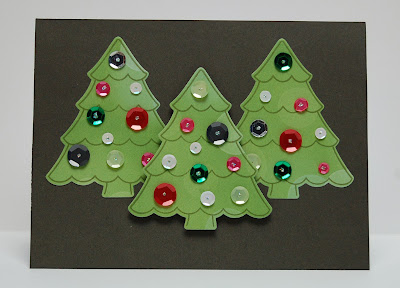
On a piece of green patterned paper stamp several trees with the tree from Lawn Fawn's Trim the Tree stamp set.


Lind up the tree shaped die with the stamp image and run through a die cut machine such as the big shot. 


Isn't it amazing!  The die fits perfectly around the stamped image to create awesome stamped die cuts.  Adhere two trees to the card base and attach the third in the center with a pop up adhesive.


Now to decorate the trees with this coordinating set of mixed sequins.  There are a variety of sizes and colors, including some snowflakes.


Randomly attach the sequins to the trees with either a min glue dot or a small dab of a wet adhesive.  Once attached put a little dab of stickles to add a little sparkle to the centers and to prevent any glue sticking to anything you don't want it to.


 Christmas Mantel Card


And last but not least here is a fun Christmas scene card. 

Start by creating your card base 4 1/4" x 10" and score down the middle of the 10" side.  You want the opening on the bottom of this card so it opens up and not to the side.


To create the brick for the fireplace and mantel trim a piece of cardstock that is 4" x 3 1/2".  With the 3 1/2" side parallel to the top score at 2 3/4" and 3" pre-fold these two score lines.  With the same side up also score at 1/2", 1", 1 1/2" & 2 1/2".


Flip the cardstock so the 4" side is parallel to the top.  Score every other row at 3/4", 1 1/2", 2 1/4", 3" & 3/4".


Now starting on the second row, score every other row at 3/8", 1 1/8", 1 7/8", 2 5/8" & 3 3/8".


This is what the front side of the cardstock should look like now.


Next stamp and die cut the stocking and garland pieces.  These work the same as the trees earlier, just stamp and line up your die and you have perfectly die cut stamped images.


Fold your cardstock so the scored flap hangs over the front.  I put some pop up adhesive in a few spots under the flap to help support it.  Before this though I attached the garland and stockings with a dab of adhesive.


Here's what it looks like with a double stack of pop up adhesive to support the mantel piece.


Stamp, die cut and attach the gifts along the bottom and trim the Merry Christmas portion from one of the tags from the tag sheet.  Attach the fireplace to the card and Merry Christmas piece to card base.

Happy Holidays and thanks for looking, I hope you are inspired to create some of your own holiday cards with this awesome collection from Lawn Fawn. 

Tuesday, September 10, 2013

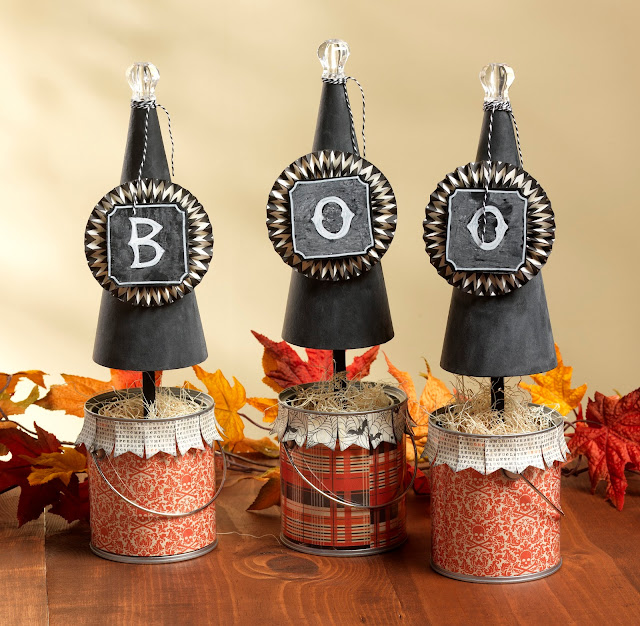
Boo Cones


Pails make great bases for cone projects. Use glass gems to fill the bottom, or Lima beans the kids won't eat and cover the top with colored thread, or in this case excelsior basket filler.


Supplies:

3 - Medium Clear Pails (Arc-21)
3 - Medium Paper Mache Cones
3 - Styrofoam 2 7/8 x 5 7/8 Cones
3 - Styrofoam blocks cut to fit base
3 - Acrylic knobs (Yor-1794)
Authentic “Thrilling” paper collection
Tim Holtz Black Soot Distressed Ink
1 package of Decorative Excelsior
Wood dowel 7/16” x 36”
Black & White bakers twine
Fancy Pants Chalk Board stickers
Bistro Marker white & Chalk
Martha Stewart Score board
E6000 glue, glue gun & hold the foam glue
Black Acrylic paint & foam brush

Directions:

1. Creating the Buckets: cut scrapbook paper into strips to fit the inside of the bucket (4.25” x12”)
place strip inside bucket, use a little glue gun to secure. You will need another piece of paper to fill
in (4.25” x 2”)
2. Cut paper flags to go around the top edge of the bucket. Cut paper strips (1.25”x1”) then cut the
bottom to make the flag shape.
3. Glue flag paper to the top of the bucket with glue gun.
4. Used Tim Holtz Distressed ink pad and dabber to distress the flags
5. Glue Styrofoam to the bottom for your bucket using “hold the foam” glue.
6. Creating the Cones: Cut the tops of each cone about .75” then paint all 3 cones black and wood
dowel
7. Glue acrylic knobs to the top of each cone with E6000 glue.
8. Wrap each cone with bakers twine and tie in a knot or bow.
9. Create 3 Rosettes using the Martha Stewart score board (to make cut 2 strips 2”x12” score them
every 3 notches) follow directions on the packaging.
10. Using the Bistro Marker write BOO on each chalk sticker. Rub chalk all over the cones & chalk
sticker then wipe down this will make your surface look like chalk board.
11. Add caulk board sticker to rosette then glue rosette to cones using glue gun.
12. Put Styrofoam cones in side paper cones then push wood dowel into Styrofoam and into the base
of your bucket.
13. Add Excelsior to the base of the bucket to cover up the foam.

Wednesday, May 15, 2013

Canvas Explosion


 Created and Designed by Connie Richardson for Craft Warehouse
Supplies:
  • 11x14 Canvas
  • Golden Gel Medium
  • Molding paste
  • Gesso
  • Flute Paper - brown Petaloo
  • Acrylic paint - Espresso
  • Frame - Color me Crazy by Petaloo
  • Tim Holtz : Idea-ology Watch, Mini gears, Swivel clasps, Keys, Keyholes and Destinations paper pack
  • Tim Holtz : Idea-ology distressed ink black soot & gathered twigs
  • Tim Holtz Ranger alcohol ink : Pitch black (applied to embellishments)
  • Tim Holtz Ranger distressed stains : Tumbled Glass & Vintage Photo
  • Cheese Cloth
  • Metal hangers
  • Mini Misters
  • Exacto Knife
  • Embellishments : Martha Stewart
  • E6000 Glue
Directions:
  1. Paint sides of canvas with acrylic paint espresso - let dry
  2. Apply gel medium molding paste for texture (may use stamps or other objects to create desired designs) - let dry
  3. Apply small amounts of distressed stain into mini misters and spritz on to canvas in random areas and let dry.
  4. Cut Tim Holtz paper "Destinations" to fit the top and backside of the canvas. Then distress paper - glue into place with Mod Podge - let set till tacky...important it is left pliable enough to cut, add Mod Podge as needed.
  5. Using exacto knife slice 9 pie pieces, then fold pieces back to took like an explosion. (you can use paint brush handle to help roll back)
  6. Apply Gesso to flute paper - let dry
  7. Spritz cheese cloth with vintage photo distressed stain - let dry
  8. Glue cheese cloth to flute paper.
  9. Add Distresses bronze to handle and other metal embellishments.
  10. Glue handle into canvas using E6000
  11. Tear and spritz paper then glue to canvas
  12. Add favorite photo or art work
  13. Embellish 
Join us for our National Scrapbooking Month! To help celebrate there will be in store giveaways, make and takes, and special sale prices!

You can also enter to win prizes the entire month of May on Instagram! This is how to play:

1. Take a photo in Instagram while you are in Craft Warehouse anytime during the month of May (no purchase necessary).

2. Tag your photo by typing "@craftwarehouse" and "#craftwarehouse" so we can see your photo!

3. Each time you post a photo between May 1st - May 30th and tag us, you can be entered to win prizes!

Tuesday, May 14, 2013

3 Little Angels Canvas Art


 Designed and Created by Connie Richardson for Craft Warehouse

Supplies:
  • 11x14 Canvas
  • Mod Podge
  • Bo Bunny Paper
  • Petaloo Color Me Crazy Flowers
  • White  Magnetic 3x3 Mini Frames
  • White Zipper
  • Silver Acrylic Pearl Paint
  • Iva pearls on a string
  • Martha Stewart Butterfly Embellishments
  • Cheese Cloth
  • Gesso
  • Golden Gel Med (Art Dept)
  • Flower Stencil
  • Tim Holtz Angel Wing Dye cut (need a big shot)
  • Tim Holtz Distressed vintage photo ink pad and dabber
  • Tim Holtz Distressed Stains: Broken China, Tumbled Glass
  • Tim Holtz idea-ology tissue wrap
  • Vintage patina
  • Spell Binders Flower Die
Directions:
  1. Paint sides of canvas with silver paint and let dry.
  2. Apply gel medium then lay in pearls.
  3. Distress Bo Bunny paper
  4. Spray canvas with tumble glass shimmer mist - Spritz preparation as follows: In spray bottle - shake together - 2parts simmer acrylic pearl paint along with 3 parts water & then add some distressed stain. Shake well, play with ratio until you get the desired consistency.
  5. Apply mod podge to tissue wrap - let dry
  6. Tear paper into a V - adhere zipper with adhesive - following the V.
  7. Cut out wings using the Big Shot and dye cut. Distress with ink Vintage photo ink pad and dabber.
  8. Cut out flowers using Spellbinders Dye & Big Shot.
  9. Glue all components to canvas

Join us for our National Scrapbooking Month! To help celebrate there will be in store giveaways, make and takes, and special sale prices!

You can also enter to win prizes the entire month of May on Instagram! This is how to play:

1. Take a photo in Instagram while you are in Craft Warehouse anytime during the month of May (no purchase necessary).

2. Tag your photo by typing "@craftwarehouse" and "#craftwarehouse" so we can see your photo!

3. Each time you post a photo between May 1st - May 30th and tag us, you can be entered to win prizes!

Thursday, April 25, 2013

Love Love Love Canvas Projects


We all love Pinterest, but it's time to stop searching for ideas and start creating in real life!

Use our projects as a tool: replicate the project entirely, tweak it with your favorite colors and embellishments or use it as a starting point for something even more amazing! No matter what your 'crafting' skill level, there's a project here for you!


 Here are the tools you will need to create your stencil template:
  • Fiskers Precision  knife
  • Steel Ruler or ruler with steel edger
  • Blank Stencil Sheet
  • Sharpie fine point marker
  • Cutting Matt


Start by printing your letters "LOVE" In Rockwell Bold font, size 475
Then place the letters under the stencil and trace then with a Sharpie. 
Notice How the "O" in Love is tilted?


 Cut out your stencil with precision knife. Make sure your letters connect and save the inside of the "O" and "V"

Supplies: 
  • 12"x12" Black Canvas
  • Martha Stewart Extra Fine Glitter or Darice Rhinestones
  • Foam Brush .75" wide
  • Beeswax pick up stick (helps with bling project, find in Jewelry Department)

 To create "Bling" or "Glitter" LOVE simply trace your stencil with the yellow watercolor pencil on to canvas. Then Use Martha Stewart Glitter Glue and foam brush to add your bling or glitter.


Supplies:
  • 12"x12" Deep White Canvas
  • Montana Gold "Red" Spray paint
  • 2 - Darcie Battery Powered teeny lights
  • Removable pop-dots or tape 
  • Small Nail & hammer
  • Duck Tape
  • Cardboard or Styrofoam for support when you hammer nails into canvas
To Create "Lit Up" LOVE tape down your outer stencil placing the center of the "O" and "V" and the space between the L & O. once secured on the canvas Spray paint red. Once dry remove your stencil. Place Styrofoam or cardboard under canvas for support. Then hammer small holes for your mini lights to go through. Poke light through the holes then tape battery pack to the back of your canvas.

Tip: If you place one battery pack inside in the bottom corners this will help you canvas hang straight.

To get our free Light Up My Love Canvas project sheet visit our website here!

Thursday, April 11, 2013

Feather Freestyle Art Canvas


We all love Pinterest, but it's time to stop searching for ideas and start creating in real life!

Use our projects as a tool: replicate the project entirely, tweak it with your favorite colors and embellishments or use it as a starting point for something even more amazing! No matter what your 'crafting' skill level, there's a project here for you!

Supplies:
  • 16"x20" White Canvas
  • 16"x20" Drop in Canvas Frame
  • Americana "Sea Glass" & "White" Acrylic Paint
  • Foam Brush
  • 12" Feathers
  • Martha Stewart Fine Gold Glitter
  • Martha Stewart Glitter Glue
  • E6000 Glue
Get our free Feather Freestyle Art Canvas instructions on our website here

Monday, April 8, 2013

Glittered Ombre Chevron Canvas


We all love Pinterest, but it's time to stop searching for ideas and start creating in real life!

Use our projects as a tool: replicate the project entirely, tweak it with your favorite colors and embellishments or use it as a starting point for something even more amazing! No matter what your 'crafting' skill level, there's a project here for you


Supplies:
  • 14"x18" White Canvas
  • Martha Stewart Fine Glitter
  • Martha Stewart Glitter Glue
  • Fiskers Paper Cutter
  • Ruler
  • Yellow Watercolor Pencil
  • Masking Tape
  • Foam Brush 
Print out the free Glittered Ombre Chevron instructions on our website here

Friday, March 1, 2013

Martha Stewart Circle Border Punch System


NEW to Craft Warehouse is the Martha Stewart Circle Border Punch System!
Martha Stewart Crafts™ Circle Edge Punch Kit

Create perfectly punched circles with pretty, die-cut borders. Make doilies, decorations, place mats, and cards. The Martha Stewart Crafts Circle Edge Punch Starter Kit makes it simple - and you don't need to trim your paper first. The innovative design punches edge designs from 6 inch to 12 inch in diameter. Additional punch designs available.

The Circle Edge Starter Kit* includes:
Base (size 4in x 11.25in)
Eyelet Doily Punch cartridge
Instructions

Watch the video below to see it in action! 


* Starter Kit is on sale for $24.98 (regular $35.99) and Circle Border Cartridges on sale for $15.88 (reg. $21.99) until March 17th, 2013.

Tuesday, January 1, 2013

Bringing in the New Year!


Happy New Year! This week Craft Warehouse is welcoming the New Year with fun ideas to help encourage, get us organized, or just fun ways to motivate ourselves in 2013!


We love this fun project found via Pinterest by Celebrations! You can find the full directions on their blog here.

LinkWithin

Related Posts Plugin for WordPress, Blogger...
Blogging tips