Showing posts with label quilting. Show all posts

Tuesday, October 6, 2015

Novelty Winter Flannel Quilt


This quilt can be made so quickly and easily! It's perfect size for a child. Change the stripe pattern and it can be a great quilt for an adult.
 
 
NOVELTY STRIPE QUILT by Elaine Byrum for Craft Warehouse

Finished size 38” x 50” approx.
Novelty Winter Flannel Quilt @craftsavy, #craftwarehouse, #flannel, #quilt
 
Supplies:
  • 1 yard of repeat stripe fabrics
  • 5/8 yard border fabric
  • 3/8 yard binding fabric
  • 1 1/2 yards backing fabric
  • 45"x54" batting
  • 505 spray adhesive
  • Rotary cutter, mat and ruler
  • Sewing machine
  • Thread to match fabric
Cutting Instructions:
  • From the 1 yard repeating stripe cut 2 -  32 1/2" x 42" Pieces.
  • From the 5/8 yard border fabric cut 4 - 4 1/2 x 42" Pieces.
  • From the 3/8 yard binding fabric cut 5 - 2 1/2 x WOF
Directions:
  1. Using the 1/4 seam allowance, sew the border onto the stripe fabric. Wrong sides together. Sew top and bottom borders on, then press and square up.
  2. Layer top, Batting and backing using the 505 spray. After you have layered your quilt, choose any stripe and quilt by sewing on the line at the color change. Stitch in the ditch where the borders are attached.
  3. Bind with your favorite method.
This quilt can be made so quickly and easily! It's perfect size for a child. Change the stripe pattern and it can be a great quilt for an adult. 


Monday, October 5, 2015

Seahawks Tailgating Quilt


 Show your team spirit with this one of a kind
Seahawks Lap Quilt!
 
Seahawks Tailgating Quilt @craftsavy, #craftwarehouse, #Seahawks, #Quilt
 
Supplies:
  • 1 - Essential Gems Cotton Fabric Strip packs
  • Choose 1 1/4 yards from our collection of sport teams cotton fabrics 
  • 1 1/4 yards of batting
 

The Essential Gems strip packs can be bought in so many color combinations  you can make it in your favorite team colors. 


Katrina used this free pattern from Wilmington Prints
The link takes you to their web site and a PDF file with 4 patterns to download
http://www.wilmingtonprints.com/projects/essential-gems-yankee-doodle-project


Monday, June 8, 2015

Yankee Doodle Quilting


Craft Warehouse has these great Essential Gems by Wilmington Prints.  Each Essential Gem package has 24 - 2½” x 44” strips of fabric.  My favorite is the Yankee Doodle strip pack-red, white and blue! 


Craft Warehouse has these great Essential Gems by Wilmington Prints.  Each Essential Gem package has 24 - 2½” x 44” strips of fabric.  My favorite is the Yankee Doodle strip pack-red, white and blue! by @craftsavvy

We have free project sheets in our stores to make 2 styles of flags.  One style uses straight strips to create Flag Gems, the other cuts the strips to make the Zig Zag Flag.  A perfect easy quilt for all of our patriotic holidays this summer.

Craft Warehouse has these great Essential Gems by Wilmington Prints.  Each Essential Gem package has 24 - 2½” x 44” strips of fabric.  My favorite is the Yankee Doodle strip pack-red, white and blue! by @craftsavvy

Craft Warehouse has these great Essential Gems by Wilmington Prints.  Each Essential Gem package has 24 - 2½” x 44” strips of fabric.  My favorite is the Yankee Doodle strip pack-red, white and blue! by @craftsavvy
 
All 4 projects are fast and fun to make for your patriotic summer holiday celebrations!

Wednesday, October 15, 2014

Cuddle Throw Using Buckaroo


Silky soft Cuddle fabric resembles real mink in touch. It has a soft short pile that is as soft as cashmere. It is the ultimate fabric for making blanket from babies to adults!


Supplies:

8 strips, 5 1/2” x 30”, of Cuddle
5/8 yd Cuddle for outer borders
1/3 yd Cuddle for 2 1/2” border
1/4 yd Cuddle for binding


You will need to purchase fabric for backing.  We recommend 1-1/4 yards Cuddle

Directions:

Finished Size 45”x55”

Sew the Cuddle strips together in your order of preference.  The kit is designed to coordinate, so the order is purely your preference.

Trim the center of the quilt so that it is 30” wide.

Cut the 1/3 yard of border fabric into 4 strips each 2 1/2” wide.  Stitch the borders to the sides of the quilt first, and then to the top and bottom.

Cut the 5/8 yd of Cuddle into 4 strips each 5 1/2” wide.  Add to the sides first, and then to the top and Bottom.

Lay the quilt front and backing wrong sides together and pin liberally (insert batting if desired, but be sure to use a spray adhesive so it doesn’t slide).  Quilt “in the ditch” or as your prefer.
Cut the 1/4 yard of Cuddle binding fabric into 2” wide strips.  Seam these and add them to the quilt by stitching in a narrow seam, folding it over and under and then stitching down on the top or bottom side using a serpentine stitch.

HINTS: Use a walking foot and pin liberally — this fabric moves!  The use of batting is optional — two layers of Cuddle may be all that you want or need — it will be heavy.  We recommend a size 90 universal machine needle.  It  works well on the knit and is heavy enough to do the machine quilting to finish.


Tuesday, October 14, 2014

Miss Kate Quilted Pillow by Design Team Member Jenifer Cowels


Thank you so much for joining me today.  I have such a fun project to share with you.  I was so excited when I opened my Craft Warehouse box and saw the wonderful goodies inside.  I received the cutest mini quilt pattern from Thimble Blossoms along with some Miss Kate by Bonnie and Camille for Moda Fabrics, now in Craft Warehouse stores!.  I couldn’t wait to get started.   After following the easy, clear pattern and having the cutest little mini quilt in my hands I was trying to come up with a different way to use it.  I don’t have very much wall space in my sewing room but I do have a couch.  So I made a mini quilt pillow to adorn my couch.


Supplies:
16”x16”-Pillow Form
Ric-Rac (optional)
Fat Quarter for the back
Directions for 16x16 pillow:
1.       Follow all of the Instructions for the mini quilt.
2.       Baste Ric-Rac along all 4 sides.  (optional).
3.       On the top and the bottom add a 1 ¼”sash and a 2” sash on both sides.  This will give you a 16 ½”x16 ½” square.
4.       Cut the Fat Quarter to 16 ½”x16 ½” for the back.
5.       Sew along 3 ½ sides, leaving an opening for turning.
6.       Turn and press.
7.       Insert the pillow form into the opening.
8.       Hand Stitch the opening closed.
And now you are done!
Here is a close up of the optional ric-rac, I love how it looks like a little scallop.
Here is a picture of the beautiful fabric for the back, I just love it. 
I hope you have enjoyed my project today and I look forward to all of the wonderful inspiration from the Craft Warehouse team.

Monday, October 13, 2014

Craft Warehouse Design Team Member Jenifer Cowels


Welcome back Craft Warehouse Design Team Alumni Jenifer Cowels. Jenifer is our resident seamstress and quilter! Not only does she sew, she does paper crafting too! I can't wait for you to see the beautiful project featuring Moda Fabrics tomorrow! In the meantime, let's hear about what motivates her to create! 


How long have you been crafting?

I have been doing some sort of crafting my whole life.  When I was growing up we didn't have much money so when my mom was at work I would sneak into her sewing room and cut up some sheets and make shorts to start out with then it grew from there.  Now I dabble in just about everything taking turns between paper crafts and sewing depending on my mood.


What inspires you to be creative?

Everything inspires me.  I love to watch my children draw and do art projects because they just go all out.  They haven't learned the "rules" yet, and they make the most wonderful things.  They are so willing to learn new things and they are not afraid to get their hands dirty even if it means making a mistake.


What Craft Warehouse products do you love to use?

I love going into Craft Warehouse and just walking through the store and looking at all the displays.  The projects are just so wonderful and they keep all the supplies handy so you don't have to search the store for the 1 thing you are looking for. I love the fabric selection they carry fabrics that I don't see at other local stores.

Make sure to visit Jenifer on her blog and then join us back tomorrow as she shows us a beautiful mini quilt tutorial!

Thursday, August 7, 2014

College Week! 1 Hour Fleece Blanket


It's time to hang up our flip flops and get back to school! This week we will have fun ideas that are perfect for Dorm Room Decor! Even if it's only home for a short time, make your space one of a kind! These quick and easy projects will help make that space fit you! Fleece will not fray when cut making fleece blanket an ideal quick, no sew gift!

1 Hour Fleece Blanket @craftsavvy #craftwarehouse #nosew #diy

Dimensions Approx. 58” x 58”

Supplies:

1 2/3 yards of 2 (two) Coordinating Fleece Print and/or solid fabric.
Sharp Fabric Scissors or Pinking Sheers—or– Rotary Cutter, Mat and Ruler.
Quilting or Safety Pins
Masking Tape


Directions:

1. Lay one piece of fabric on your work surface with WRONG side up and selvedges on the right and left.  Lay the second piece of fabric RIGHT side up on top of the first with the selvedges on the top and bottom.  This will stabilize your blanket.

2. Remove selvedges and trim fabric to measure 58 inches square.  Use a few pins to hold the pieces together.

3. Place Masking tape on all sides  of the top piece of fleece, four inches inside from the edge.

4. Cut fringe at one inch spacing, using the masking tape as a guide for stopping.  You may use scissors, pinking shears or your rotary cutter and mat.
Tie the top and bottom layers together by knotting at each fringe cut.  At each corner, cross over the fringe so the bottom layer right ties to the top layer left, etc.

Enjoy!

The same technique can be used to make a matching pillow!  Then same technique for measuring and cutting can be used to make an easy single layer blanket!

* 30% off regular College Fleece prices (reg $13.99 per yard) until August 24th, 2014

Tuesday, August 5, 2014

College Quilt Kits


It's time to hang up our flip flops and get back to school! This week we will have fun ideas that are perfect for Dorm Room Decor! Even if it's only home for a short time, make your space one of a kind! These projects will help make that space fit you!

WSU Quilt @craftsavvy #craftwarehouse #quilting #college #diy
(Quilt featured from our Kennwick store)

Create this special quilt for the college student in your life! All the fabric is cut and kit with a pattern ready for you to get started! Check your stores for specific patterns, fabrics, and prices. 

WSU Quilt @craftsavvy #craftwarehouse #quilting #college #diy

 * 30% off regular prices of College Bolted Cotton (reg $12.49 per yard) and Crafter's Quarters Fabric $2 (reg $2.99) until August 24th, 2014

Friday, August 23, 2013

Carry All by Design Team Member Jenifer Cowels


Hi!! It's Jenifer Cowles again and I am so excited to be back with you today! 

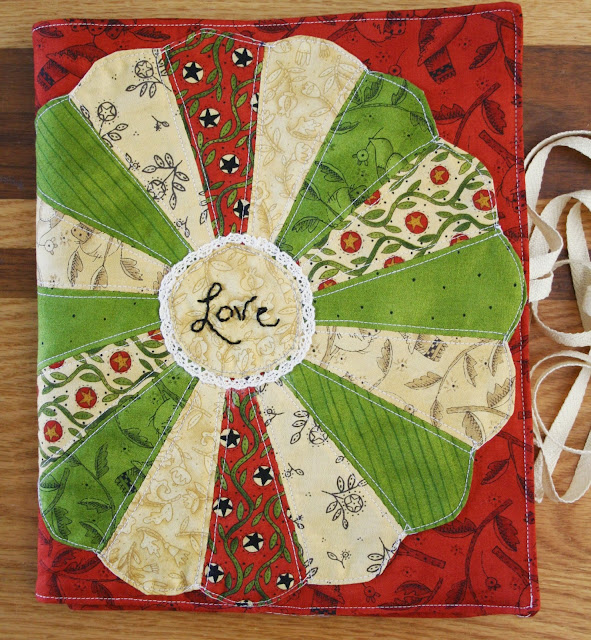
I have fun project for those of you that likes to take your projects on the go.  With this project carry all you can put everything you need for you project in one convenient place.  Make a few for multiple projects.


Let's get started.

Supplies:

Fabric
Multiple fat quarters
Decorative trim and ribbon-May Arts
Fusible batting -ThermOWeb
Templates or pattern for cover

Cut 3-11x30 pieces of fabric (these can be different fabrics if you choose) and also cut one of the fusible batting.

Decorate one of the 11x30 pieces as desired.  I put a Dresden plate on mine, this is a good project to try something new.

Iron the fusible batting to one of the 11x30 fabric pieces, this will be the inside fabric if you are using multiple fabrics.
Fold the last 11x30 fabric in half long ways and iron.  Giving you a piece 5 1/2x30.  Baste to the fabric with the batting to the folded piece.  This is the pocket.
Stitch desired pocket sizes on the right hand side, 1 at 6" and 1 at 7 1/2.

Pin ribbon to short side right at the pocket making sure it is not going to catch in the seams.

Sew right sides together leaving a 3" opening for turning.
Turn right side out.  Hand stitch the opening.
Stitch 9 1/2" on both the left and right sides.


Fill with necessary supplies and you are ready to work and travel with everything all in one place.

Saturday, March 16, 2013

Clover Flower Headband


Happy National Quilt Day! All weekend long we will be inspiring our quilters with projects, dates of special Make and Takes, and in store demos!


Saturday, March 16th from 11-1pm, we have a free Clover Flower Make and Take! Join us as we show you really how easy this is! Then, you can go home and use your flower to create a cute headband!

To print this free fabric headband pattern, drag the image to your desktop and print at 8.5"x11". 


To see a list of all our in store make and takes for National Quilt Day, visit our website here.  

Friday, March 15, 2013

National Quilt Day Giveaway


Happy National Quilt Day! All weekend long we will be inspiring our quilters with projects, dates of special Make and Takes, and in store demos! 


This giveaway is now closed. The winner picked via Random.org is 

What an awesome giveaway! Thank you for the chance to win! :D
  
This giveaway is for our quilters! There are six prizes that will go to one lucky winner!

We have a quilt pattern by Empty Bobbin called "Bleachers" in three sizes; a four sized "Pow Wow" quilt by Cluck Cluck Sew; Quilts from The House of Tula Pink with 20 fabric projects to make; Make It Modern Quilts 5 designs by Ann D. Hansen for Leisure Arts; Jelly Roll Dreams 12 new designs for jelly roll quilts by Pam and Nicky Lintott; and A Passion for Precuts 7 designs by Pam McMahon.

That is a prize package valued at over $100!

To enter to win, you can...

1. Comment here! We need to be able to contact you if you win! If your email is not attached to your profile, please add an email address in your comments making sure to add spaces as shown: email (at) address (dot) com. Thank you!

2. Share our giveaway via Facebook by clicking "share" on our Facebook post, then come back here and tell us that you did.

3. Share our giveaway via Twitter, then come back here and tell us that you did.

4. Pin our giveaway via Pinterest, then come back and tell us that you did.

One winner will be picked via Random.org on March 18th, 2013!

*We ship in the US only thank you.

To see a list of all our in store make and takes for National Quilt Day, visit our website here

Thursday, March 14, 2013

Baby Rag Quilt


Happy National Quilt Day! All week long we will be inspiring our quilters with projects, dates of special Make and Takes, and in store demos! 


We love this quick and easy Baby Rag Quilt tutorial, by Creations by Kara, perfect for the beginner quilter and quick project for those that are experienced!

* 3-Piece Rotary Cutting Set NOW $35! Everything you need to begin quilting: mat, ruler and rotary cutter. Reg. $54.99 

Wednesday, March 13, 2013

Carrot Table Runner


Happy National Quilt Day! All week long we will be inspiring our quilters with projects, dates of special Make and Takes, and in store demos! 


Get ready for Easter with this fun Carrot Table Runner via Better Homes and Gardens


* Bolted Batik Cotton Fabric $7per yard. One-of-a-kind hand-painted prints and solids. 44", 100% cotton. Selection varies by store. Reg. up to $11.99 per yard. Sale prices good until March 17th, 2013.

LinkWithin

Related Posts Plugin for WordPress, Blogger...
Blogging tips