Showing posts with label mini book. Show all posts

Tuesday, November 18, 2014

12 Days of Christmas Mini Activity Album

I love Christmas.  I love the giving, the conversation, the good will and everything that goes with it.  As a mother of two, I have decided I want my children to know that Christmas is more than parties and gifts.  That is why this year I have created a place to record and encourage my kids to give this year.  

This album has 24 Christmas activities for our family to celebrate the Christmas season.  The activities range from baking cookies to random acts of Christmas kindness giving hand warmers and cocoa to volunteer bell ringers outside your favorite store.  These ideas slip into the cutest little bag I created to clip into the back of the album and my kids will take turns drawing a random activity for twelve days. 

 If you would like a copy of these ideas, you can download them here:
Random Acts of Kindness Cards:


Family Activity Cards:
I created this album before the season starts this way as we complete each activity we can take a photo or two and place them in each of the twelve pages.  The Authentique Three Christmas’ in One paper pad made this project easy by giving me perfectly coordinated papers, stickers and diecuts all in one place. 
12 Days of Christmas Mini Activity Album @craftsavvy #craftwarehouse #christmas #minibook #diy
I am looking forward to using this little album to encourage my kids to give more than take during this holiday season. Here are the steps to help you create one for you and your family this year. 
Supplies Used:
Authentique Paper Three Christmases in One Paper Stack
Darice Stickerz: Red and Black
Darice Trims: Red Snowflake, Red and Black Glitter
Thickers Black Number
iCraft Super Tape
Grafix Chipboard
Triveni Craft 4mm Red Gems
We Are Memory Keepers Gift Bag Punch Board
Baker’s Twine
Foam Tape
Directions:
Creating the Cover:
Step One:  Decide what size you want your album and cut two squares of chipboard to that size.  Next decide what size you want your spine and cut a piece of chipboard to that size.  I decided my album should be 6 ½ x6” so my chipboard cover pieces were cut 6 ½ x6“ and the spine was cut 1 ¾“x6 
Step Two:  Layout your chipboard pieces with the spine piece in the center making sure to leave a gap between each piece of ¼”.  Measure the length of your chipboard pieces to find the size of your inside cover.  Next add two inches to both the length and the height of the measurement to get a piece of paper the correct length to wrap around the cover.
Step Three:  Cut and splice together a piece of paper long enough to cover the inside of the album using the inside cover measurements you just made.  Then create a piece of paper to cover and wrap around the outside of the album.  I wanted the spine to be a different color than the cover or back so I made the center four inches of my cover piece a different color.  Cut the corners of this sheet diagonally to help give it a finished look after it folds.
Step Four:  Using super sticky adhesive such as iCraft SuperTape carefully place adhesive around the boarders of all your chipboard pieces and carefully fold your paper over gluing down each flap.  Then again place your adhesive around the edges and place your inside piece of paper inside your album. 

Creating the Pages:  
Step One:  Cut two lengths of Darice Trim Ribbon one yard long and using super sticky adhesive glue the ends of the two pieces onto the inside of the spine of the album.  Next cover these ends with another piece of cardstock completely gluing down the edges. 
Step Two:  Cut the base of your pages.  You will need spots for 12 days of activities so I created 12 pages.  I like some of my pages to differ in size so two of those are half pages are two pages have flaps to lift or open.  So basically I cut 8 6x6” pieces, four 3x6” pieces and two flaps to glue onto a 6x6 that measured 4¼x6.”  (*Note:  I thought I would like my pages to be slightly smaller than my 6 ½ x6” cover so my pages are actually 5 5/8 ”x 5 5/8”.  I regretted it later.  So my measurements in my photos will slightly differ.)    
Step Three:  Match up the pages and place one page on top and one page under the ribbon.  Using strong adhesive to sandwich it all together.  Make sure to leave space between each set of pages so that your album folds.  Also make sure you place any half pages you have next to each other or the album will not fold correctly. 
Decorating and Embellishing the Pages and Cover: Using the diecuts an the stickers in the Authentique Three Christmas’ paperpad, embellish the cover and the inside pages of the album.
For the cover I used foam adhesive to layer the diecuts from the paper pad and add depth.  (Some places have three layers of this foam tape!)  I tied bakers twine around the spine and I also used Darice stickers to lay out the title. 

For the inside pages I used a combination of papers, stickers and ribbon to embellish each page.  Since I want this to be an easy project to put together this Christmas, I wrote the dimensions of the photos in the locations they will go. 


Punch the Bag: Using the We Are Memory Keepers Gift Bag Punch Board punch and fold a gift bag that measures small enough to glue into the back of your album.  If you have young or “energetic” kids, you may consider clipping the bag to the back cover so you can remove it when it is time to pick an activity and then clip it back in when you are done.  (I’m considering this option. J)  
Print and Cut Out the Cards:  Download and print the cards I made or make your own and cut them out and place them in the bag. 
Step Six-Have Fun and Add Photos!

Friday, June 6, 2014

My Mind's Eye Mini Album by Craft Warehouse Design Team Member Amanda De Jong


Hello there! I'm Amanda De Jong with the Craft Warehouse Design Team and I am so excited to be sharing a couple projects with you today! I had the opportunity to create with the My Minds Eye Market Street collection, a mix of Nob Hill and Ashbury Heights, and when I was going over all the product I thought the best way to highlight all the bold patterns and embellishments would be through a mini album.

I absolutely love the touches of gold in these collections. So much so that I wanted to bring even more gold in to my album, but in a more subtle way. One of my favorite things to do with mist is to create a simple watercolor effect on my background paper.


I spray and/or tap my mist on to my nonstick craft mat, spray it with water, then lay my paper over this mist and press down. I especially love doing this with gold spray as you get this gorgeous shimmery watercolor look that is subtle but adds shine. You can do this with a mix of colors as well. Play with different concentrations of mist and water and see how they turn out, it's different every time!

Once my misted papers were dry I cut them down to 4x6 sheets along with several of the Ashbury Heights papers I knew I wanted to use. I quickly went through and lightly tacked my photos down where I wanted them to get my pages in order and ready to punch the holes for my rings.

After that it was a matter of adding more accents of the patterned papers and many of my favorite pieces from the chipboard and die cuts in the collection! We had a huge snowstorm in February that was out of the norm for us. We were used to the occasional inch of snow, so when we were snowed in for 3 days and reached nearly 9 inches it was a pretty exciting and fun time for us! This mini was the perfect way to document that.


When I was done with my album and looking over the pieces of the collection I still had left, my eyes kept falling on the globe chipboard piece from Nob Hill. I knew I wanted to create a layout with that as a focal point. I decided to use my Cameo to cut a design directly on to my background paper so I planned the layout in Studio so I could see where I needed to cut. It comes in handy when you can pull in your photo and build around it, there's no guessing game!


I chose these flags and offset them so that I would just get a peek of the paper behind them.


I did end up changing up the placement of the globe, I love it front and center! And decided not to cut out flags on the photo itself. That's the beauty of pulling a photo in to Studio. You know exactly how it's going to turn out!

So there you have it! I hope you've enjoyed my projects and are inspired to go create! Thanks for looking!

~Amanda

Mini Album Supplies: White Cardstock, Twine, Enamel Dots, Mr Huey Gold, Mint Julep and Opaque White Mists, My Minds Eye Ashbury Heights 12x12 Paper, Label Stickers and Flair Pins, My Minds Eye Nob Hill Chipboard Elements, Washi Tape and Foil Mixed Bag Die Cuts
Layout Supplies: My Minds Eye Ashbury Heights 12x12 Paper and Label Stickers, My Minds Eye Nob Hill Chipboard Elements, Washi and Foil Mixed Bag Die Cuts, White Cardstock, Enamel Dots, "Flags" Hero Arts, Design ID:  #48372 cut file from Silhouette

Friday, April 25, 2014

Graphic 45 Envelope Mini Book by Design Team Member Keri Sallee


Hello Craft Warehouse Friends!! Keri Sallee here and I am so excited to be here with you today. One of my favorite things to make is mini-albums and when I saw what was in my Craft Warehouse box, I knew exactly what I wanted to make.

In my box was: 

Graphic 45 "By The Sea" Paper Pad


Matching "By the Sea" Chipboard 


 Teresa Collin's Basically Essential Stencil in "Scallop"


OTHER MATERIALS:
* Aleene's Tacky Glue
* Modeling Paste
* Acrylic Paint (Navy Blue)
* Tim Holtz Distress Ink (Walnut Stain) 
* 6 x 9 Manila Clasp Envelopes 
* EK Sucess 3-D Dots 
* Fiskars Scissors 


To make the base of your album, grab your envelopes, glue and scissors. You can make this album with any number of envelopes. For the completed project, I used 4 envelopes (for this sample tutorial I used 3.)

Cut the flap off of one of the envelopes and set that envelope aside. 


Taking the rest of your envelopes, lay them end to end, with the opening pointed towards the left. 


Apply adhesive to the envelope flap on the right and then lay the next envelope on top. Be careful not to cover the flap crease (it will make it difficult to close your album if you do.) Continue this process until you have used all of the envelopes (except for the one you cut the flap from.)


Now grab the trimmed envelope and turn it so that the opening is facing the right. Add adhesive to the envelope flap and adhere your final envelope to the beginning of your string of envelopes. 


Fold your album in an accordion shape. 


For your front, cover your front envelope with the Graphic 45 Seashell paper. To make the scallops on the cover, mix equal parts modeling paste and acrylic paint. Using a small spatula, scrape your mixed through the Teresa Collins Scallop Stencil. (NOTE: This stencil is thin, so if you have a stencil adhesive available it is very handy.)


To complete your album, fussy cut shapes of your choice and add chipboard shapes from the Graphic 45 Chipboard embellishments. I chose to use Tim Holtz Distress ink in Walnut Stain to give it a vintage feel and EK Success 3-D dots to add dimension. 


The envelope pockets allow for TON of extra space for journaling and pictures!


I hope you have enjoyed seeing this project come alive as much as I've enjoyed making it. I can't wait to see how it inspires you!

Until next time friends...remember to make your art intention...not an afterthought.

XOXO,

Friday, March 28, 2014

We R Memory Keepers Instagram Album by Design Team Member April Joy Hill


Hi everyone! It's April Hill, here again for Craft Warehouse.  I got really lucky and was able to play with some newly released goodies from CHA Winter that are already at Craft Warehouse!  The new items from We R Memory Keepers are awesome!  The 4x4 Instagram Album is SO adorable and the Inky Rose collection was actually my favorite from their new collections, so yay!

DSCN4389_800

In case any of you want to pick up the album, but aren't sure how to get photos sized to fit the pockets, here's a little tutorial on how I created a 6x4 print using an iPhone app called PicFrame and printing my photos wirelessly to my Canon Selphy printer.

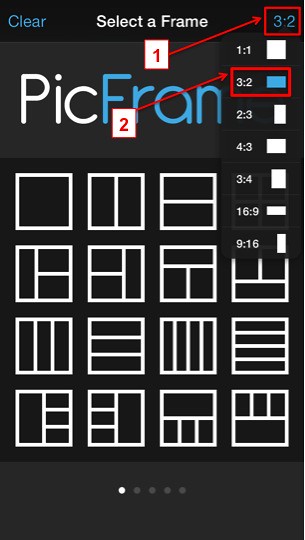
On the PicFrame start screen, the top right button defaults to 1:1, but if you click that button, you can select 3:2 (which is equivalent to 6x4).

1

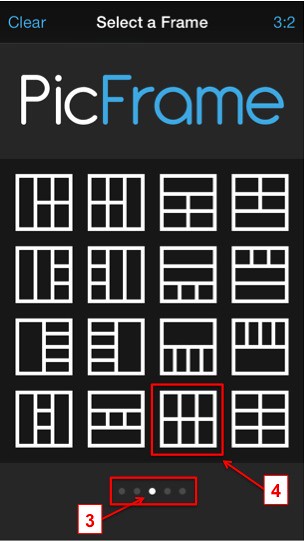
For 2x2 sized photos, swipe your screen from right to left to get to the third page of templates and select the template that has space for 6 photos.

2

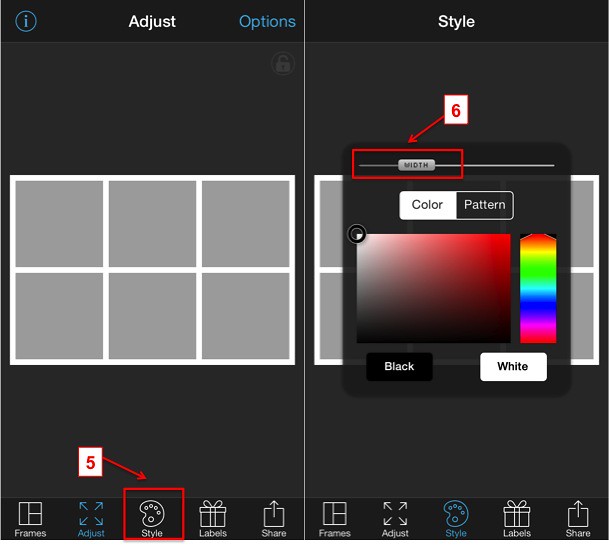
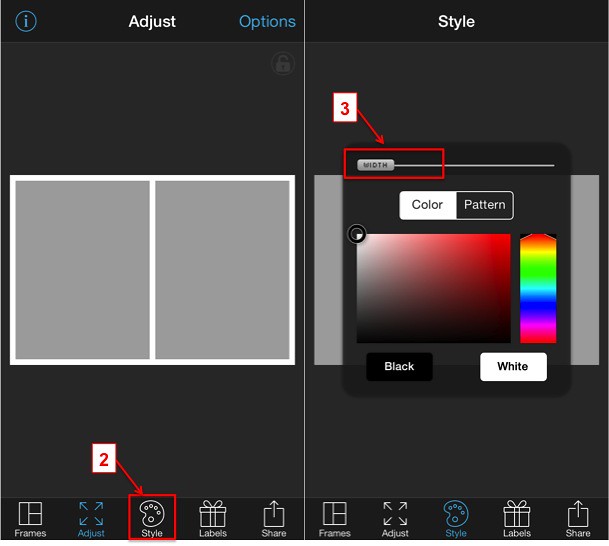
This template defaults with white borders (which I leave for my photos), but if you wanted to remove the borders, you can click the "Style" button on the bottom and slide the "Width" lever all the way to the left (and if you wanted to add a thicker white border, you can slide it to the right).

3

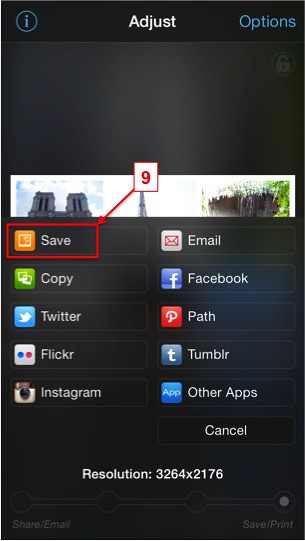
Double click into the gray areas of the template to add your photos.  Once you have all 6 photos selected, click the "Share" button to save the photo to your camera roll so you can print it later.

4

5

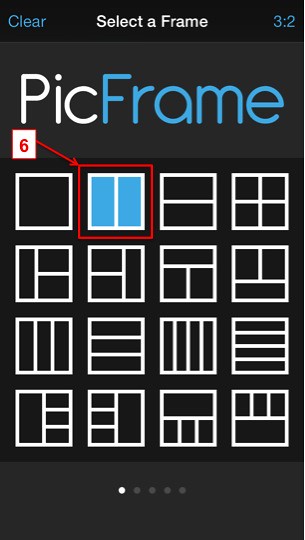
For 4x4 sized photos, you will do something similar, but from the main screen, you will select the two-photo template from the first page of templates.

6

For 4x4 photos, I don't add a white border, so I move the "Width" lever all the way to the left.

7

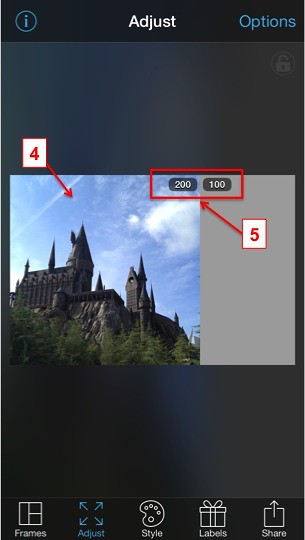
Here is where it will get a little tricky with this sized photo.  After putting your photo in, you want to move the horizontal line so that it sizes the photo to 200-100.  This is roughly equivalent to 4x4.  [With a Canon Selphy printer, the photos are slightly smaller than 6x4, so it's not going to be perfect, but I promise.. it's close enough! ;)]

8

From there, you would save it like you did the 2x2 template.  And hopefully you found that tutorial helpful, so you can head on over to Craft Warehouse to purchase a We R Memory Keepers album for yourself!

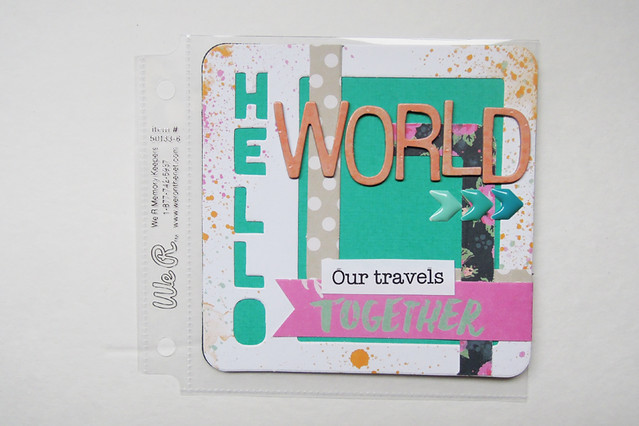
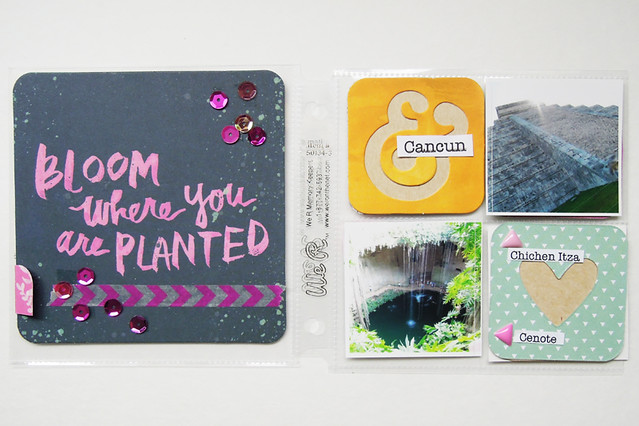
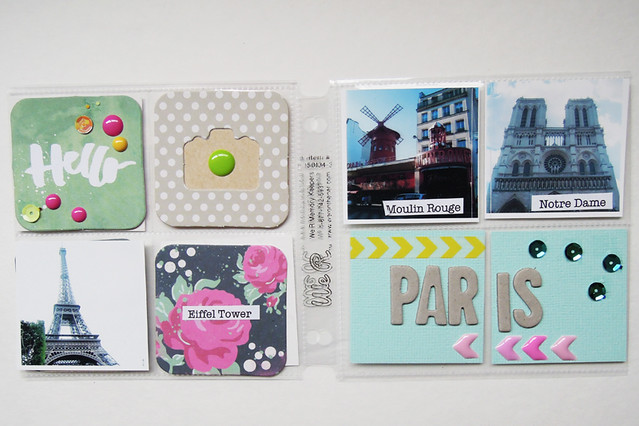
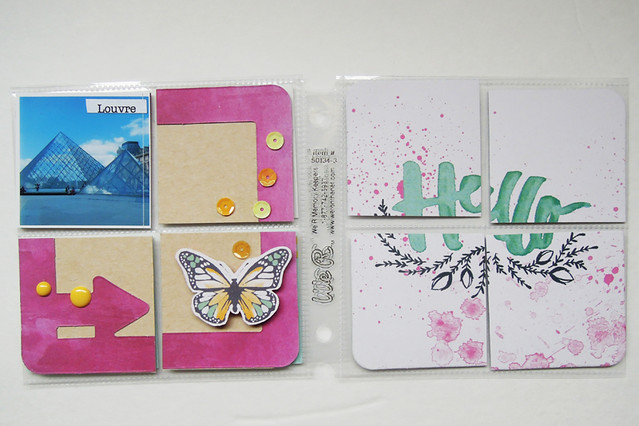
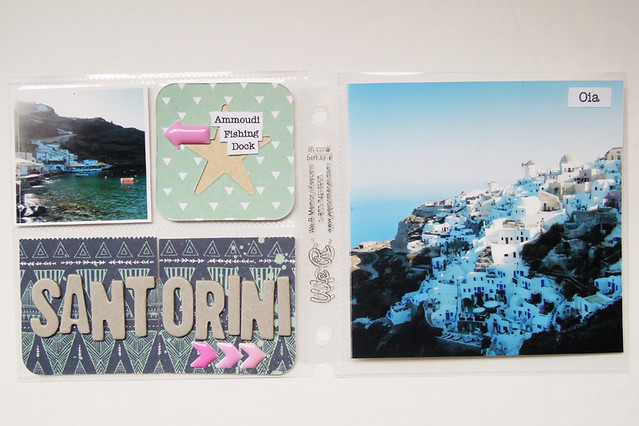
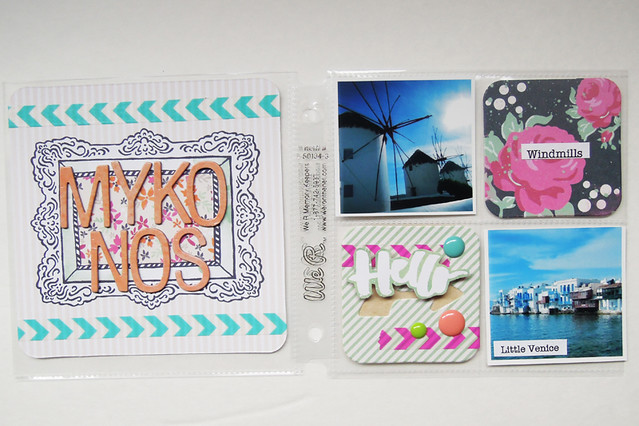
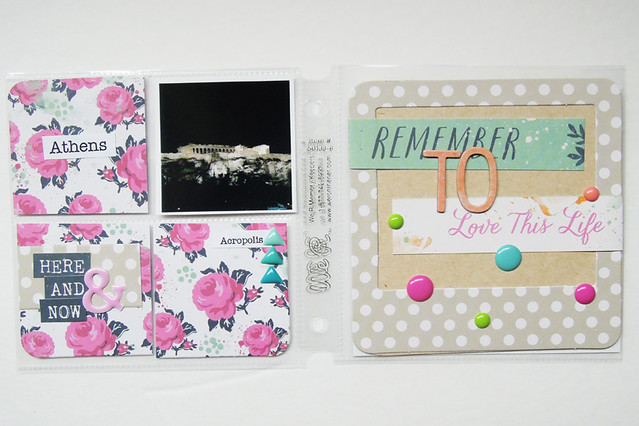
And now, here is the start of an album I put together to document the places my husband and I have been lucky enough to travel together to!  It's titled "Hello World - Our Travels Together."

For the cover page, I loved the die-cut journaling cards that came in the Inky Rose collection, so I used the die-cut "Hello" as a starting point.

DSCN4397_800

DSCN4399_800

DSCN4400_800

DSCN4403_800

DSCN4405_800

DSCN4406_800

DSCN4411_800

Thanks for stopping by!  I hope you enjoyed my little album as much as I loved putting it together! :)

LinkWithin

Related Posts Plugin for WordPress, Blogger...
Blogging tips