Showing posts with label stamping. Show all posts

Tuesday, November 11, 2014

Lawn Fawn Snow Day Holiday Cards


Hi Crafters! Amber here and I'm so excited to be designing for Craft Warehouse! I have three very different Christmas cards to share with you today. I got to play with items from Lawn Fawn's Snow Day collection. This line is just way too cute! First up is this layered patterned paper card.


Lawn Fawn Snow Day Holiday Cards @craftsavvy @lawnfawn #craftwarehouse #card #holiday #christmas #diy


I love layering patterns like this and working with paper kits makes it easy because I know all the papers coordinate. I grabbed three different papers and cut some panels to layer on my card base. My card is a standard A2 (4.25"x5.5") so I cut the panels at 3.75"x5", 3.5"x4.75", and 3.25"x4.5". Now if you have some perfectionist tendencies then by all means line these up and make them completely concentric and perfectly centered! I, on the other hand, like them a little wonky and askew. For the sentiment I cut down one of the tags from this sheet and inked the edges with Distress Ink in Pine Needles (it matches that dark green paper perfectly!) I thought it needed another punch of color so I stuck in that red and white paper strip along the edge. Then just finished it off with a piece of flair from the same kit.


My next card is a little more classic.


Lawn Fawn Snow Day Holiday Cards @craftsavvy @lawnfawn #craftwarehouse #card #holiday #christmas #diy


I loved this Merry and Bright image from this sheet so I made it the star of the card. I centered it on a white panel, tied a bow around it using this fun Snowflake ribbon from Darice and adhered it to a black card base so it would all pop. To finish it off I added this row of gems from Triveni Craft. These things are so easy to use. They already have adhesive and they are in rows (already lined up!) so I just needed to cut the length I needed and stick it down.


And my last card might just be my favorite. I plan to mass produce a few to mail out. These are perfect for mailing since they are so flat (no flair or bows to hike up the postage!)


Lawn Fawn Snow Day Holiday Cards @craftsavvy @lawnfawn #craftwarehouse #card #holiday #christmas #diy


I used a panel of watercolor paper cut down to 5.25"x4". Using the Snow Day stamps from Lawn Fawn and clear Versamark ink I stamped the sentiment and both snowflakes on the panel. Then I heat-embossed it using Zing Clear embossing powder. I hope you can see it in this photo. 

Lawn Fawn Snow Day Holiday Cards @craftsavvy @lawnfawn #craftwarehouse #card #holiday #christmas #diy
 
Next I made my faux watercolor palette. I used Tim Holtz® Distress Ink in Peeled Paint and Pine Needles. You will need either a craft mat or an acrylic stamp block (just something smooth) to smear some ink on. I placed white cardstock under my acrylic block just so you could see it better.

Lawn Fawn Snow Day Holiday Cards @craftsavvy @lawnfawn #craftwarehouse #card #holiday #christmas #diy


Then using a Niji waterbrush (these things are great by the way, get one immediately! The water is IN the brush. You don't need a cup. A cup that will inevitably be spilled all over your craft table and ruin something. You'll thank me! They are also great for traveling or art journaling on the go.) pick up some of the ink and begin brushing the lighter color on the top half of the panel. Then brush the darker color on the bottom. Overlap the two colors in the middle to blend. If your inner perfectionist is screaming for straight lines then feel free to mask off a rectangle with some washi tape before you paint to make her happy.

Lawn Fawn Snow Day Holiday Cards @craftsavvy @lawnfawn #craftwarehouse #card #holiday #christmas #diy


Now you have this wonderful watercolor resist. Your friends and family will be so impressed and won't know how easy it was to do!


Lawn Fawn Snow Day Holiday Cards @craftsavvy @lawnfawn #craftwarehouse #card #holiday #christmas #diy


I decided to attach this with foam tape to a black card base for some contrast. It would also look great on a coordinating green card as well.


If you still haven't seen enough of this Snow Day collection, stop by my blog for even more card ideas from this kit. Thank you to Craft Warehouse for having me!

Thursday, October 16, 2014

Lawn Fawn Sending Hedgehugs Card


There is nothing like getting a handmade card! Handmade cards are something different. After all, what makes a more beautiful keepsake than a personalized handmade holiday card? This darling hedgehog card will make anyone that you send it to smile!

Coloring Technique: Coloring images in with color pencils first- using a medium to heavy pressure and color in small circles. This will lay down your base color- and give a slightly waxy coat. Then use Tombow brush markers in same colors to layer over the top- the marker glides over the waxy build up allowing you to blend the marker with the pencil resulting in a blended finish that has depth. It’s fast, easy, and satisfying!


Lawn Fawn Hedgehugs Card @craftsavvy @lawnfawn #craftwarehouse #lawnfawn #card #diy

Supply List

• PA-White A2 cards and envelopes
• PA- light blue cardstock
• PA- medium blue cardstock
• PA white smooth cardstock (for stamping/diecutting)
• tape runner and foam tape
• Scissors
• Darice red/white bakers twine
• EK success heart puffy stickers (or similar)
• We R Quick Stick tool
• We R Evolution die cutting machine
• Lawn Fawn- hedgehugs dies
• Lawn Fawn- hedgehugs stamps/ acrylic handles
• Versafine black ink pad
• color pencils (tan, brown, pink)
• Tombow brush markers (tan, light brown)

Directions

1. Cut light blue textured cardstock to 5” x 3 3/4”

2. Cut medium blue textured cardstock to 5 1/4” x 4”

3. Die Cut snowy hillside with stitched dies. (start with a 5 1/2” x 2” strip of smooth cardstock

4. Use a piece of white cardstock 3” x 2” and stamp the 2 different hedgehogs with black Versafine ink. Then color. First use color pencils (medium-heavy presuure- pushing hard enough in small circles so that you get a sort of waxy build up) color bodies light tan, and the quill area in brown. Can add a little pink on ears/cheeks) Now take similar color tan Tombow brush marker and color over the color pencil in same shade. The marker will blend with the color pencil resulting in a blended finish that looks professional! Repeat with the brown color on the quill area.

5. Next, position the stamped images and dies to be die cut. Use slightly tacky washi tape to secure die in place before die cutting.

6. Use 1 white A2 card, and 1 each of the light and medium blue cardstock and layer to card front using tape runner. Then wrap a double length of red and white bakers twine around card and tie on front. Use scissors to trim ends.

7. Use black Versafine ink to stamp the ‘sending hedgehugs’ to snowy hillside or stamp inside of card
instead. Use tape runner to layer snowy hillside diecut to bottom of card.

8. Finish!- Use foam tape to add stamped, colored, and die cut hedgehogs to card front. Add a mini
heart sticker.

Monday, September 1, 2014

Game Day Bottles


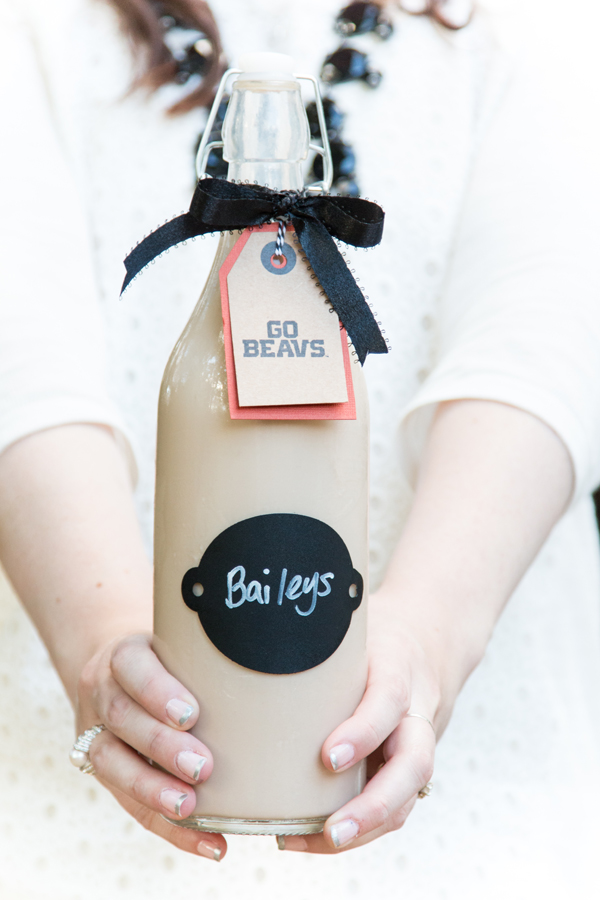
Happy Labor Day! When a friend came over with a thank you gift for us, I knew I had to share it! He brought over a bottle of homemade Bailey's Irish and Creme. Oh. my. dearie. The bottle is what got me (hey, blame the crafter in me)! It was a snap lid bottle and I thought right away of Craft Warehouse's snap bottles and got excited about the kind of gifts I could give this fall! Craft Warehouse carries these 12" beautiful clear bottles so you can see what is inside. They also make the best backdrop for a belly band, label, or tag and are food safe!

Homemade Bailey's Irish and Creme @craftsavvy @createoften #craftwarehouse #masonjar #diy #party

I also knew this would make the best drink to bring over to a friend's house for Game Day! Here is the supply list to create your own!

Homemade Bailey's Irish and Creme

2 cups of whiskey

2 cups of vodka

2 Tbsp instant coffee

2 Tbsp chocolate syrup

2 cans sweet condensed milk

2 cups heavy cream (can use 1% fat free milk)


In a large stock pot, combine ingredients and then carefully pour into bottle. Refrigerate. This recipe can fill one bottle with a little extra for you to drink at home.

Here is a Vegan Non Alcoholic version I found to share.

Decorate the Bottle

Supplies:

1 12" Snap Lid Bottle
WeRMemory Keepers Homemade Die Cut Set
Chalkboard Sticky Back Paper
American Crafts Ribbon and Twine
Card Stock
Bistro Chalkboard Marker
Clear Snap Color Box Rubber Stamps (available in NW teams)
Kraft Tag
Ranger Ink Archival Black Ink
Sizzix Big Shot Die Cutting Machine

Directions:

1. Stamp image on to tag. Mat the tag by cutting card stock a little larger than the tag and keep together. Punch a hole in the card stock at the same place the tag's hole is in.

2. Tie bow to the top of the bottle. Run twine through the tag and tie to the back of the bottle and let the tag hang in front.

3. Die cut the label from the chalkboard sticky back paper. Use the marker to write on the chalk board paper. (Or use pre-cut chalkboard labels *)

4. Place the label on the jar making sure the jar is dry before applying.

Give and drink!

* Removable Chalkboard Labels 50% off regular prices (reg. $4.99) until September 21st, 2014

Tuesday, July 15, 2014

Lawn Fawn Critters in the Forest Card


I found out while I was making these cards that paper piecing and coloring can be very relaxing. I used Lawn Fawn stamps on watercolor paper so that my coloring would be easier. Tim Holtz Distress Markers worked perfectly to color images once, then for shading I colored the area again with the same marker.

Tip: Use an Archival Ink to prevent bleeding when coloring your image.


Supplies:

Paper by Doodle Bug Design and Bo Bunny Press

Stamps -  Lawn Fawn Critters in the Forest (animals and forest scene), Sophie's Sentiments (Let's Celebrate), and Bannerific (banner and birds)

Pop Up Adhesive

Quickie Glue Pen

Ranger's Archival Ink in Black

Directions:

See how I pieced the card together right here!


Would you like to design for Craft Warehouse? Who we are looking for: Artists (including scrapbooking, pocket page scrapbooking, card making, stamping, jewelry making, paper crafts, quilting, fiber artists, fine artist, painter, or DIY crafter) within the contiguous United States. Click here to find out how to apply!

Tuesday, July 8, 2014

Lawn Fawn S'more Party Favors


Get in the mood for summer S'mores with this darling new set of stamps by Lawn Fawn! When I saw this set, I freaked out. Really. I think it is my favorite set of all time. It has the cutest sentiments that can be mixed around for a variety of cards and tags. I created S'more favors (really, aren't they cute?) using Tim Holtz Distress Markers to color the stamps in!


Lawn Fawn Smore Favors @craftsavvy @createoften #diy #party #favors #smores #glamping

Supplies:

Lawn Fawn Love You S'more Stamp Set
Kraft Tags with Twine
Archival Black Ink by Ranger
Watercolor Paper
Tim Holtz Distress Markers - Rusty Hindge (gram cracker) and Vintage Photo (chocolate)
Foam Popup Dots
Treat Bags
Gram Crackers
Chocolate
Marshmallows 

Lawn Fawn Smore Favors @craftsavvy @createoften #diy #party #favors #smores #glamping

Directions:

1. Stamp s'more image and smile on to watercolor paper. Color in with Distress Markers. Cut out.

2. Stamp sentiment on to Kraft Tag. Place s'more on the tag using a pop up dot. Place string on the finished tag.

3. Fill treat bag with two gram crackers, a square of chocolate, and a marshmallow. Tie the bag closed with the string.

4. Try to give them away before they are consumed.

Thursday, December 5, 2013

Lawn Fawn Holiday Cards by Design Team Member Michelle Wofford

                                                                          Hey there, Michelle back again to share a couple more fun holiday cards.  I am loving these fun stamps and coordinating die sets from Lawn Fawn.


Before you start you want to gently bend the individual pieces of the die to separate them.  If you have some pliers you can trim the excess metal pieces off the edges of the dies but they do not effect the end results of the die cut.


Start by making a card base from card stock, trim cardstock to 9" x 6" and score down the middle of the 9" side to create a card that is 4 1/2" x 6".  Trim a piece of patterned paper 4 1/2" x 6" for front of card.


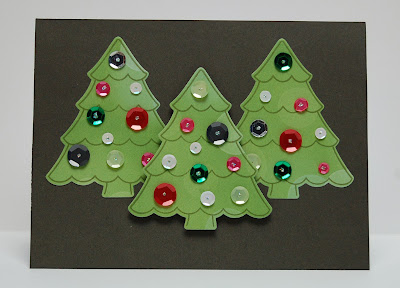
On a piece of green patterned paper stamp several trees with the tree from Lawn Fawn's Trim the Tree stamp set.


Lind up the tree shaped die with the stamp image and run through a die cut machine such as the big shot. 


Isn't it amazing!  The die fits perfectly around the stamped image to create awesome stamped die cuts.  Adhere two trees to the card base and attach the third in the center with a pop up adhesive.


Now to decorate the trees with this coordinating set of mixed sequins.  There are a variety of sizes and colors, including some snowflakes.


Randomly attach the sequins to the trees with either a min glue dot or a small dab of a wet adhesive.  Once attached put a little dab of stickles to add a little sparkle to the centers and to prevent any glue sticking to anything you don't want it to.


 Christmas Mantel Card


And last but not least here is a fun Christmas scene card. 

Start by creating your card base 4 1/4" x 10" and score down the middle of the 10" side.  You want the opening on the bottom of this card so it opens up and not to the side.


To create the brick for the fireplace and mantel trim a piece of cardstock that is 4" x 3 1/2".  With the 3 1/2" side parallel to the top score at 2 3/4" and 3" pre-fold these two score lines.  With the same side up also score at 1/2", 1", 1 1/2" & 2 1/2".


Flip the cardstock so the 4" side is parallel to the top.  Score every other row at 3/4", 1 1/2", 2 1/4", 3" & 3/4".


Now starting on the second row, score every other row at 3/8", 1 1/8", 1 7/8", 2 5/8" & 3 3/8".


This is what the front side of the cardstock should look like now.


Next stamp and die cut the stocking and garland pieces.  These work the same as the trees earlier, just stamp and line up your die and you have perfectly die cut stamped images.


Fold your cardstock so the scored flap hangs over the front.  I put some pop up adhesive in a few spots under the flap to help support it.  Before this though I attached the garland and stockings with a dab of adhesive.


Here's what it looks like with a double stack of pop up adhesive to support the mantel piece.


Stamp, die cut and attach the gifts along the bottom and trim the Merry Christmas portion from one of the tags from the tag sheet.  Attach the fireplace to the card and Merry Christmas piece to card base.

Happy Holidays and thanks for looking, I hope you are inspired to create some of your own holiday cards with this awesome collection from Lawn Fawn. 

Thursday, April 18, 2013

Fancy Pants Designs Stamp & Paper Canvas


We all love Pinterest, but it's time to stop searching for ideas and start creating in real life!

Use our projects as a tool: replicate the project entirely, tweak it with your favorite colors and embellishments or use it as a starting point for something even more amazing! No matter what your 'crafting' skill level, there's a project here for you!

Layer your favorite patterned papers and use a simple stencil to make a statement! Finish the look with an easy-to-use stamp border, such as the Inkadinkado Stamp Gear Collection by EK Success, that gives you perfect placement every time. 

Supplies:  
  • 12"x16" White Canvas
  • Acrylic Paint: Blue Velvet, Sea Glass & Coral Blush
  • Fancy Pants Designs "Trend Setter" Paper Collection and Quote Stencil
  • Inkadinkado Stamping Gear Starter Kit (heart stamp)
  • All Night Media Large & Small Pop Dots
  • Pioneer Embellishment Glue Sticks
  • TomBow Permanent Dots Adhesive Glue Runner
  • 3 - foam brushes
Watch this video to see how easy it is to use the Inkadinkado Stamp Gear Collection by EK Success!


* Entire Stock of Stamp Gear Collection by EK Success is 30% off regular prices until May 28th, 2013!

Get our free Fancy Pants Designs Stamp and Paper Canvas project sheet on our website here!

Wednesday, April 3, 2013

Dear Lizzy Lucky Charm


When given the challenge to make some simple but fun cards for Craft Warehouse, using the NEW Dear Lizzy's Lucky Charm Collection for American Crafts, I knew I wanted to use these darling jars and quotes from the Card Stock Die Cut Pack.


To save paper, I used a pre-made 5x7 card and cut the following from the 12x12 paper pack:

Pink Paper - 1 1/2" x 5 1/2"
Pink Floral - 3 1/2" x 5 1/2"
Navy Floral - 5" x 1 1/2"

After gluing my papers in place, I used pop up dots to add lift to the Card Stock  Quote and Jar Die Cuts. Using the gold DIY Twine by Crate Paper, I tied a bow around the top of the jar. Of course I had to use the "Love You" stamp from the Lucky Charm Clear Acrylic Stamp Set and make a little tag from left over scrap paper from the collection. I just placed glue on the bag of the tiny tag and tucked the top under my bow so it looked like it was hanging in place. 

Making cards can be quick and simple with Lucky Charm!

Tuesday, March 19, 2013

Color Me Happy by Guest Designer Andrea Ancich

Hi there Craft Warehouse blog readers, Andrea Ancich here. I have the wonderful privilege of being a guest designer this month. It was so fun to serve and create last year during my term on the design team.  What I love about Craft Warehouse is the fun new products they get in. I get to bring you some fun projects using the NEW Color Me Happy line from Glitz Design. I first saw this line at CHA this winter when i went. I was instantly drawn to the fun colors, washi tape and embellishments. 


This card was super quick and easy to make.I used a card taht was 8.5x5.5 folded in half. Attached some patterned paper at the bottom. I cut one of the die-cut cards down to fit at the top of the card. I then used the wood washi tape to cover the seam. I pop dotted the hello and added the simple arrows. Viola! a cute easy card!


I had fun with this last layout. It is an 11 x 8.5. Next time you're stuck, try a different size layout to get the mojo flowin'!


I altered a little $1 clipboard.... 


I started out with all of these goodies...


I made some marks with my pencil on where I needed to cut so the paper would fit around the top of the clipboard.


After cutting the paper, I used a liquid adhesive and adhered it to the clipboard.


 I then covered the back of the clipboard.


I used some clear adhesive to attached this hello piece. I also used an adhesive eraser to get rid of the extra glue that was hanging out.


Then I added some washi tape. To get the effect that I want with my washi, I usually double or triple up the layers to get a bolder more concentrated colors.


I added some more embellishments....


And this is the finished project.....


Thanks for looking!

Andrea


LinkWithin

Related Posts Plugin for WordPress, Blogger...
Blogging tips