Showing posts with label paper. Show all posts

Saturday, October 3, 2015

Spooky Halloween Blocks


Spooky Halloween Blocks @craftsavy, #craftwarehouse, #Halloween, #decor
 
Halloween Blocks Created By Jessie at our Gresham Store
 
Supplies
  • 1 - 6ct. unfinished wood block set
  • Halloween Paper of your choice
  • Embellishment Glue Stick
  • Darice Chipboard Letters
  • Extra Fine Glitter (color of your choice)
  • Acrylic paint to match the glitter colors
  • Black Acrylic paint for the blocks, back and sides
  • Black Marbleizing Spray
 

Directions:
  1. Start with painting all your blocks with black acrylic paint.
  2. Let dry and set aside.
  3. Cut paper to fit the front of each block then glue to the block using the embellishment glue stick. Smooth out paper and press down on paper so it adheres well to the block.
  4. Paint the chip board letters with acrylic paint.
  5. Glittering Letters: use a brush to spread Martha Stewart glitter glue, then sprinkle glitter. Let dry then give it another coat of glue. Once it dries completely it will be clear and your glitter will still sparkle but it wont fall off!
  6. Spider Web Letters: Once your acrylic paint dries take letters outside and spray them with wed spray. You will love the way it turns out!


Spooky Halloween Blocks @craftsavy, #craftwarehouse, #Halloween, #decor
 

Friday, June 19, 2015

Mini Teepees


Mini TeePees! So cute! So Easy!


Supplies:
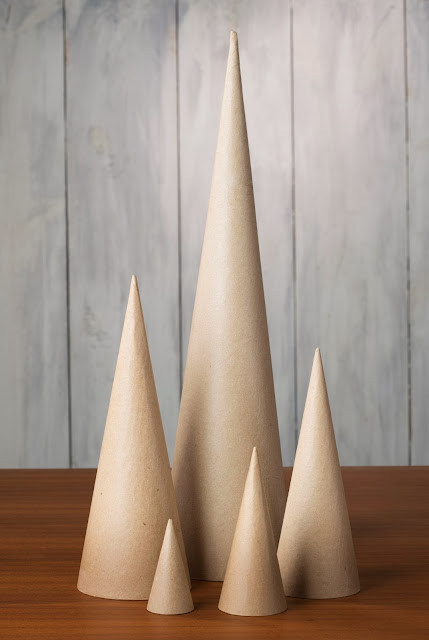
  • paper mache cones - choose a few different sizes for interest
  • pattern paper and embellishments of your choice (we like the Journey Collection by Crate Paper) 
  • 3 in 1 Beacon glue
  • Jute cording
  • Craft knife
  • wooden dowels


Directions:

  1. Using craft knife- cut the top points of the cones. 
  2. with a pencil, draw a rounded opening at base of cone and use craft knife to cut out
  3. Select papers of your choice to wrap cones- adhere with 3in1 Beacon glue
  4. tie together 3 wooden dowels and place inside cone so the tied together ends are just poking out the peak of your cones. (secure in place inside of cone with 3in1 Beacon glue)
  5. Now use 3in1 Beacon glue to add the jute trim around base of cone, around opening, and around the top of your teepee!
  6. Finally add embellishments with 3in1 Beacon glue. 


Monday, February 2, 2015

Butterfly Punch Canvas Art


We have projects for every type of crafter in this special blog series. We will show you how we did it, and what you need to do it, all found on the shelves of your local family owned and operated Craft Warehouse stores.

You can almost see the butterflies moving across this Butterfly Canvas Art. This is so creative and easy!


Butterfly Punch Canvas Decor @craftsavvy @sarahowens #punches #home #decor #canvas

Simply punch out scrapbook papers and glue to the canvas. Great project for kids to do as well, and they can choose their own papers and punch designs!

* 50% off entire stock of Canvas regular prices and 30% off of regular prices of Punches until February 23rd, 2015

Tuesday, November 18, 2014

12 Days of Christmas Mini Activity Album

I love Christmas.  I love the giving, the conversation, the good will and everything that goes with it.  As a mother of two, I have decided I want my children to know that Christmas is more than parties and gifts.  That is why this year I have created a place to record and encourage my kids to give this year.  

This album has 24 Christmas activities for our family to celebrate the Christmas season.  The activities range from baking cookies to random acts of Christmas kindness giving hand warmers and cocoa to volunteer bell ringers outside your favorite store.  These ideas slip into the cutest little bag I created to clip into the back of the album and my kids will take turns drawing a random activity for twelve days. 

 If you would like a copy of these ideas, you can download them here:
Random Acts of Kindness Cards:


Family Activity Cards:
I created this album before the season starts this way as we complete each activity we can take a photo or two and place them in each of the twelve pages.  The Authentique Three Christmas’ in One paper pad made this project easy by giving me perfectly coordinated papers, stickers and diecuts all in one place. 
12 Days of Christmas Mini Activity Album @craftsavvy #craftwarehouse #christmas #minibook #diy
I am looking forward to using this little album to encourage my kids to give more than take during this holiday season. Here are the steps to help you create one for you and your family this year. 
Supplies Used:
Authentique Paper Three Christmases in One Paper Stack
Darice Stickerz: Red and Black
Darice Trims: Red Snowflake, Red and Black Glitter
Thickers Black Number
iCraft Super Tape
Grafix Chipboard
Triveni Craft 4mm Red Gems
We Are Memory Keepers Gift Bag Punch Board
Baker’s Twine
Foam Tape
Directions:
Creating the Cover:
Step One:  Decide what size you want your album and cut two squares of chipboard to that size.  Next decide what size you want your spine and cut a piece of chipboard to that size.  I decided my album should be 6 ½ x6” so my chipboard cover pieces were cut 6 ½ x6“ and the spine was cut 1 ¾“x6 
Step Two:  Layout your chipboard pieces with the spine piece in the center making sure to leave a gap between each piece of ¼”.  Measure the length of your chipboard pieces to find the size of your inside cover.  Next add two inches to both the length and the height of the measurement to get a piece of paper the correct length to wrap around the cover.
Step Three:  Cut and splice together a piece of paper long enough to cover the inside of the album using the inside cover measurements you just made.  Then create a piece of paper to cover and wrap around the outside of the album.  I wanted the spine to be a different color than the cover or back so I made the center four inches of my cover piece a different color.  Cut the corners of this sheet diagonally to help give it a finished look after it folds.
Step Four:  Using super sticky adhesive such as iCraft SuperTape carefully place adhesive around the boarders of all your chipboard pieces and carefully fold your paper over gluing down each flap.  Then again place your adhesive around the edges and place your inside piece of paper inside your album. 

Creating the Pages:  
Step One:  Cut two lengths of Darice Trim Ribbon one yard long and using super sticky adhesive glue the ends of the two pieces onto the inside of the spine of the album.  Next cover these ends with another piece of cardstock completely gluing down the edges. 
Step Two:  Cut the base of your pages.  You will need spots for 12 days of activities so I created 12 pages.  I like some of my pages to differ in size so two of those are half pages are two pages have flaps to lift or open.  So basically I cut 8 6x6” pieces, four 3x6” pieces and two flaps to glue onto a 6x6 that measured 4¼x6.”  (*Note:  I thought I would like my pages to be slightly smaller than my 6 ½ x6” cover so my pages are actually 5 5/8 ”x 5 5/8”.  I regretted it later.  So my measurements in my photos will slightly differ.)    
Step Three:  Match up the pages and place one page on top and one page under the ribbon.  Using strong adhesive to sandwich it all together.  Make sure to leave space between each set of pages so that your album folds.  Also make sure you place any half pages you have next to each other or the album will not fold correctly. 
Decorating and Embellishing the Pages and Cover: Using the diecuts an the stickers in the Authentique Three Christmas’ paperpad, embellish the cover and the inside pages of the album.
For the cover I used foam adhesive to layer the diecuts from the paper pad and add depth.  (Some places have three layers of this foam tape!)  I tied bakers twine around the spine and I also used Darice stickers to lay out the title. 

For the inside pages I used a combination of papers, stickers and ribbon to embellish each page.  Since I want this to be an easy project to put together this Christmas, I wrote the dimensions of the photos in the locations they will go. 


Punch the Bag: Using the We Are Memory Keepers Gift Bag Punch Board punch and fold a gift bag that measures small enough to glue into the back of your album.  If you have young or “energetic” kids, you may consider clipping the bag to the back cover so you can remove it when it is time to pick an activity and then clip it back in when you are done.  (I’m considering this option. J)  
Print and Cut Out the Cards:  Download and print the cards I made or make your own and cut them out and place them in the bag. 
Step Six-Have Fun and Add Photos!

Wednesday, October 22, 2014

Holiday Paper Mache Cones


Paper Mache Cones are perfect no matter the season! These Christmas cones are perfect for a mantel, holiday craft night, or fun gift! Make them with your girl friends or children! It is fun for the whole family!

Holiday Paper Mache Cones @craftsavvy @sarahowens #craftwarehouse #papermache #cones #christmas #diy

Santa Cone

Supplies:

A small, medium & large paper cone.
Red acrylic paint
Martha Stewart glue & fine red glitter
1 yard 1” black ribbon
1/4 yard 1/2” black ribbon
2 yards of white marabou
2 packs of Darice clear square rhinestones
Tools
Scissors
E-6000 glue & glue gun

Directions:

1. Paint the cones with red acrylic paint.  Set aside and let dry.

2. Once completely dry...take the Martha Stewart glue and apply on cone.  From there, coat in glitter.  Sprinkle off excess.  Set aside and completely dry.

3. Take your black ribbon.  Wrap around the middle of each cone.  Glue the ribbon with E6000.  Let it dry.

4. Place rhinestones on card stock paper in square formation.  Cut paper around the rhinestones to create the buckle.

5. Take white marabou (or a boa) and cut to fit the bottom of the cone.  Use up top!  Glue on and then dry!

Christmas Tree

A small, medium & large paper cone.
Christmas paper with 10-12 sheets of paper
Wood Stars
Gold glitter
Martha Stewart Glitter Glue
Red Acrylic Paint

Directions:

1. Paint the cones with red acrylic paint.  Set aside and let dry.

2. Take the scrapbook paper and cut into strips.(3”long by 1/2” wide for the large cone), (2 1/2” long by 1/2” wide for medium  cones) (and 2” long by 1/3” wide for small cones).

3. Make a loop with the paper strip.  Glue gun.

4. Glue each loop, on to the cones.  Let dry.

5. Coat the wooden start with Martha Stewart glitter glue.  From there, sprinkle gold glitter and shake off excess.

6. Enjoy your new paper holiday tree!

* 50% off Paper Mache Cones until October 27th, 2014

Friday, October 10, 2014

Authentique Spirited Origami Clock and Card by Craft Warehouse Design Team Member Danika Hunt


I've been making these Origami clocks for years, out of everything from wallpaper to vellum. I love to teach this craft to friends, so I'm excited to give the readers on this blog the instructions as well! It's truly a completely customizable decor piece, and is way easier to make than it looks. In addition to the Origami clock, I'm including ideas on a pop-up card using the same Origami folds as the clock. Origami isn't just paper cranes or airplanes, and once you get the hang of a few basic folds, you can incorporate origami folding into lots of other paper crafts.

Origami Clock

Supplies:

*4 sheets of patterned paper, 2 each of 2 patterns. I used paper from Authentique's "Spirited" collection, along with the sticker sheet from the collection for the "numbers".
* A bone folder for crisp folds. I used the one that came with my Martha Stewart Scoring Board.
* Walnut Hollow Clock Works. Be sure to get a 1/4" shaft. I also always get bigger, better clock hands from the same brand
* Darice "Home for the Haunting" fleece spider net. This can be found in the Halloween section of your local Craft Warehouse
* Darice 8 piece Crafter's Tool Set. You will need the hole puncher and hammer. You will also need a wood or resin block to hammer on top of.
*Aleene's Tacky Glue in either regular or Quick Grab
* 6" mat board or thick chipboard for the back. Either square or round.
*Crescent wrench to tighten clock bolts.
* A heavy book to flatten clock while it dries.

Instructions:

Center Circle-

1. Cut 2 sheets of patterned paper into 6"x6" squares.
2. "Square base" fold each of the 8 pieces. (LINK:http://www.origami-instructions.com/origami-square-base.html) Once you've chosen which side of the paper you want to show, that is the "Right" side. The side you want hidden is the "Wrong" side. Fold Right sides together on the diagonal, and wrong sides together on the horizontal. Crease folds well with the bone folder.


3. Nestle together 2 folded pieces, open ends to the center, and put a little glue under the top flap. Be sure to alternate all the layers. (see photo) Continue nestling and gluing until you've done all 8. (The last one is tricky, make sure both sides layer right)


4. Once it's all nestled and squished together to your liking, let glue dry under a heavy book.

NOTE: I love Aleene's tacky glue for this project because it allows you to move things around for a bit without hardening too fast. Do not use hot glue or a glue runner.


5. After it's dry, glue the web to the front. Center it nicely and match the spiderweb points up with the origami points. Let dry under the book.

Outside Circle-

1. Cut 2 sheets of your contrasting patterned paper into 5 3/4"x 5 3/4" squares.

2. Fold once, diagonally, with wrong sides together.

3. Loosely arrange the triangles in a circle and overlap every other point.

4. Place Center circle on top of this loose arrangement, and then get ready to get finicky! You want a 1/4" between points, and the tip of each center circle point should match the folded edge of the outside circle triangles.  (see photo) Take your time. Only be as finicky as you are comfortable, and remember you are using a wet glue and have some wiggle time.


5. Once arranging is done, lift corners of outside circle and glue where you can. Then lift off center circle, glue some more, and put center circle back on top to secure.

6. Put it all under the book to dry.

Clock Assembly-

1. Glue the 6" piece of mat board or chip board to the back of the clock. Let dry under the book.

2. Take your hammer and hole punch and find the center of the front of the clock. Place over the wood/resin block and hammer away. With the fleece and mat board it will take a bit to get all the way through. Then enlarge the hole a bit more to make it easier to get the clock part through.

3. From the back, shove the clock part shaft through the center and assemble as instructed on the package. Add hands and top piece. I added stickers from the "Spirited" collection pack to the back of the hands, trimmed and glued to fit.

4. Add "Numbers" of your choice to the 12,3,6,9 clock positions. I used stickers from the collection, backed with die cut glitter paper scalloped circles. You can use anything from buttons, brads, flowers, or any other embellishment, as long as whatever you use doesn't obstruct the hands as they go around.


NOTE: The clock parts are not permanently attached. Make clock faces for each holiday or season, or change up your decor, and use the clock parts in each clock face!

Origami Pop Out Card

Supplies:
* Authentique "Spirited" Collection cardstock, die cuts, and stickers.
* American Crafts Printed Adhesive Cork Sheets
* American Crafts Glitter Cardstock
* Bone Folder
* Solid Color Cardstock
* Lifestyle Crafts Nesting Dies * Tombo Glue Runner
* Aleene's Tacky Glue
* A heavy book

Instructions:

Front of Card-

The front of the card can be designed and assembled in an infinite number of ways. The card base is a 6"x12" piece of cardstock, folded in the center. I die cut frame pieces from the cork sheet for each card and used die cut pieces from the "Spirited" Collection with each card, but otherwise they are very different, and the focus on the card is on the origami pop out inside.

Inside-

1. Glue a 5 3/4"x 5 3/4" to each face of the inside of the card with a glue runner.

2. The pop out base piece is cut at 6"x 6".  Do the same "Square base" fold technique used on the clock, but omit 1 diagonal fold.

3. Decorate and embellish as much or as little as you like. For each layer you add to the pop out, be sure to cut it at least a 1/4" smaller than the layer below it, to allow unobstructed creases. Textures are great, i.e. embossing, but pop dots are not recommended, inside the card.

4. Fold origami pop up piece up. Put Tacky Glue on the bottom flat side and center it on the card fold. Put glue on top flat side and fold the card down on top of it. Get that heavy book again and let the card dry underneath.

5. Decorate and embellish your heart out!


Monday, September 8, 2014

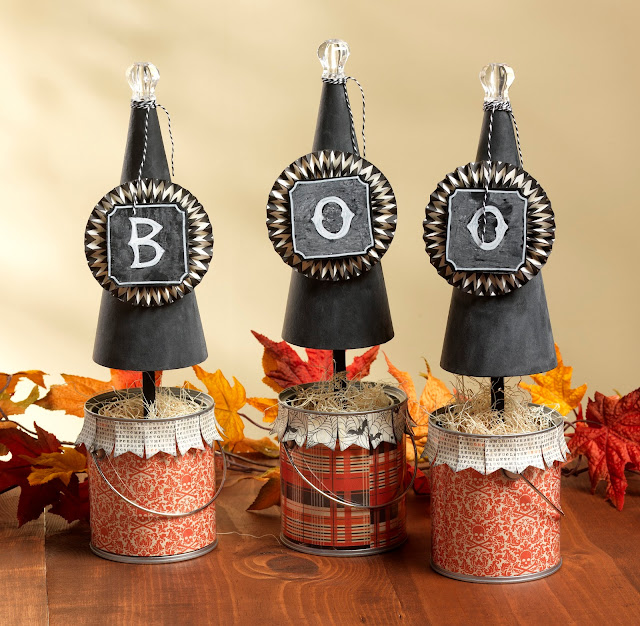
Boo! Cones


Pails make great bases for cone projects. Use glass gems to fill the bottom, or Lima beans the kids won't eat and cover the top with colored thread, or in this case excelsior basket filler.


Boo Cones @craftsavvy @sarahowens #craftwarehouse #halloween #diy #party #decoration


Supplies:

3 - Medium Clear Pails (Arc-21)
3 - Medium Paper Mache Cones
3 - Styrofoam 2 7/8 x 5 7/8 Cones
3 - Styrofoam blocks cut to fit base
3 - Acrylic knobs (Yor-1794)
Halloween paper collection
Tim Holtz Black Soot Distressed Ink
1 package of Decorative Excelsior
Wood dowel 7/16” x 36”
Black & White bakers twine
Chalk Board stickers
Bistro Marker White & Chalk
Score board
E6000 glue, glue gun & hold the foam glue
Black Acrylic paint & foam brush

Directions:

1. Creating the Buckets: cut scrapbook paper into strips to fit the inside of the bucket (4.25” x12”)
place strip inside bucket, use a little glue gun to secure. You will need another piece of paper to fill
in (4.25” x 2”)
2. Cut paper flags to go around the top edge of the bucket. Cut paper strips (1.25”x1”) then cut the
bottom to make the flag shape.
3. Glue flag paper to the top of the bucket with glue gun.
4. Used Tim Holtz Distressed ink pad and dabber to distress the flags
5. Glue Styrofoam to the bottom for your bucket using “hold the foam” glue.
6. Creating the Cones: Cut the tops of each cone about .75” then paint all 3 cones black and wood
dowel
7. Glue acrylic knobs to the top of each cone with E6000 glue.
8. Wrap each cone with bakers twine and tie in a knot or bow.
9. Create 3 Rosettes using the score board (to make cut 2 strips 2”x12” score them
every 3 notches) follow directions on the packaging.
10. Using the Bistro Marker write BOO on each chalk sticker. Rub chalk all over the cones & chalk
sticker then wipe down this will make your surface look like chalk board.
11. Add chalk board sticker to rosette then glue rosette to cones using glue gun.
12. Put Styrofoam cones in side paper cones then push wood dowel into Styrofoam and into the base
of your bucket.
13. Add Excelsior to the base of the bucket to cover up the foam.

* Paper Mache Cones 50% off regular prices and Chalkboard Labels 50% off regular prices (reg $4.99) until September 21st, 2014

Thursday, September 4, 2014

Halloween Paper Cones


We have a paper mache project for every holiday! These Doodlebug Designs cones are perfect for your Halloween party or home decor!

Halloween Paper Mache Cones @craftsavvy @sarahowens #craftwarehouse #halloweeen #papermache #diy #party

Doodlebug Designs Cones

Supplies:

2 - large paper mache cones
10 - 12x12 sheets of patterned paper of your choice.
Marvy scalloped punch 1.5”
Glass 3”candle stick
Chip board
Glue gun
E6000 glue
Gray primer spray paint
Black spray paint
Black glitter blast spray paint.

Directions:

Punch scalloped circles out of scrapbook paper of your choice.
Glue on to cones using glue gun.
Cut a circle out of chip board to fit in the base of your large cone. Glue circle into cone using a glue gun.
Spray the glass base with gray primer, once dry spray it with black spray paint, then glitter blast!
Attach the candle stick to the base of your cone using E6000.

Witch Hat

Directions: 

Cut 12x12 chipboard into a circle with a craft knife. (Tip: Use a plate for a template.)
Spray paint the cone and chipboard bottom.
Spray Black Webbing Spray over the top of the painted cone.
Glue base to cone using Beacon's 3 in 1 adhesive.
Add embellishments.

* Paper Mache Cones 50% off regular prices until September 21st, 2014

Tuesday, August 12, 2014

Dream Medallion Wall Hanging


Hi Craft Warehouse fans, Michelle here, and I’m so excited to be a part of the 2014 Craft Warehouse Core Design Team. Today I’m sharing a project that is great for a home décor piece or as a fun decoration for a birthday party or bridal shower. Follow along to see how you could make one of these awesome pieces for yourself, using Echo Park's Summer Bliss collection available in stores!


Dream Medallion Wall Hanging Tutorial @craftsavvy @mgddesigns #craftwarehouse #party #wedding #photobooth #diy

Today I will share with you the process I used to create the letters as well as how to create the various size medallions. Let’s start with the chipboard letters.


These chipboard letters from Paper Accents are perfect for large projects like this wall hanging or banners. They are so versatile and can be customized in many different ways. You can even emboss them with embossing folders. For this project I started by painted the bare chipboard letters with a lime green acrylic paint.


Once the paint dried I added a second coat to make sure I got good coverage. After the second coat dried I added a layer of lime Stickles to the top to add glitter. Stickles is a great way to add glitter to projects, it’s quick and simple and when it dries you don’t have to worry about glitter shedding from your project.


Here’s a closer look at the finished letters. I love the how the Stickles add just the right amount of shimmer to this piece. Now that the letters are done let’s look at how to make all those medallions.


These medallions can be made any size you want. You will need two strips of patterned paper that are 12” long, the width of the strips will determine how large or small the medallions are. The largest I made used two strips that were 3” x 12”. I also made them in the following widths, 2 1/2 ” x 12”, 2” x 12”, 1 1/2 ” x 12” and 1” x 12”. The smaller the width of the strips the tighter the medallion will look. Regardless of the size of the medallion the process to create them is the same.

Starting at 1/2” and with the paper with the pattern face up, use a scoring tool to score at every inch, so ½”, 1 ½”, 2 ½”, 4 ½” and so on. When you get to the end flip the paper over so the back side is up and score at every inch starting at 1”. By flipping and scoring every other ½” this will create “hills”and “valleys” and it will help with the accordion folding later. Repeat the scoring on the second strip, but start with the back side up and finish with the front of the paper face up.


Once your scores are made, fold back and forth on the score lines, creating an accordion fold with each strip.


Now that the pieces are folded, place adhesive on the back side of on the edges of one of the strips, I used Scor Tape here, it’s quick and has a strong hold.


Attach one end of each strip together to create one long strip.


Then attach the two loose ends together to create a circular piece.


Now fold the medallion flat so it flowers out. Cover a scrap piece of cardstock with hot glue and lay the medallion flat on the hot glue. Hold in place until the glue hardens enough to hold in place. I then used a circle cutter to cut out the medallion centers out of a piece of patterned paper.

Dream Medallion Wall Hanging Tutorial @craftsavvy @mgddesigns #craftwarehouse #party #wedding #photobooth #diy

I made extra medallions so I plenty to choose from and just layered them randomly and attached them to a piece of chipboard or cardboard.

We’d love to see what you create so be sure to share on Instagram and hashtag #craftwarehouse if you decide to try out this awesome project!

Thanks for looking!

Michelle

*Chipboard Letter Packs 2 for $8 (reg. $5.99) and Stickles Glitter Glue $2 (reg. $2.49) on sale until August 24th, 2014

LinkWithin

Related Posts Plugin for WordPress, Blogger...
Blogging tips