Showing posts with label journaling. Show all posts

Monday, August 5, 2013

Project Life is Easy for New Moms


I just gave birth to my second child, a little girl! I was so excited when Becky Higgins Project Life came to Craft Warehouse last month because I knew it would be perfect timing! For those mom's who have been through the sleepless nights of a newborn, you understand what I am talking about.

With my first born, I didn't start scrapbooking his baby pictures or album until he was well over four months old. It was about that time that he started sleeping through the night! When I look back at those pages now, they were cute and everything, but something important was missing. It was the little things that I wish I documented. Like, how much he weighed when and all those important milestones. But, there was just no time to scrapbook then!


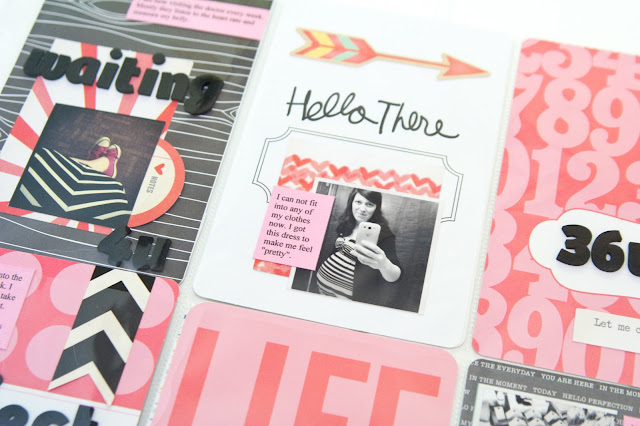
Fast forward six years later and now there is Project Life to save the day! I can easily take a journaling card and jot my thoughts down to scrapbook later. Plus, scrapbooking won't take me hours to do anymore! I can slip my cards and photos right into the pages without worrying that it won't look nice enough for our family album. All the cards mix and match as you can see in my projects below...

My goal for my album is to get those pictures off my phone and document them. I use my phone for my every day photos. To print several of my Instagram photos on a 4x6 print at my local printers, I use this free template in Photoshop.

If you are not Photoshop savvy, I have also heard how you can download the PicsArt App on your phone and put two photos on a 4x6 without the border and it fits perfectly. Then, you can email the photo to yourself and download them to your local printer that way.

You can even print them directly from your computer on photo paper, but I like to have archival safe photo paper for my photos.


Here is my first Project Life page for my family album. No pressure, just documentation...


I shared how Project Life came into Craft Warehouse stores and how I got to be the one who documented all about it for the store via the Craft Warehouse Instagram feed! It was so much fun!


I mixed the Honey and Midnight Core Kits to get the black and pink look! 


These small black American Crafts Thicker Alphabet stickers worked inside and outside the pockets. Although, I think placing the stickers on the inside makes things a little tight. I might stay with adding the foam stickers on the outside of the pockets from now on. 


I love having my handwriting show through out my pages, but my family says that if I want them to be able to read any word of it later, that I need to type my journaling. I think it looks cleaner. I just type it on the computer and print it out on matching card stock. Simply done. 


Guilt free reasons to start Project Life:


* Project Life Core Kits $19.93 (reg $29.99) and Mini Kits $9.93 (reg $14.99)

Thursday, August 2, 2012

Zentangle Art


Yesterday, we showcased Zentangle art and today we would like to share with you some art featuring this technique. The main thing to remember about doodling is to relax and have fun!


Zentangle books are 25% off regular prices and a 4 pack of Micor Pens are only $6.88 (reg. $10.99). Hurry in because the sale ends, August 19th, 2012!

Friday, July 20, 2012

Echo Park Paper & Lawn Fawn Stamped Journal by Guest Designer Lizzie Oakley

                                                                       Hello there fellow crafters, I'm Lizzie!  I am so excited to be a guest designer for Craft Warehouse!  This is such an honor and wow, I was completely gushing with joy when I was chosen! I have a super fun project for you using some Echo Park Paper, Lawn Fawn Stamps, and the totally amazing Chormatix Markers from American Crafts
 

We are going to be making a fun journal using the items above plus our sewing machine.  If you don't have a sewing machine, that's fine!  You can use a needle and thread!  I promise you, it's not as scary as it sounds.

We need 7 sheets of white card stock (or any color card stock that you want to use)
Cut all of the card stock down to 10 x 7 inches.  Our journal is going to be 5x7 inches.


Take one sheet of the cut card stock and score (on the 10 inch side) at 5 inches and then again at 5 1/4.  

I don't have a fancy smancy scoring board.  Instead I use my trimmer and a pair of scissors.  I lightly press along the guide so I'm careful not to cut the paper, but it will still leave a nice line that is easy to fold.


Take your card stock and fold along the scored line.  You should end up with something like I have in the above the photo.  This is going to be the cover to your journal.  Start to plan out and decorate your cover. 

Do not worry about scoring the other sheets.


Now it's STAMPING TIME!  I know that the Chromatix markers are alcohol based, but I wasn't too sure on what ink would work the best.  I do love my StazOn as it just produces such a nice dark solid image.  But my Versafine makes clear stamps so crisp!  I was torn to say the least.  So off I went to stamp with both inks!


You might be able to see that with the StazOn the colors seemed to bleed a little bit when using the markers.  I had an idea that this would happen, but wanted to make sure.  The Versafine worked great!

Another tip when using the Chormatix, the blender is more of an eraser.  It does blend, but I found if using a color lighter then one I'm working with, the blending effects pop out a bit more.


With the flat elements to my cover added, I began the sewing of the binding.  There are many binding tutorials you can find all around the interwebz.  I like to sew the binding.  It's easy and I don't have to wait hours for glue to dry.  I'm an instant gratification kind of a girl, what can I say?
Take all 7 sheets of your paper, with your cover on the outside and sew down the center of your scored lines.

Once sewn together, fold the journal in half.


What's that?  You see a few uneven pages?  This happens here and there.  Take your trimmer or handy dandy scissors and just trim away the naughty edges.
Finish decorating your cover and VIOLA!


A very lovely, one of a kind journal!

By using the card stock, this journal is nice and sturdy and can withstand tons of doodles and coloring!  Even if you just need a fun play to practice your coloring techniques!  You could substitute the inner pages with regular weight paper and have a fun writing journal.  It's up to you! 

Tuesday, May 29, 2012

Echo Park {Note To Self}


Introducing Note to Self, a paper line that can be used for any occasion or project, now available at your local Craft Warehouse!

NS28016_Note_to_Self_Collection_Kit_F

Take a peek at some design team projects using this line!

Favorite sketches_altered book_CWa5

The view from here_July 2011_CWa5

These are the days_July 2009_CWa5

Projects by Steffanie Seiler
may-14

may-19

Projects by Jennifer Evans


Projects by Cara Goedeking

Saturday, February 11, 2012

i love to create day 11- SMASH


Each day of the year is a great day to get crafty! In February we are celebrating some of our favorite
scrapbooking and stamping products because they make creating more fun, easier, and inspire us to
do more. We want to share the love with you, so each day in February (it’s a leap year so there are
29 days!) we are picking one of our favotire products to share with you!

Check back each day to see the daily pick, and learn more about it.

We craft ourselves, and actually use and recommend these items, because we Love to Create!

Today’s pick: Smash from K and Company


For the Moments and Musings that Stick

Choose Folios in 7 colors and themes. Use them for journals, scrapbooks, dream lists, event planners, lists, a place to save post cards, ticket stubs, and other memorabilia from your everyday life. Each comes with it's own Smash Stick (glue stick on one end, pen on the other!)
There are lots of fun Smash accessories to go with your new Smashing hobby! Including pockets, clips, date stamp, bands, smash pads, stickies, and more!


watch this fun video to get the idea behind SMASH!

see a smash page layout come together in this video by our Scrapbook Design team Member Jennifer Evans.


LinkWithin

Related Posts Plugin for WordPress, Blogger...
Blogging tips