Showing posts with label mason jar. Show all posts

Tuesday, September 15, 2015

Pumpkin DIY Mason Jars


Happy Fall Y'all! Get this pretty vintage finish by using chalk paint on the outside of your clean clear canning jar.
 
This paint sticks to the glass! For a distressed look you can lightly sand the dried paint with sandpaper.


Americana Decor Chalky Paint Pumpkin Mason Jars @craftsavy, #craftwarehouse, #diy, #masonjar, #AmericanaDecor,#americanadecorchalkypaint
 
 
Directions:
  1. Clean glass and lids with soapy water, then go over the our side of the glass with rubbing alcohol. (This helps make sure there is no moisture on the glass and the paint will adhere easier)
  2. Choose the color you want to paint your glass, sponge paint on to glass using a blotting motion.
  3. Let first layer completely dry.
  4. Paint 2-3 more layers allowing each layer to dry.
  5. Paint the top of the mason jars lid and metal ring. Using the same technique as you did for the jars.
  6. We used wood dowel rod caps for the top. Paint with chalky paint to match the lid.
  7. Screw lid on the mason jar once dry.
  8. Glue dowel to the top of the lid using E6000 glue.
  9. Take a 8" strip of green floral wire and bend it in a loop around the bottom of the dowel cap, then twist the wire around a pen or pencil to give it a curl. trim extra wire.
  10. Add ribbon as your final touch and you are done!

Monday, February 16, 2015

Mason Jar Inspiration


We have projects for every type of crafter in this special blog series. We will show you how we did it, and what you need to do it, all found on the shelves of your local family owned and operated Craft Warehouse stores.

What can I do with only 3 mason jars?


Mason Jar Inspiration @craftsavvy @sarahowens #craftwarehouse #masonjar #decor #diy

Use three jars that can be the same or different sizes, add some filler such as moss or marbles then accent with a hand tied piece of ribbon.

Mason Jar Inspiration @craftsavvy @sarahowens #craftwarehouse #masonjar #decor #diy

Another option is to take a bag of sand, some rusty wire and a few yards of jute.It can be so calming and relaxing! Just add some tea lights or votives and you have your own day spa! 

Mason Jar Inspiration @craftsavvy @sarahowens #craftwarehouse #masonjar #decor #diy


Make a mason jar caddy for most any area of your home. Glue together the three jars, then 'tie' them together with jute or ribbon.

Mason Jar Inspiration @craftsavvy @sarahowens #craftwarehouse #masonjar #decor #diy

* 50% off regular prices of Designer Sand, Batter Operated Tealights $4.93 (reg $6.99), and Canning Jars $1 each until February 23rd, 2015

Wednesday, February 11, 2015

I Heart Canning Jars


We have projects for every type of crafter in this special blog series. We will show you how we did it, and what you need to do it, all found on the shelves of your local family owned and operated Craft Warehouse stores.

Everyone is loving canning jars these days. Stenciling is so easy! You can finish this look in no time! Chalky Finish Paint is extremely easy to work with and great on virtually any surface. It creates a white washed finish in a variety of vintage colors.

I heart Stenciled Canning Jars @craftsavvy @sarahowens #craftwarehouse #diy #masonjar #stencil

Supplies:

Mason Jar
Cosmetic Sponge (to pounce over the stickers so that the paint doesn't seep through)
Chalky Finish Paint
Sticker or Tape (we used a punch with adhesive backed paper)
Twine 


I heart Stenciled Canning Jars @craftsavvy @sarahowens #craftwarehouse #diy #masonjar #stencil

1. Paint the entire jar. Let dry and apply stickers or tape.

2. Paint the jar again in a different color and let dry.

3. Remove the stickers and you have a stenciled jar!

How easy is that!

* Chalky Paint $6.88 (reg $8.99) and Mason Jars $1 (quart and pint size, regular or wide mouth) on sale until February 23rd, 2015

Friday, January 30, 2015

Super Bowl Party Tray


There is still time to get in the game and create this one of a kind party tray for your Super Bowl guests this weekend!


Super Bowl Party Tray @craftsavvy @sarahowens #craftwarehouse #superbowl #party #diy #masonjars


Supplies:


    Metal Tray 13"x20.5" Retail 29.99 (FUM/363)
    2 Sheets of Football Field Paper By Reminisce
    2" Oval Circle Punch By Marvy
    White Artist Pen by Faber Caster
    Tombow Extreme Adhesive
    Paper Straws Blue Chevron
    Chalk Board Labels
    Brown Card Stock Paper
    Mason Jars

Super Bowl Party Tray @craftsavvy @sarahowens #craftwarehouse #superbowl #party #diy #masonjars


Directions:

1. Tape paper together to create a football field. Lay in tray and cut paper to size trimming the ends.

Super Bowl Party Tray @craftsavvy @sarahowens #craftwarehouse #superbowl #party #diy #masonjars

Super Bowl Party Tray @craftsavvy @sarahowens #craftwarehouse #superbowl #party #diy #masonjars

   
   2.  Punch out oval shapes using brown card stock paper. Using an artist pen draw lines on your football.

Super Bowl Party Tray @craftsavvy @sarahowens #craftwarehouse #superbowl #party #diy #masonjars


    3. On the back of your paper football place strip of tombow adhesive and place straw leaving 1" on the top of the straw so you can drink out of it.

Super Bowl Party Tray @craftsavvy @sarahowens #craftwarehouse #superbowl #party #diy #masonjars

Super Bowl Party Tray @craftsavvy @sarahowens #craftwarehouse #superbowl #party #diy #masonjars
  

 4. Place Chalk board labels to the front of each mason jar, add straws and you are done!
 

Thursday, January 29, 2015

Trendy Bottle and Jar Home Decor


We have projects for every type of crafter in this special blog series. We will show you how we did it, and what you need to do it, all found on the shelves of your local family owned and operated Craft Warehouse stores.

Bottles and canning jars are not just for recycling, decorate the place!

In case you need a reason to open that bottle of
wine this project is both easy and dramatic.


Trendy Bottle and Jar Home Decor @craftsavvy @sarahowens #craftwarehouse #bottle #masonjar #diy #home #decor


Supplies:

Vinyl Letters
Montana Gold Label Spray Paint in your choice of color
Water Bottle with Wire Clamp Lid

Directions:

Before painting with Montana spray paint, apply a vinyl letter or icon on the bottle then paint. After
paint dries peel up the vinyl. It's as easy as that!

Trendy Bottle and Jar Home Decor @craftsavvy @sarahowens #craftwarehouse #bottle #masonjar #diy #home #decor

* Vinyl Letters $1.00 (reg. $2.49), Montana Gold Label Spray Paint $7.75 (reg $10.50), and Water Bottle with Wire Clamp Lid $3.00 (reg $3.99) until February 23rd, 2015

Monday, December 1, 2014

Quick and Easy Christmas Mason Jar Snow Globes


This Snow Globe is the PERFECT fast and easy DIY project for the whole family! If you missed this make and take at our Open House Event, here are the direction to make your own mason jar gifts!

Quick and Easy Christmas Mason Jar Snow Globes @craftsavvy #craftwarehouse #christmas #diy #masonjar #snowglobe

Supplies: 

• Pint Mason Jars
• Powder Snow
• Darice- holiday trims (variety of choices)
• Darice- 10pk mini trees
• PA- score tape 1/4” wide
• PA- 1” glue dots
• wire cutters
• small handheld broom or similar and waste basket or clean up

Directions:

1. Remove the lid of your mason jar.

2. Use wire cutters to carefully cut the base off of one of the trees (making it smaller so that you can have some height variation in your little snow globe scene- this adds interest)

3. Use 2 extra strength 1” glue dots- apply to the inside of the lid. Place tree on one glue dot, place cut tree on other glue dot.

4. Use mini scoop to scoop up powder snow and pour into empty mason jar. Only a scant hand size will do. Any more will be too much.

5. Place the lid onto the jar (the trees going into the jar- they will be upside down at this point) and
then screw on the ring- securing the lid.

6. Use score tape to run a length of sticky tape around the circumference of the life (on to the
metal ring) Remove paper liner. Add ribbon by pressing it into the sticky strip of score tape all
around the lid. (did you know you can TEAR scor-tape! Being able to tear a super tacky tape
like this is amazing and fast! No scissors!

* Optional: A Craft Warehouse Gift Card fits perfectly inside! What a fun way to give a gift!

Monday, September 1, 2014

Game Day Bottles


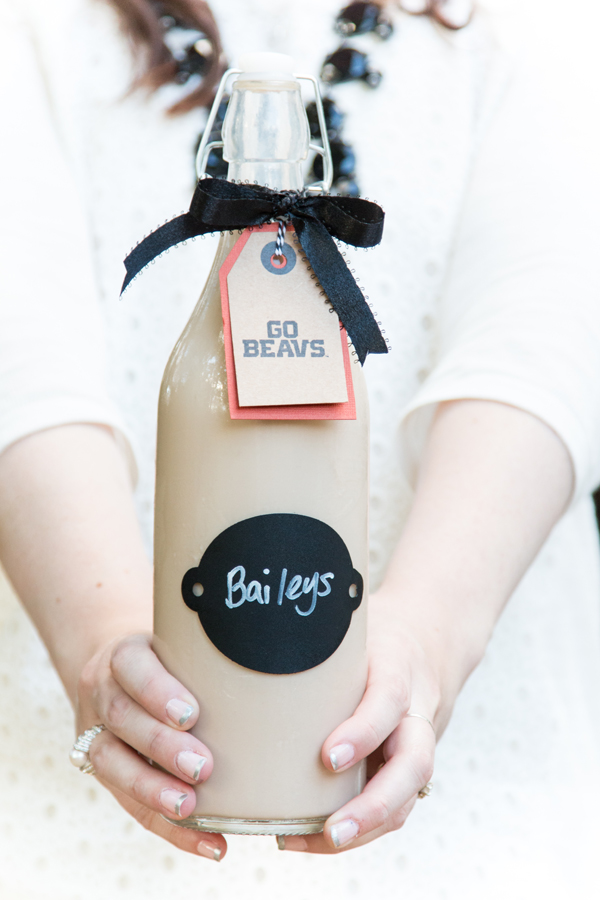
Happy Labor Day! When a friend came over with a thank you gift for us, I knew I had to share it! He brought over a bottle of homemade Bailey's Irish and Creme. Oh. my. dearie. The bottle is what got me (hey, blame the crafter in me)! It was a snap lid bottle and I thought right away of Craft Warehouse's snap bottles and got excited about the kind of gifts I could give this fall! Craft Warehouse carries these 12" beautiful clear bottles so you can see what is inside. They also make the best backdrop for a belly band, label, or tag and are food safe!

Homemade Bailey's Irish and Creme @craftsavvy @createoften #craftwarehouse #masonjar #diy #party

I also knew this would make the best drink to bring over to a friend's house for Game Day! Here is the supply list to create your own!

Homemade Bailey's Irish and Creme

2 cups of whiskey

2 cups of vodka

2 Tbsp instant coffee

2 Tbsp chocolate syrup

2 cans sweet condensed milk

2 cups heavy cream (can use 1% fat free milk)


In a large stock pot, combine ingredients and then carefully pour into bottle. Refrigerate. This recipe can fill one bottle with a little extra for you to drink at home.

Here is a Vegan Non Alcoholic version I found to share.

Decorate the Bottle

Supplies:

1 12" Snap Lid Bottle
WeRMemory Keepers Homemade Die Cut Set
Chalkboard Sticky Back Paper
American Crafts Ribbon and Twine
Card Stock
Bistro Chalkboard Marker
Clear Snap Color Box Rubber Stamps (available in NW teams)
Kraft Tag
Ranger Ink Archival Black Ink
Sizzix Big Shot Die Cutting Machine

Directions:

1. Stamp image on to tag. Mat the tag by cutting card stock a little larger than the tag and keep together. Punch a hole in the card stock at the same place the tag's hole is in.

2. Tie bow to the top of the bottle. Run twine through the tag and tie to the back of the bottle and let the tag hang in front.

3. Die cut the label from the chalkboard sticky back paper. Use the marker to write on the chalk board paper. (Or use pre-cut chalkboard labels *)

4. Place the label on the jar making sure the jar is dry before applying.

Give and drink!

* Removable Chalkboard Labels 50% off regular prices (reg. $4.99) until September 21st, 2014

Monday, August 11, 2014

Frozen Mason Jar Snow Globes


We know how to pull off a great party! Visit our stores and you can find tons of Frozen Party inspiration, including a great party craft and favor using the classic mason jar! These snow globes are fun and easy to make - with almost no prep time!

Frozen Mason Jar Snow Globes @craftysavvy #party #frozen #diy #masonjar
(I Like Warm Hugs Mason Jar Snow Globe by Tina from our Salem Store)
Supplies:

Mason Jars
Ribbon
American Crafts Glitter Paper
Glitter (we have found that chunky works better than fine)
Confetti
Craft Foam Snowflakes
Frozen Vinyl Quote (available at Craft Warehouse stores)

Frozen Mason Jar Snow Globes @craftysavvy #party #frozen #diy #masonjar
(Shaken Up)

Directions:

1. Pre-party place vinyl quote on jar according to package directions and cut glitter paper the size of the top of the mason jar lids.

2. Place glitter, confetti, and foam snowflakes inside the jar.

3. Fill entire jar with water.

4. Place lid back on to the jar and then glue the glitter paper to the top. Tie ribbon around the rim. 
 

Frozen Mason Jar Snow Globes @craftysavvy #party #frozen #diy #masonjar
(Some People are Worth Melting For Mason Jar Snow Globe by Tina from our Salem Store; 
Shaken Up with white chunky glitter)

Shake and enjoy! 

Monday, July 21, 2014

Party Mason Drinking Jars


I thought that creating mason glasses for a party would be fun but I had no idea how much of a hit they would be! The adults thought they were darling and the kids felt super special! When the party was over, I kept mine to do it again, but these would make great party favors too!

Here are a few great tips to keep the project fast and simple to make!


Party Mason Drinking Jars @craftsavvy @createoften #masonjars #diy

Supplies:

Mason Jars with Rim (remove lids)
American Crafts Glitter Paper and Twine
Bo Bunny Press Doilies
We R Memory Keepers Nesting Dies - Homemade (six piece set) and Indian Summer Pattern Paper
Queen & Company or Sierra Pacific Crafts Paper Straws
Chalkboard Sticky Back Paper
Doodlebug Design Wood Grain Pattern Paper
Lawn Fawn Happy Trails Stamp Set and Love You S'more Set
Brilliance Moonlight White Ink
Ranger Archival Black Ink 
Tombow Xtreme Permanent Adhesive
Embossing Heat Gun

Directions:

 1. Use the Homemade die cut set and cut all your pieces needed at once. Cut the label from the Indian Summer paper, the tag from the wood grain paper, and the chalkboard circle from the sticky back chalkboard paper.

2. Stamp all your items at once. Stamp the camper and heart on the chalkboard circle. Use your embossing heat gun to heat the image before handling. The white will come off if you do not do this first. Stamp "let's toast" on the wood grain tag in black.

3. Place chalkboard sticker on the front of the label. Using the Xtreme adhesive will help keep the label on, but will give you an opportunity after the party to still remove the label to reuse the mason jar. Place adhesive all over the back of the label's edges and place on the front of the jar.

4. Trace the lid on the back of the glitter paper with a pencil and cut out. Glue the circle to the top of the doily. Punch out a hole in the middle of the circle for the straw.

5. Now that we have the pieces ready, assemble the jars. Place the doilies on the top of the jars and add a straw. Add the tag with twine around the rim.

Now fill the jars with your favorite party beverage and enjoy!


Monday, July 7, 2014

DIY Flower Arrangements and Gold Glitter Vases


I love flower arrangements. Fresh flowers during the summer is something I wish I could have all the time! They can be really expensive to buy at the store so I make my own as often as I can!

Another thing I also love is glitter. I just don't love it all over my hands, face, and home. So when I heard about Krylon's Glitter Blast I had to try it. It is glitter in a spray can. The can is filled with adhesive and glitter - all you have to do is point and spray! I like that!

For this handmade vase, I just grabbed a mason jar and got to work! Scroll down to find out how to make your own vase and then how to create your own flower arrangement for less!

DIY Flower Arrangments and Gold Glitter Vases @craftsavvy @createoften #craftwarehouse #diy #vases #flowers #glamping

Supplies:

Mason Jar
Krylon Gold Spray Paint
Krylon Gold Glitter Blast
American Crafts Twine
Flowers

Vase Directions:

1. Spray the outside of the jar with gold spray paint. Do a couple of coats for a good application.

2. When dry, spray the outside of the jar with gold Glitter Blast. Make sure the jar is completely covered. Let dry.

3. Tie a piece of twine around the lip of the jar.


One of my favorite DIY projects is creating my own flower arrangements! I got several bouquets of flowers from my local Trader Joe's for only $20!  Here is how you can create your own flower arrangements using your own handmade vases!

Flower Arrangement Directions:

1. Open up all the bouquets and remove the flowers from the rubber bands and packaging.

2. If your flowers come with flower food, disperse the food out evenly to all your vases. Fill your vases up half way with water.

3. Sort your flowers on the counter so you can see what you have.

      1 - Foliage
      2 - Place smaller groupings of flowers together (like smaller Daisies, Asters, etc).
      3 - Large flowers will be used last, so place them on their own.

DIY Flower Arrangments and Gold Glitter Vases @craftsavvy @createoften #craftwarehouse #diy #vases #flowers #glamping


4. Using the foliage (branches of leaves) first, cut to desired length (for a mason jar I cut between 9"-10"). Putting one branch into the jar at a time criss-cross the stems into the vase. You are going to be creating a homemade frog this way. You should have about four or more pieces crossed into the vase.

5. Use smaller flower stems next (labeled 2 in the picture above) and make sure all the leaves are removed before adding them to the vase. Cut to the same length as before. Add one stem at a time twisting the stem into the jar so that it will slide into your homemade frog. Place the stems evenly around the vase.

6. For stems that have a lot of flowers attached (like a bunch of Daisies), remove them from the main stem so that you get more bang for your buck! Tuck these into your arrangement by twisting the stem again into the homemade frog.

7. Lastly, pick a favorite large flower (labeled 3 in the picture above) and cut to the same length as your other flowers. Find the front of your vase and twist the stem into the vase at the focal point of your arrangement. Make sure if you are using any Roses that all the leaves are removed before adding them to the vase.

*Note: For mason jar arrangements 1 large flower is enough. For large arrangements, you can add several large flowers to draw attention to the front of the arrangement. Have fun with it! This is a great way to make beautiful floral displays around your home for less!

Monday, June 2, 2014

Mason Jar Monday


This weekend, I was extremely inspired while at a wedding. The entire decor was burlap lined with lace. The tablescapes were lit with mason jars as candle holders. It was rustic, vintage, and beautiful. Craft Warehouse loves the Mason Jar Craze! So much that we even have books on the subject and our stores are filled with ideas to get you started using the classic storage container.


Here's more mason jar inspiration from employee Beth Williamson, from our Meridian Craft Warehouse store.


This teacher gift is spray painted on the outside and then brushed with charcoal.


This centerpiece created with three mason jars. All jars were painted on the outside. Then, using tape to mask off stripes and stars were painted the second color (blue on one jar and red on the other).


Lastly, this bride and groom set is perfect for wedding decor. Each jar was added to candle sticks and decorated with burlap and embellishments. You can get directions on making these right here.

You can click on "mason jar" at our sidebar of our blog under "labels" to see even more ideas!
Friday, May 9, 2014

Anniversary Advice Jar Set by Craft Warehouse Design Team Member Denise Johnson


Hello my fellow Craft Warehouse fans!!  I'm Denise Johnson, a CW Design Team member, here to share one of my very favorite projects with you. My DT goody pack included an amazing array of supplies from the "Save the Date" collection by Teresa Collins along with a simply scrumptious pack of Hazel & Ruby scalloped washi tape. When I'm not playing with paper...I'm a professional planner/stager, specializing in DIY, vintage inspired weddings, home decor and theme parties. 

The design team pieces I received were absolutely PERFECT for a DIY wedding set that 
any bride would swoon over! I love the DIY trend, with hands on interactivity from the bride, wedding party, family and friends. This project would be a perfect shower activity or an amazing gift from a crafty bridal party member. 
Let's take a look at my Anniversary Advice Jar Set....    


This set includes:

 -a beautifully embellished jar for each milestone anniversary 
-advice cards for guests to fill out
-an "advice" banner
-an envelope keepsake book to store advice cards

Supplies Used: 

Teresa Collins "Save the Date" 12x12 papers, 6x6 paper pad, Damask Stencil, Clear Stamp Set
Hazel & Ruby Scalloped Washi Tapes
2 tags & binding ring
Mason Jars
2 skewers
Styrofoam ball
Hot glue
Burlap scraps
Tulle
Jute
Baker's Twine
Index cards
Distress Ink
Journaling Pen
Ink for stamping
Hole reinforcers
Hole Punch
Paper Trimmer and scorer
**(if creating the dimension (shown in tutorial) you will need Golden Gel Medium and a whitewash medium)


Here's a video so you can see how to make this fun set!

Thank you for taking the time to check out my Design Team project today!
I hope this project inspires you to craft your very own DIY party or wedding decorations and interactive accents. 

Happy Crafting,
Denise 

LinkWithin

Related Posts Plugin for WordPress, Blogger...
Blogging tips