Showing posts with label die cutting. Show all posts

Monday, June 29, 2015

Glowing Rose Die Cut Card


Glowing Rose card by Jeanean Brown

Supplies: 
  • white card stock cut to 4" x 5 1/4"
  • cardstock for card (choose your color!) cut to 4 1/4" x 11" and fold in half 
  • creating a 4 1/4" x 5 1/2" card
  • black glossy card stock (for die cutting)
  • Little B nested labels die cuts
  • Little B sentiments die cuts
  • Little B blossoms die cuts
  • Die cut machine- like Big Shot or Evolution Advanced.
  • Distress Ink pad in choice of color (this will be the 'glow' of your flower) 
  • foam blending pod (or make-up sponge)
  • xyron sticker maker (or liquid glue with fine tip applicator)
  • dimensional foam tape or pop dots


Directions:   
  1. Die cut the piercing only label die cut from the Little B die cut nested set of labels- set on white card stock where you want (tip- use washi tape or painters tape to secure in place while you die cut) This will make the pierced frame in your white card stock.  Set aside.   (All Little B dies are sold with a magnetic organizer! You can see exactly what you have, it's labeled on the spine so you can store them on a shelf like a book! Everything stays in place until you need it. 


 2. Die cut the Hello sentiment from the Little B die cut sentiments set- black glossy card stock . Set aside. Look at the other fun options in this die cut set...

3. Die cut the leaf, and the nested rose from the Little B die cut set. (note- you will need both the inside of the rose die and the outside of the rose die- place them on your mat so the inside is nested inside the outside die before cutting black glossy card stock.) On the inside of each Little B die cut package is a line drawing of each die cut- and each of these is labeled with it's measurement! So handy!


4.) Now use foam blending pod and distress ink pad of your choice. Pick up color with foam and apply in circular motion onto white card stock that you've previously die cut the pieced label frame to. Apply to center area of pierced frame- slightly larger area then the black rose die cut.
The Darice foam ink pods come in a clear case- you get 24pc. You can use both sides- essentially use each side for each color of ink- thats 48 colors! WOW. These are really dense foam pods so they are easy to control and last a long time.


5.) After you have colored your 'glow' spot run your black glossy card stock die cuts through the sticker maker by Xyron. (You can use a fine tip liquid glue if you don't have a sticker maker)
Then apply the die cuts to your card. 
Finally add dimensional foam squares to back of white panel and attach to your folded card. 


Monday, May 25, 2015

Watering Can Card by Becca Glos


How to make a Window Box Watering Can Card by Becca Glos for @craftsavvy


Supplies List:

5"x 7" Cream Card
Bo Bunny - Double Dot Paper; Mellow Yellow, and Hot Pink
Darice - Clouds Embossing Folder #1217-53
Darice - Tim Holtz Kraft-Core Metallic Collection pack #GX-1960-01, bronze sheet
Darice - Bakers Twine Pink/white
Impression Obsession - Watering Can die #DIE155-A
Ranger Stickles - Diamond
Echo Park Jack and Jill Collection; Jill Floral, Dress Pattern and Cute as a Button Papers
Marvy Uchida - 2" Scalloped Cirlce Punch
Martha Stewart - Medium Frond Punch #M283047
Sticky Thumb Tape Runner
3M Foam Tape

Directions:

Cut Mellow Yellow paper to 3 3/4" wide x 4" and emboss with cloud folder, attach to top of card (centered and 5/8" from top) with tape runner

Cut Cute as a Button (woodgrain side) paper to sizes 4" x 1/2" and 4" x 1 1/2", cut the sides of larger piece at a slight angle to resemble a planter
    
Attach to bottom of card (centered and 5/8" from bottom). Tie bow around smaller piece with bakers twine (approx 12"). Adhere on top of larger piece with foam tape

Punch 1 - 2" scalloped circle with Hot Pink paper and cut in half (need only 1 half, adhere above planter in the center

Punch 1 - 2" scalloped circle with Jill Floral paper, cut in half, adhere on top of both sides of hot pink circle so the hot pink is peeking through

Punch 3 fronds with Dress Pattern paper and adhere, tucking behind scalloped pieces. Die cut watering can with Tim Holtz metallic bronze paper

Adhere to top right corner of yellow paper at an angle. Add "drops" of water with stickles to look like water coming out of the watering can

Monday, October 13, 2014

Snowflake Card


There is nothing like getting a handmade card! Handmade cards are something different. After all, what makes a more beautiful keepsake than a personalized handmade holiday card?  Here is a snowflake embossed and diecut card that will be sure to wow whoever you send it to!

Snowflake Card @craftsavvy @lawnfawn #craftwarehouse #lawnfawn #holiday #christmas #card

Supply List

• PA-White A2 cards and envelopes
• PA- green textured cardstock
• PA- white cardstock (for die cutting)
• Tombow- dot adhesive runners (pink)
• Scissors
• Hot off the Press Dazzles gold border stickers
• Hot off the Press Dazzles gold dot stickers
We R Memory Keepers Quick Stick tool
• We R Memory Keepers Evolution die cutting machine
Lawn Fawn- stitched snowflake dies
• snowflake embossing folder
• non stick craft mats

Directions:

1. Cut green textured cardstock to 2 1/4” x 5 1/2”
2. Emboss card with snowflake embossing folder
3. Diecut 3 large snowflakes using the NEW Evolution die cutting machine. Watch the video below to see how it works!


4. Use tape runner to adhere green panel down the middle of the embossed card.

5. Die cut the Stitched Snowflakes on the Evolution.

6. Select 2 gold dazzles border stickers and adhere to each edge of the green cardstock panel on your card. Place right on the edge. Trim excess from edges of card with scissors. Note- the border sticker pack is a variety of borders.

7. Working on the non stick craft mat, use the Tombow dot runner (pink runner) to apply dot adhesive to the back of snowflakes and then place on card across the green panel. Then gently rub over snowflakes with clean finger- this not only burnishes the snowflake to the card but it also removes any excess adhesive easily.

8. Lastly, use the Quick Stick tool to pick up the gold dot dazzle stickers from sticker sheet and transfer to snowflakes to precisely and easily decorate.

Now make sure to send your card off to someone special! 


Tuesday, September 2, 2014

Wicked Sign


When I saw this project by Becca Glos, Meridian Craft Warehouse Employee Design Team Contest Winner, I was so impressed that she didn't use any patterned paper in this entire project! She just has a good time creating an awesome distressed look that I asked her to share with us today!

Wicked Sign @craftsavvy #craftwarehouse #wicked #halloween #diy #sign


Supplies:

6   NST-190 plaques
Delta Acrylic Paint:  Charcoal, Rain Grey, Black, White and Gecko
Delta Crackle Medium
½” Flat Brush for Acrylic
Paper Accents Block Style lowercase chipboard letters
Paper Accents black chipboard shapes:  Witches Hat and Bat
Bazzill Purple 12x12 Cardstock – 1 sheet
Lifestyle Crafts Nesting Frames 3 die set
Darice Damask Embossing Folder
Doodlebug Sequins:  Limeade and Lilac
Skinny Stripes Shoe Laces (black and white) or other  ¼” Ribbon
Tim Holtz Ideaology hinges, 2 packages
E6000 black glue
Mod Podge Matte finish
Tim Holtz Distress Ink pad  Black Soot and foam applicator tool
Tombow Hook and Loop fasteners
SCH-247  3” unfinished wood block


Directions:

1.    Paint plaques with Charcoal paint, let dry. Then apply a coat of crackle medium. When the crackle medium is tacky apply Rain Grey paint. It will start to crackle as it starts to dry.  Lastly, paint the edges of the plaques with Black paint using little paint on the brush and applying quickly and kinda messy.  Place plaques on their sides so holes are facing each other (1/2, 3/4, 5/5)


2.    Using 4” frame die from the Nesting Frames set, cut 6 pieces from purple card stock. Emboss them with damask embossing folder.  Distress the edges with foam applicator tool and Black Soot distress ink pad.  Center them on plaques and adhere with Mod Podge.


3.    Paint chipboard letters with a coat of white paint before applying the 2 coats of Gecko green.  This will make the gecko green brighter.

4.    Use Glossy Accents to adhere limeade sequins to letters, adding more at the bottom and less as you work your way up. Apply lilac sequins to the black hat and two each for both bats for eyes.


5.    Glue letters and chipboard shapes to plaques with E6000.

6.    Lace shoe strings/ribbon through the holes of plaques 1/2, 3/4, 5/6 and glue to the back with E6000.  Glue hinges to the front of plaques 2/3 and 4/5 using the black E6000, leaving about ¼” space in between plaques.  Let dry thoroughly.


7.    Paint blocks black and add Tombow hook/ loop fasteners to help keep plaques standing up.


Thursday, July 24, 2014

We R Memory Keepers Indian Summer Collection Tutorial


Today's tutorial will help you create a fast and simple layout using our new products from We R Memory Keepers! Their new Indian Summer collection is perfect for summer photo as well as feminine and masculine projects! I loved the turquoise, black and white, along with the gold hues that I decided to also use their new dies in gold too! Grab your supplies and let's get started!


We R Memory Keepers Indian Summer Layout Tutorial @craftsavvy @createoften #scrapbooking #craftwarehouse

Supplies:

We R Memory Keepers Indian Summer 12x12 Collection
We R Memory Keepers Indian Summer Wood "Life Is Beautiful"
We R Memory Keepers Indian Summer Wood "Doily"
We R Memory Keepers Indian Summer Wood "Feather"
We R Memory Keepers Indian Summer Chipboard Alphabet Stickers
We R Memory Keepers Embossing Folders "Feather"
LifeStyle Crafts Cutting Dies "Feathers"
White Cardstock
Gold Vellum 
American Crafts Gold Glitter Paper
Tombow Xtreme Adhesive Runner
Scallop Punch 2"
Big Shot Die Cutting Machine by Sizzix
Rhinestone Stickers

Directions:

1. Cut  two pieces of patterned paper to 10"x4" (black with white dots) and another 10"x5" (feathers). Glue them down on a 12x12 piece of paper about 3/4" from the top. Punch three scalloped circles from a piece of patterned paper and set aside.

2. Cut 10"x1/2" of turquoise paper and glue to the bottom of the feather paper. Cut 10"x1 1/4" strip from pattern paper and add it to the bottom of the page. Mat your photo on white cardstock and place at the top left hand corner.

3. Using scissors, cut the peg hole off the "Life is Beautiful" Wood Veneer and glue it with the Xtreme adhesive to the top of the Wood "Doily". Make sure the peg hole is facing down on the doily. Add more adhesive and place at the bottom right corner of the photo.

We R Memory Keepers Indian Summer Layout Tutorial @craftsavvy @createoften #scrapbooking #craftwarehouse

 4. Emboss a 3"x4" white cardstock with the "feathers" embossing folder. Die cut feathers from gold vellum and gold glitter paper.

We R Memory Keepers Indian Summer Layout Tutorial @craftsavvy @createoften #scrapbooking #craftwarehouse

5. Layer at the bottom left corner of the photo and page the 3"x4" embossed card, wood feather (remove peg hole with scissors), scallop circle, and feathers. Add a number to the card. 

6. Place two more scallops on the page and add three rhinestones. 

We R Memory Keepers Indian Summer Layout Tutorial @craftsavvy @createoften #scrapbooking #craftwarehouse

7. Use the dots in the Alphabet set to create bullet points on the page for your journaling. 

Would you like to design for Craft Warehouse? Who we are looking for: Artists (including scrapbooking, pocket page scrapbooking, card making, stamping, jewelry making, paper crafts, quilting, fiber artists, fine artist, painter, or DIY crafter) within the contiguous United States. Click here to find out how to apply!

Monday, June 16, 2014

Hello Peek A Boo Card


Miss out on our free card make and take last week? No problem! We have the step by step so you can make your own from home right here! For more of this month's make and takes, check out our Facebook event page!


Hello Peek a Boo Card @craftsavvy #craftwarehouse #techniquetuesday #card #tutorial #diy #washitape

Supplies:

•Big Shot die cut machine- Ellison (Sizzix)
•Hello script die cut - Technique Tuesday
•Black cards and envelopes (A2 size)
•Hot pink card stock, lime green cardstock, bright yellow card stock, aqua card stock
•Ribbon
•Corner Rounder
•Scor tape, Sticky thumb, or Tombow Xtreme tape (strong tape)
•Mini Xyron adhesive Sticker Maker
•Clear acetate sheets
•Washi tape - Studio DIY black and white mix. or similar,
•Signo (uniball) white gel pen
•Rhinestones, pearls, or sequins to match

Directions:

1.) Die cut the precut aqua card stock (2” x 1”) with the Technique Tuesday Hello script die and big shot. Set aside.
2.) Use corner rounder to round the to ‘open side’ corners on black card. and also 2 right corners of the precut lime green card stock. - then use strong tape to adhere to inside of card. The Lime
green will show through to the front later.
3.) Next use washi tape (any kind) to position the same script hello die cut onto card front- where you want the peek a boo to be. and then die cut. - remember to die cut with the card laying open so you are only cutting a Hello shaped hole in the front of the card- and be sure you are cutting so that you can read the hello- you will be die cutting DOWN. - you don't need the black hello die cut that this cuts.


4.) Next use the black and white mix washi tape on the pre cut clear acetate sheet and attach to INSIDE of front of card. This creates a clear window through the Hello die- now when you close
the card you can see the lime green through the hello shaped hole. Make sure to place this strip of acetate over the Hello shaped hole in the card.


5.) Now layer the 4 1/4” x 1” bright card stocks- aqua, bright yellow, hot pink to each other using strong tape. Offset these just a little so you have narrow stripes of bright color showing under the hot pink. Use strong tape again to secure ribbon around this stacked layer and tie in a knot on front.

 
6.) Use the Xyron sticker machine to add sticky to back of hello die cut and carefully insert this into the hello shaped die cut hole on front of card- onto the clear acetate. You will still be able to see through the holes in the letters to the lime green inside card- yet the aqua die cut hello is secure in place.
7.) Use strong tape to add the be-ribboned layered bright card stock border to card- just under the die cut so it looks like the strip of aqua card stock is part of the aqua hello die cut.
8.) Embellish with rhinestones, pearls, or sequins. !

We suggest the white Signo Uniball gel pen for addressing the envelope!

Thursday, December 5, 2013

Lawn Fawn Holiday Cards by Design Team Member Michelle Wofford

                                                                          Hey there, Michelle back again to share a couple more fun holiday cards.  I am loving these fun stamps and coordinating die sets from Lawn Fawn.


Before you start you want to gently bend the individual pieces of the die to separate them.  If you have some pliers you can trim the excess metal pieces off the edges of the dies but they do not effect the end results of the die cut.


Start by making a card base from card stock, trim cardstock to 9" x 6" and score down the middle of the 9" side to create a card that is 4 1/2" x 6".  Trim a piece of patterned paper 4 1/2" x 6" for front of card.


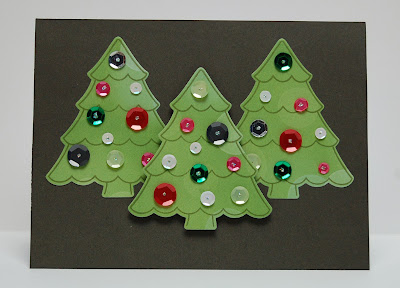
On a piece of green patterned paper stamp several trees with the tree from Lawn Fawn's Trim the Tree stamp set.


Lind up the tree shaped die with the stamp image and run through a die cut machine such as the big shot. 


Isn't it amazing!  The die fits perfectly around the stamped image to create awesome stamped die cuts.  Adhere two trees to the card base and attach the third in the center with a pop up adhesive.


Now to decorate the trees with this coordinating set of mixed sequins.  There are a variety of sizes and colors, including some snowflakes.


Randomly attach the sequins to the trees with either a min glue dot or a small dab of a wet adhesive.  Once attached put a little dab of stickles to add a little sparkle to the centers and to prevent any glue sticking to anything you don't want it to.


 Christmas Mantel Card


And last but not least here is a fun Christmas scene card. 

Start by creating your card base 4 1/4" x 10" and score down the middle of the 10" side.  You want the opening on the bottom of this card so it opens up and not to the side.


To create the brick for the fireplace and mantel trim a piece of cardstock that is 4" x 3 1/2".  With the 3 1/2" side parallel to the top score at 2 3/4" and 3" pre-fold these two score lines.  With the same side up also score at 1/2", 1", 1 1/2" & 2 1/2".


Flip the cardstock so the 4" side is parallel to the top.  Score every other row at 3/4", 1 1/2", 2 1/4", 3" & 3/4".


Now starting on the second row, score every other row at 3/8", 1 1/8", 1 7/8", 2 5/8" & 3 3/8".


This is what the front side of the cardstock should look like now.


Next stamp and die cut the stocking and garland pieces.  These work the same as the trees earlier, just stamp and line up your die and you have perfectly die cut stamped images.


Fold your cardstock so the scored flap hangs over the front.  I put some pop up adhesive in a few spots under the flap to help support it.  Before this though I attached the garland and stockings with a dab of adhesive.


Here's what it looks like with a double stack of pop up adhesive to support the mantel piece.


Stamp, die cut and attach the gifts along the bottom and trim the Merry Christmas portion from one of the tags from the tag sheet.  Attach the fireplace to the card and Merry Christmas piece to card base.

Happy Holidays and thanks for looking, I hope you are inspired to create some of your own holiday cards with this awesome collection from Lawn Fawn. 

LinkWithin

Related Posts Plugin for WordPress, Blogger...
Blogging tips