Showing posts with label echo park. Show all posts

Friday, November 28, 2014

Chistmas Glitter Paper Mache Cones with Snow Flake Bases


Paper Mache Cones are the perfect starting base for any holiday project! We added a star ornament for a base to set these cone trees on! A fun and unique winter holiday touch! 


Christmas Glitter Paper Mache Cones @craftsavvy @sarahowens #craftwarehouse #papermache #cones #holiday #diy

Supplies:
  • Large and Small paper Mache cones
  • Large and Small Wood Snow Flakes
  • Echo Park "Home for the holidays" Paper collection
  • Assorted Buttons
  • Nicole clear chunky glitter
  • Martha Stewart Glitter Glue
  • Clear Knobs
  • Jute String
  • Glue Gun
  • Beacon 3in1 Glue
  • Cotton lace ribbon
Directions:
  1. Place scrapbook paper on its back side. Place a line of glue going from the top of your cone to the bottom and place in the top corner of your paper. add more glue and wrap the paper onto the cone.
  2. Trim extra paper off cone.
  3. For large cone trim of tip of cone about an inch down.
  4. Glue the clear knob to the top of the cone using Beacon glue.
  5. Glitter The entire cone with glitter glue and clear glitter.
  6. Glue cone to the snow flake wood base using beacon glue.
  7. For the large cone wrap jute around the knob and tie.
  8. For the small cone add cotton lace to the bottom of the cone using beacon glue.
  9. Add buttons to both cones using Beacon glue.

Monday, November 24, 2014

Echo Park Wood "JOY" Letter Set


Customize this wooden 'Joy" set any way you wish! The kit comes unfinished so all you need to do is decorate it for the perfect holiday decor or gift!


Echo Park Wood Joy Letter Set @craftsavvy @echoparkpaper #craftwarehouse #holiday #diy

Supplies:
  • Unfinished "Joy" Letter Set
  • Burgundy, White and Green Acrylic Paint
  • Echo Park "Home for the Holidays" Paper Collection & sticker sheet
  • 1 yard Jute String
  • Black Bling
  • Mini bird
  • large and small pop dots
  • Tim Holtz Distressed ink Black Soot
Directions:
  1. Paint all wood with acrylic paint.
  2. Cut paper to fit the front of each letter buy tracing in the reverse side of the paper.
  3. Distress all sides of paper with distressed ink
  4. Glue paper on to each letter using Beacon 3in 1 glue.
  5. Wrap jute around the "J" and tie.
  6. Add bling to the front of the "J"
  7. Glue bird on to the "O" using Beacon Glue.
  8. Place large pop-dots on the sticker "Merry Christmas" and stick to the front of the "O" letter.
  9. Place small pop dots on the nutcracker and stick to the letter "Y"

Tuesday, August 12, 2014

Dream Medallion Wall Hanging


Hi Craft Warehouse fans, Michelle here, and I’m so excited to be a part of the 2014 Craft Warehouse Core Design Team. Today I’m sharing a project that is great for a home décor piece or as a fun decoration for a birthday party or bridal shower. Follow along to see how you could make one of these awesome pieces for yourself, using Echo Park's Summer Bliss collection available in stores!


Dream Medallion Wall Hanging Tutorial @craftsavvy @mgddesigns #craftwarehouse #party #wedding #photobooth #diy

Today I will share with you the process I used to create the letters as well as how to create the various size medallions. Let’s start with the chipboard letters.


These chipboard letters from Paper Accents are perfect for large projects like this wall hanging or banners. They are so versatile and can be customized in many different ways. You can even emboss them with embossing folders. For this project I started by painted the bare chipboard letters with a lime green acrylic paint.


Once the paint dried I added a second coat to make sure I got good coverage. After the second coat dried I added a layer of lime Stickles to the top to add glitter. Stickles is a great way to add glitter to projects, it’s quick and simple and when it dries you don’t have to worry about glitter shedding from your project.


Here’s a closer look at the finished letters. I love the how the Stickles add just the right amount of shimmer to this piece. Now that the letters are done let’s look at how to make all those medallions.


These medallions can be made any size you want. You will need two strips of patterned paper that are 12” long, the width of the strips will determine how large or small the medallions are. The largest I made used two strips that were 3” x 12”. I also made them in the following widths, 2 1/2 ” x 12”, 2” x 12”, 1 1/2 ” x 12” and 1” x 12”. The smaller the width of the strips the tighter the medallion will look. Regardless of the size of the medallion the process to create them is the same.

Starting at 1/2” and with the paper with the pattern face up, use a scoring tool to score at every inch, so ½”, 1 ½”, 2 ½”, 4 ½” and so on. When you get to the end flip the paper over so the back side is up and score at every inch starting at 1”. By flipping and scoring every other ½” this will create “hills”and “valleys” and it will help with the accordion folding later. Repeat the scoring on the second strip, but start with the back side up and finish with the front of the paper face up.


Once your scores are made, fold back and forth on the score lines, creating an accordion fold with each strip.


Now that the pieces are folded, place adhesive on the back side of on the edges of one of the strips, I used Scor Tape here, it’s quick and has a strong hold.


Attach one end of each strip together to create one long strip.


Then attach the two loose ends together to create a circular piece.


Now fold the medallion flat so it flowers out. Cover a scrap piece of cardstock with hot glue and lay the medallion flat on the hot glue. Hold in place until the glue hardens enough to hold in place. I then used a circle cutter to cut out the medallion centers out of a piece of patterned paper.

Dream Medallion Wall Hanging Tutorial @craftsavvy @mgddesigns #craftwarehouse #party #wedding #photobooth #diy

I made extra medallions so I plenty to choose from and just layered them randomly and attached them to a piece of chipboard or cardboard.

We’d love to see what you create so be sure to share on Instagram and hashtag #craftwarehouse if you decide to try out this awesome project!

Thanks for looking!

Michelle

*Chipboard Letter Packs 2 for $8 (reg. $5.99) and Stickles Glitter Glue $2 (reg. $2.49) on sale until August 24th, 2014

Wednesday, September 25, 2013

Echo Park's Reflections Fall Scrapbook Page by Design Team Member Erica Thompson


Hello Everyone!  My name is Erica Thompson and I am so very excited to be posting for the very first time here on The Craft Warehouse blog!  I had some great products to create with from The Craft Warehouse store and was able to scrap some recent photos of one of our boys using Echo Park's Reflections Fall  line.
 

I had four photos that I planned on using but then decided after going through the collection that I wanted to only use the two photos of my son and his acorns.  We had recently gone to the park and the boys had a blast finding acorns!  We had to keep a close eye on my youngest because he kept trying to eat them.  I knew this collection would be a perfect match for these photos and had so much creating my layout!

After I decided what photos I was going to use it was time to chose a background paper for my layout.  I normally take my photos and put them against each paper I have out and decide what I like best.  I ended up choosing one that matched the acorns my son had found and it also matched the football helmet on his sweatshirt.

Now that I have my background I like to start choosing pieces to layer my photos on.  I do tend to use a ton of layers but for some reason I was not feeling it with this layout.  I knew I had to use the patterned paper with the acorns on it so I went ahead and cut that down to a good size.  I am not one to measure so I just eyeball just about everything!  Once I had that paper cut down and placed it against a few of the other patterned papers and ended up picking out a great chevron paper that I thought went well with the other two papers.

When I scrap I do not follow any certain design rules I just have fun and do what I think looks good to me.  I have fun with it and just enjoy being creative.  Since my photos are going to have a light patterned paper behind them I decided to mat them with a dark brown paper from the collection to help them stand out. 

Now that I have my layers and my photos are matted I went ahead and adhered these pieced down to my background paper.  I only add adhesive to the centers of everything so that if I want to tuck in more layers and embellishments I can do it easily.  Once my layout is complete I will go back and add more adhesive to hold it all together or my favorite thing to use is staples!  Now that I have these temporary adhered to my layout it is start to add embellishments and bring this layout to life!  I start with a border strip from one of the collections sticker sheets.  I always take the stickers and stick them to the back of my hand a few times to remove some of their stick so they are easy to remove in case I change my mind after placing them on my layout.

This just happen to be the case with this border sticker and even though I liked the boarder strip I ended up removing it from my layout.  I continued to embellish my layout and I did alter a couple of the embellishments from the layered stickers.  I found a great layered sticker with some leaves and acorns on it but only wanted to use one of the acorn so I removed it and kept the dimensional with it and added it to this fabulous Bo Bunny flower.

Next I added a few embellishment clusters to my layout.  I tend to have at least one cluster somewhere on my layout.  I did keep this layout pretty clean but still had to add some clusters!


And that's it my layout is complete and I did it all while keeping my 3 year old busy with scrapbook paper, punches and markers and my 1 year old in his high chair eating his cereal!  Busy moms have to fit creative time in our schedules whenever we get the chance!  Here is a look at my completed layout!

I hope you enjoyed my layout and if you love this collection from Echo Park as much as I do make sure you visit Craft Warehouse where you will find everything you need to get your creative juices going!  Have a fabulous day!!

Friday, August 2, 2013

Echo Park's Photo Freedom by Guest Designer Rebecca Grinder


Pocket Page Scrapbooking gives me the ability to scrapbook in the midst of a busy and hectic schedule.  Instead of my photos stored on my phone, computer, or in a box somewhere, they are making it into an album.  

Echo Park's Photo Freedom Kits are as easy as 1, 2, and 3! All you have to do is purchase the kit at your local Craft Warehouse, pick two of the five page protectors in the kit, cut the kit's papers to fit, and slip your pictures or papers inside the pockets!

This kit collection was designed by Graphic 45 and is called Transatlantique! It is perfect for either travel or heritage pages. Below, I created a two page spread of a trip to one of my favorite antique stores when visiting home in California.


The papers have simple places to add my own journaling and then slip them into the pocket of the protector.


The kit is large enough to make several pages. I created another double page spread on the back of the one above about our trip to the beach.


I cut a 12x12 page to slip in the left long 6"x12" slot and then cut the other piece twice at 4". This made it easy to put stickers on the 4"x6" pieces, add my photo, then slip them in their pockets on the right side of the page.


Make sure to visit your local Craft Warehouse to see the other Photo Freedom kits they carry!

Tuesday, July 9, 2013

Echo Park's Here & Now Collection and a Silhoutte Tutorial


Hi there... Andrea Ancich here again to give you a little tutorial on the Cameo by Silhouette NOW available in our Salem, Gresham, and Vancouver stores!                                                            


First: open a new workspace: When I work on mine, I make sure the grid is on there so I can measure things while I'm working. It's in the upper right hand corner. You can make your grid as big or as small as you'd like.


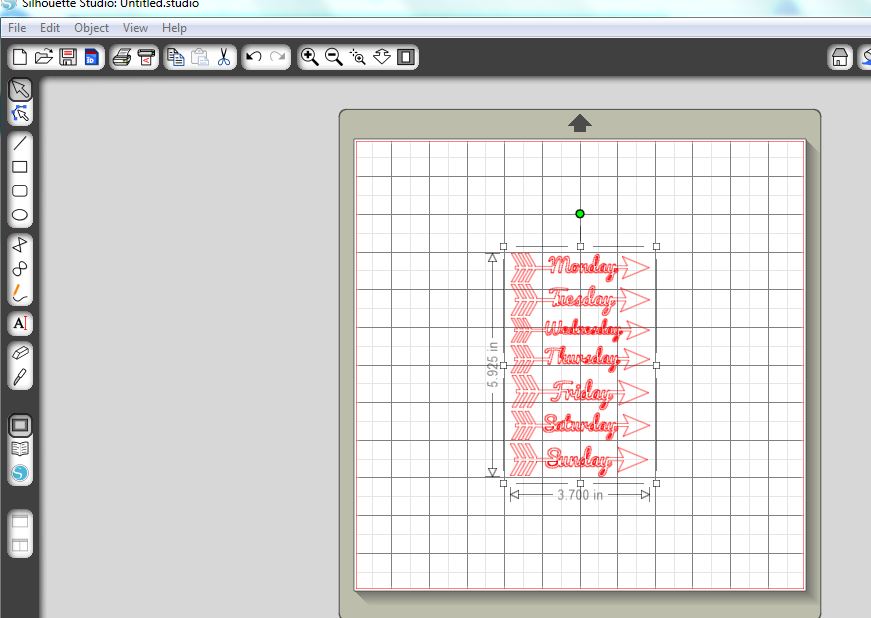
Second: Select the designs you would like to use. (Check out the Silhouette online store for lots of fun designs available).


I chose the arrows knowing I would eliminate all but the Monday arrow; I'll show you how to do that.

I moved them up to the corner of the 'mat' so i would maximize my cutting area.
 I right clicked on the design and "ungrouped" them. Next I deleted "Tuesday-Sunday".

I decided on a size that would work best for my project, knowing I could make it bigger or smaller if needed.


 Next, I selected a text to make my title.

I typed in my title with a default font that my program uses. (Keep in mind that all true type fonts should work as a font to be cut out).

I selected the font, centered it and changed it to a font that would compliment my pages.


After I found the font I like, I right clicked on the words and ungrouped them. This will allow me to move them closer together.

So, I began moving them closer together. Having some of them overlap is ok. 

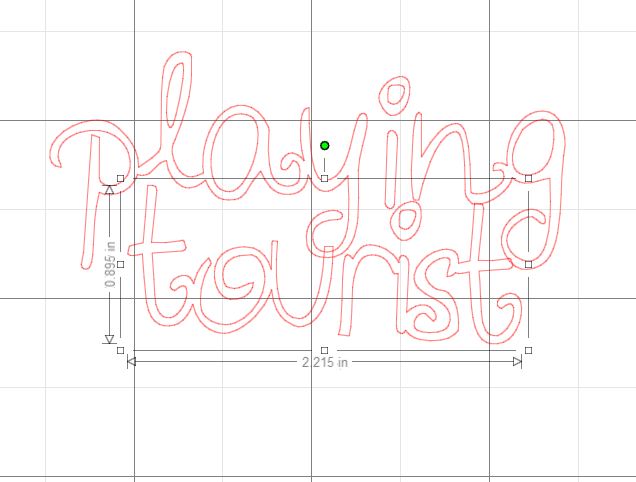
Next, right click and hit "weld". This action will weld your letters together like this one below. This will allow your machine to cut them together, kind of like cursive handwriting.
After you have done your first welding, highlight the bottom word and move it up to make your title more 'title friendly'. too much space is awkward.

After you move it into the place you want it, select it all and weld together again.
 You can see where the pieces were overlapping, they are now joined. This will cut out just as it looks on the screen. You can see that my title will be in 3 pieces: 1 - "playtou", 2 - "i" and 3 - "ngrist".

I made sure before I hit the cut button (at the top right of the screen - looks like a little blade) that I set the paper accordingly. In this case I selected cardstock, but i modified it by slowing the speed down to 1. Knowing some of the pieces of the designs were intricate, i didn't want them to get messed up. (This is all trial and error for me).

Next, I cut out my designs.

I placed the paper where it matched the designs on the computer. How fun you can use more than one piece of paper to cut out.... 

After you cut out your design, be very careful peeling it up.


Then, VOILA!

Finally, I set up my pages using my Photo Freedom page protectors.

Here is what I used for my project:


The Here & Now kit from Echo Park Paper, page protectors for the Photo Freedom line, my cameo and my pictures and ephemera from my day trip.

I added:
Cardstock (navy and red)
Washi tape

Next, I organized my pictures in the pockets.

Got the paper cut down.

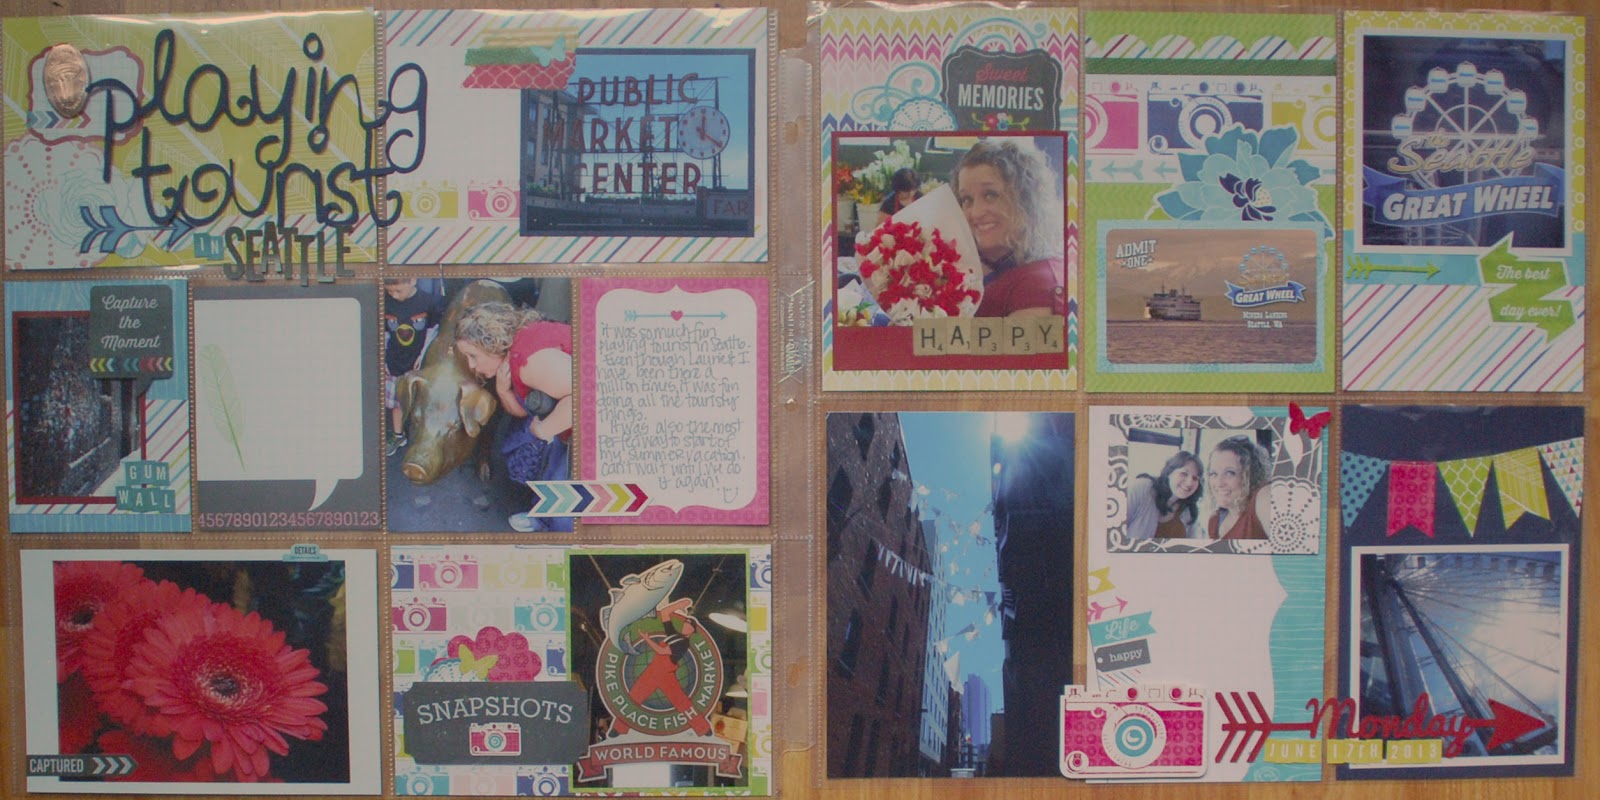
And created a fun layout for my "playing tourist" day trip to Seattle with my friend Laurie.
Here is the left side of the page:
Here is the right side of the page.

If you'll notice, I put the title on top of the page protectors. While the page protectors give us guidelines/structure to follow, try something new and out of the box next time you're doing a pocket divider page.
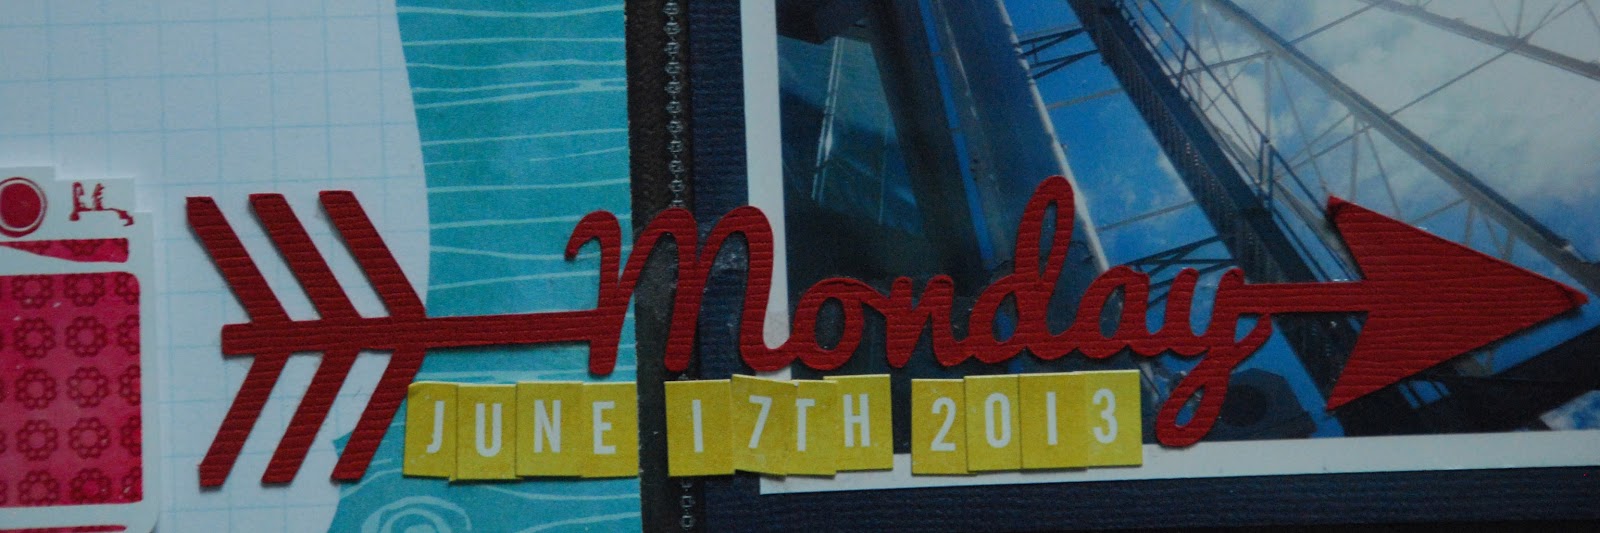
 I also put the arrow and date on top of the page protector.
 
I have an Instax camera that takes little Polaroid pictures, so I made a little frame on my Cameo with it so I can have fun frames around them. This picture and butterfly sit on top of the page protectors as well.

Good luck on your own adventures into Silhoutte land!

Happy Crafting,


LinkWithin

Related Posts Plugin for WordPress, Blogger...
Blogging tips