Showing posts with label vintage. Show all posts

Friday, June 20, 2014

Americana Chalky Paint Lamps DIY


Transform mismatched lamps into a matching pair using our new DecoArt Americana Chalky Paint! No priming or sanding just paint.
Americana Chalky Paint Lamp DIY @craftsavvy #craftwarehouse #diy
   
 1. Start by cleaning both surfaces with a damp cloth.
Americana Chalky Paint Lamp DIY @craftsavvy #craftwarehouse #diy
2. Paint your first layer of a chalky color of your choice. I used "Relic" Chalky Paint. 

3. Dry brush a second color of chalky paint to add dimension. I used "Serene" Chalky paint to complete step 3
    
Americana Chalky Paint Lamp DIY @craftsavvy #craftwarehouse #diy

* Americana Decor Chalky Paint $6.99 in 29 colors (reg $8.99) until June 22nd, 2014

Wednesday, March 21, 2012

Simple Stories Documented by Design Team Member Steffanie Seiler

Design Team Member, Steffanie Seiler shares with us her new projects with new Simple Stories Documented line soon to be in your local Craft Warehouse!

I received Simple Stories Documented collection and as I looked at the collection more, I knew I wanted to add some color.  I noticed the birds and butterflies and nature came to mind.  Hence, the hiking photos in my first layout.

Simple Stories Documented Layout with divided page protector


I cut the word LIFE from one of the 4x6 cards in my collection and basically built from there. I found the right photo to place the transparency over and what I chose gives a very subtle effect but I like it!  I used some dimensional adhesive for depth; Stickles on the butterfly and the Journey card; and went with some 3x4 photos in my 4x6 pockets.  I really tried to keep it pretty simple.   

For the card, I really wanted to make some little flags.  They're quite trendy right now and I thought they would be the perfect embellishment for what I had in mind.

Card---Designer's Choice


I used plain toothpicks and added my own button and some twine.  I did a lot of matting to dress it up.  There is just a tiny amount of Stickles on the dots above and below the bird.  I also added some dimensional adhesive behind the bird.

For the last layout, I went with a beach photo from this last summer. I chose it because it's primarily a silhouette photo with the only real color being blue.  I added a digital frame before printing.

12x12 Scrapbook Page---Designer's Choice


I am thrilled with how this one came out!  I think I crossed into the shabby chic world... just a bit.  I am usually the clean and simple scrapper but this collection pulled something out of me I didn't know I had!  

I used American Crafts and Tim Holtz ribbons for the flowers.  I just cut them off and distressed a bit with some Distress Ink to make them less white.  I made pleated paper ribbon - another first for me!  The title (besides the Thickers alphabet stickers) was simply one of the quotes from the collection cut apart to suit my needs.

I'm pretty excited about my results.  I used very little "other" product.  That's the great thing about these Simple Stories packs - they can really almost stand on their own. My oldest son (13) told me he thinks the last layout is the best I've ever made!  He's so sweet!

Visit the Craft Warehouse website to see more detailed photos here. Stay tuned into our Facebook page to find out when Simple Stories Documented line arrives on Craft Warehouse shelves!

Friday, February 3, 2012

i love to create - day 3 Distress Inks


Each day of the year is a great day to get crafty! In February we are celebrating some of our favorite scrapbooking and stamping products because they make creating more fun, easier, and inspire us to do more. We want to share the love with you, so each day in February (it’s a leap year so there are 29 days!) we are picking one of our favorite products to share with you!

Check back each day to see the daily pick, and learn more about it.

We craft ourselves, and actually use and recommend these items, because we Love to Create!

Today’s pick:


Tim Holtz® Distress Ink Pads
Tim Holtz Distress Inks are a collection of 36 acid-free, non-toxic, fade resistant, water-based dye inks. They’re perfect for the new vintage, stained, aged effect crafters are creating in their altered books, scrapbook pages, cards and paper craft projects. Tim selected the colors and helped develop these inks to produce a realistic, weathered look on paper, photos and decorative fibers. All the colorful Distress Inks afford added versatility when photo tinting and color layering with the original, award winning tones. The 2" x 2" pads are made with a higher raised felt for easier use with direct to paper techniques.

• Acid free• Non-toxic• Fade Resistant• New Higher Felt• Raised 2" x 2" Pads• Water-based Dye Inks•


check out this video from Tim Holtz as he shows you lots of techniques for Distress Inks!


Bonus! This post is all about distress inks, but have you seen the newer Distress Stains? Check out this video by Tim Holtz to learn more!


Tuesday, December 6, 2011

Jewelry Frame by Design Team Member Amanda Sherman

Hi! I'm design team member Amanda here again. I hope you're having a delightful Christmas season. I've had a wonderful season so far. It's a blast watching Christmas through the eyes of my kids and the magic they see in everything.

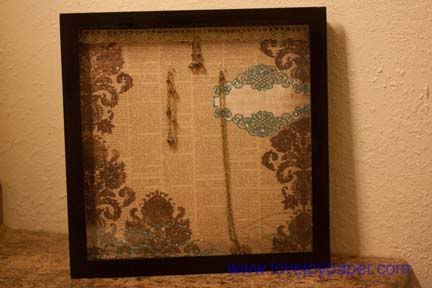
Part of Christmas to me is making gifts for family and friends. When I received a recent circular from Craft Warehouse, I saw something in it that I just knew I had to do!! It was a hinged frame jewelry "box". I thought it would be the perfect gift for my hard to shop for mother in law. So I hightailed it to Craft Warehouse in Wenatchee and got my quick little hands on one of the frames. I absolutely love this idea because you can interpret it any way. The possibilities are endless.

Photobucket

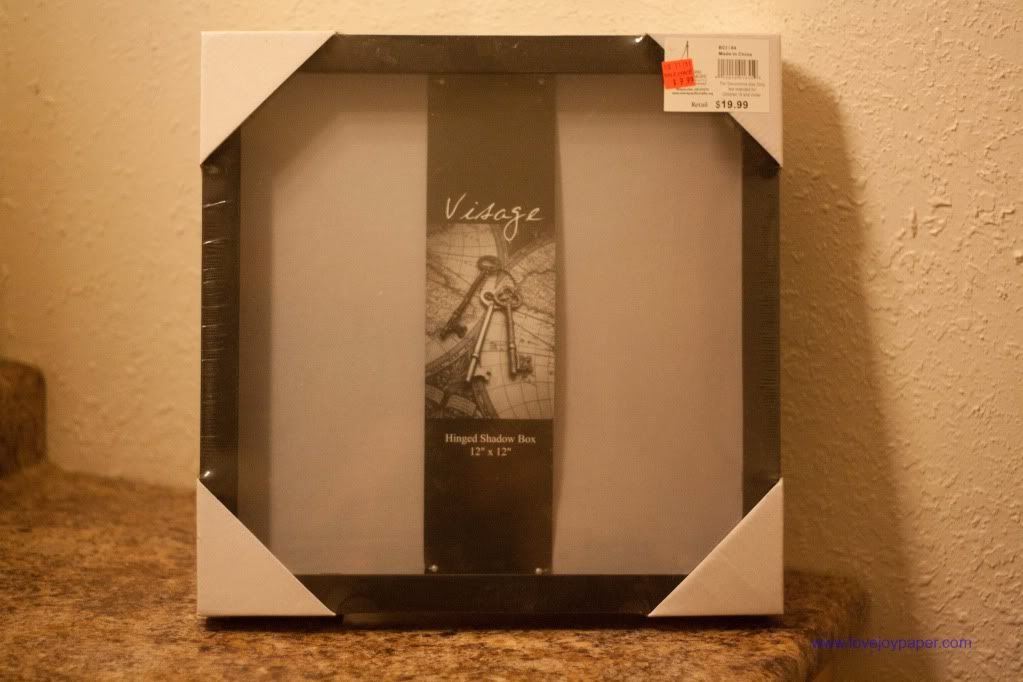
This is the frame I picked up. I bought the 12x12.

Photobucket


First, open the back of the frame and pull out the piece of foam. I used this in my project, I just flipped it around so the cloth was in the back. Then I adhered my piece of 12x12 paper to it.
I put it back in the frame, closed the back and began to work on the front.

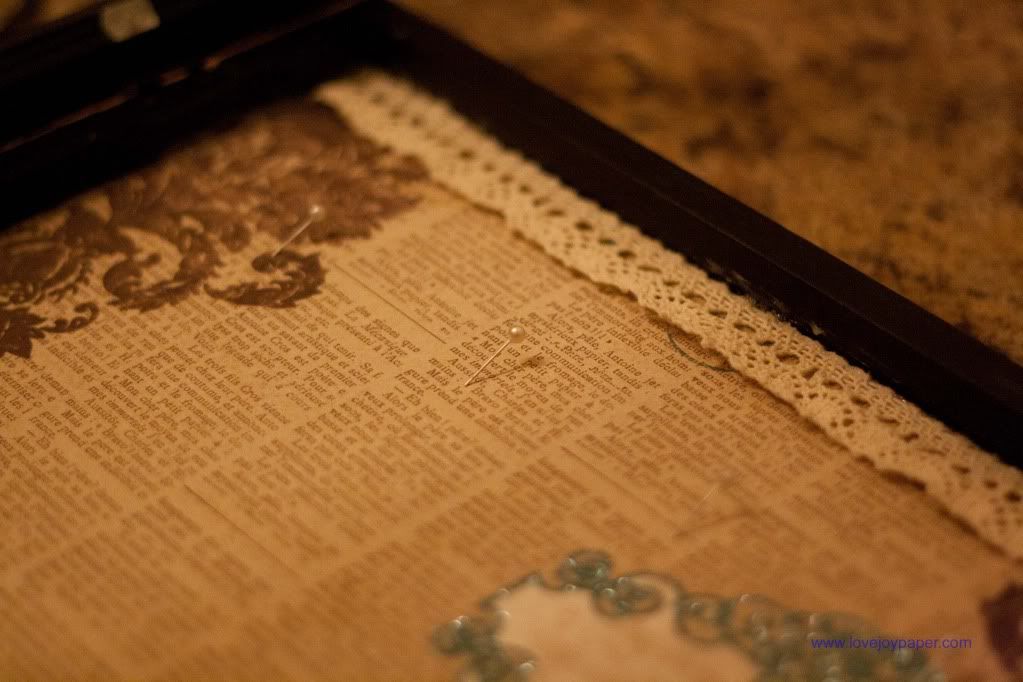
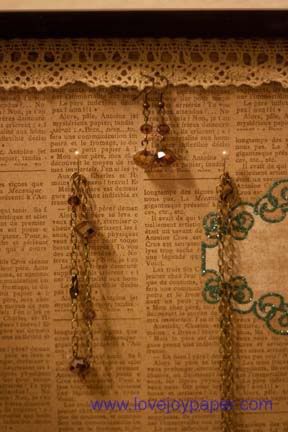
For the earrings (and to add some decorative touches) I used my favorite adhesive, Beacon 3 in 1 quick dry adhesive to apply a crotcheted ribbon. (Yes, the jewelry is made from elements and crystals from Craft Warehouse as well)

Photobucket

I then measured equal distances and use the same 4 pins that came in the frame as the "hook" for the necklaces. I put them in at an angle equally spaced.

Photobucket


Supplies:  Hinged Frame, My Minds Eye Laundry Line Two paper, American Crafts Crocheted ribbon

The finished project came out just as I had expected. And if my mother in law doesn't like it, she's always welcome to give it back to me because I'll gladly put it to use!

Have a Merry Christmas, and Happy Crafting!

Saturday, November 26, 2011

Card Making with Design Team Member Amanda Sherman

PhotobucketHi!  I’m Amanda, one of the Design Team members.  Sometimes I think there are funny twists in life.  I started scrapbooking after some failed attempts at card making. 

However, once I had a photo and story in hand to tell, the world of paper to me was completely changed and I embraced it and am now a full fledged addict.  (Yes, I’ll admit it, but I’m certainly not changing it!)

Well, now I find it ironic because I’ve struggled with cards after I took up scrapbooking.  Wait, maybe I never actually grasped cards in the first place.  At any rate, I’ve found there is a whole new world of paper products out there that make cards a bit easier. 

You see, they are 6x6 paper stacks.  Yes, really!!  I know, you’ve probably seen them at least a dozen times at Craft Warehouse.  I stayed away from them for a long time because the pattern scaled to 25% of the 12x12 size never did much for me.  Until I realized two things.  First, I can make a card out of a sheet of paper and not feel guilty for cutting a new 12x12 sheet.  Secondly, the print scale really is much better for cards.  AND if you want to make 6x6 cards (additional postage required), the hard part is done for you!!

Recently I embraced this whole thought process as I set out to make a card for my Mother in Law.  I kept the sentiment simple (well, non-existent) because I wanted it to be completely visual yumminess.  And not really knowing how the end result was going to be when I stared, I ended up having this divine card that I must say is one of my very favorite cards I’ve ever made.

lovejoypaper card
01

For the handmade embellishment, layer two pieces of tissue paper over matching cardstock.  Die cut the layers together.  Then hand stitch & spray with a Glimmer Mist for the final touch!  It makes the tissue crinkle and adds shimmer at the same time.  A definite handmade touch.

Supplies:  My Minds Eye Lost & Found Two (paper & trims), Glimmer Mist, misc (floss & button), brown ink

Monday, November 21, 2011

Thankgiving Project by Design Team Member Jennifer Evans

Family is pretty important to me. I love the memories that I have of my late grandparents and wish that I could hear them tell me just one more story of their growing up in England or their adventures coming to the United States on the Queen Mary. Growing up, we always had photos and stories to share about our family's history.

When I got married, I asked my in-laws about pictures of them or their family and they told me they didn't have any pictures of them as babies. I was shocked! No photos?

A couple of years ago, I was in the spare room helping my mother-in-law. She came across a few boxes in the closet. She said they were her mother-in-law's and she didn't know what was in them. She opened them up and inside was envelopes. I asked if I could take them home to look through them and she said it would be fine.

Needless to say, I found a gold mine. My husband's grandmother was quite the scrapbooker at heart. She had organized every envelope down to each month since her marriage. Inside each envelope were negatives! They were still in perfect order including the negatives of my father-in-law as a baby in sealed envelopes! I was the first one to crack open the envelope sealed with a 1950's date, hold up the negative to the light, and squeal at the treasure I had found. Some of these photos had been lost at what was thought forever. She had preserved them by sealing the envelope and keeping them in a dark closet for years!


Layout by Jennifer Evans
Using Crate Paper's Farmhouse line


I purchased a professional negative scanner and began preserving my family's history. I then decided, that my son should know the story of his family and wrote up questions for my family to answer. I emailed these questions to family members ahead of time and asked them to email me the answers before Thanksgiving. (You could give them a date before Christmas too).

I didn't tell the family my real reason for collecting these answers; they all thought they would be just reading the answers on Thanksgiving. What I really did, was compile the answers and gave every family member their own page in a scrapbook. I added recent and the new photos I found hidden away in the album.

I will never forget the look my in-law's had when they opened their Christmas gift that year. There were pictures of their wedding that they hadn't seen in over 20 years on the front cover. Their eyes were filled with tears and they were speechless. Now, that was the best gift I could have ever given them! A collection of memories to pass down through the years.

Some of the questions I gave the family are as follows. Feel free to use them in your own scrapbook album. The more questions the better because they may not want to answer some of them if they don't want to.

What was it like growing up as a small child?


What was your favorite part of school?

What was your favorite memory of your grandparents? Your parents?


What did you like to do as a child? What was your favorite game?

What was your favorite food?


What was your favorite childhood toy?

If the album is for a specific person add What is your favorite thing about ___________?

What is your favorite holiday memory?


What was your favorite family vacation?

What do you love about being a __________ (mom, dad, aunt, uncle, etc.)


Tuesday, November 15, 2011

Christmas Joy by Design Team Member Jules Avile

Hey there everyone! My name is Jules and I will be sharing my project with you today!

I was given a sketch and a paper kit with some goodies to play with and given the liberty to make whatever my little heart desired...well...I tried thinking of what to make, although it didn't take me long to decide, I could not help but think..."Layout"!! It was just fitting for me....and I had just pulled some old pics of my kids from years ago and just had to scrap one of them!! 


Let me show you what was given to me,

the front of the paper...


So, this is the "St. Nick" paper collection made by Fancy Pants!  Love the "lellow" (my kids used to say yellow like that!! lol)   

and the backside of the paper in the same order!

and the embellishments,

But aren't these just pretty?! I was beyond excited about the style and the colors....and those flowers and the tinsel garland! Perfect pop of color!

I did use some additional supplies, which can all be  found at your local Craft Warehouse!

These extra supplies are:

- a 12"x12" artist canvas (which you can almost always find on sale at Craft Warehouse....I stock up on a few almost every time I go..heehee)

- Spellbinders circle dies

- red double sided tape adhesive

- paint applicator (spongy circle for the effect I did)

- any white shade of Folkart acrylic paint

- Glossy Accents (this is a glue and can be used to coat anything to give an "epoxy" sticker look)

- American Craft Thickers alphabet stickers (CW carries bunches of colors and styles)

- Cosmo Cricket "Tiny Type" alphabet stickers (awesome to use for journaling)

- a Tim Holtz paper distresser (not shown above but is in another pic below) 

- and a 12x12 solid gray card stock (CW also carries tons in different colors and shades)

Now my assigned sketch designed by Jen and her sweet sister Rebecca! Didn't they do a great job? This is a very cool and simple sketch design that was so easy to start my project with. Easy peasy people!! :)

Layout created for Craft Warehouse 
by Jennifer Evans & Rebecca Grinder


Our very talented DT member Mendi just shared hers in the previous post. You must see what she made if you haven't already! Her sketch was just as fun and her project...completely gorgeous and inspiring! But go after mine ok:) lol

Ok, so I took loads of pics but will try to share just the points of the techniques and what I consider the highlights of the layout and Jen's sketch!
Here is my layout!
 

I have to say that my most favorite things to do to paper is distressing it! I love painting too, so to do the both to the paper was so much fun!
 
I started out with cutting out a frame 1-1/2" wide (I measured then cut out with a craft knife for a clean cut) and stitched around it with my sewing machine (optional or course). I then tore a strip off the inside edge close to the stitch lines and then used my paper distresser and finger tips to curl the paper and "age" the look of it!

The end result....cool huh? :)

For the gray cardstock, I cut 1" of 2 sides making it 11"x11". Then I did a dry paint technique where using my dry sponge tool, getting a little bit of paint at a time, I add it to the paper by pouncing all around it (I also did this to some of the other strips of paper and chipboard embellishments to add a "snowy" look).  

Then I added water to a dollop of paint to dilute it and add drops of it onto the cardstock to make a "splashed" effect! This is what it looked like...

Here, I tilted it to the side and tapped the paper on my table to 
make the watery paint run.

I cut 4 strips of paper to 2"x10 and 2"x11 (I had already cut up some of the paper. I didn't think of making this tree until a little later), lightly spritzed with water (to make it more workable), did an angled accordion type fold, they are soft folds (not a tight crease), distressed the bottom edges (I did that after it dried or the paper will tear) and then dry painted with the pouncing....
 (paint looks darker in the photo...?....not sure why)

I glued the top edges together to make a fan with all 4 pieces.Taking a strip of chipboard scraps, I started adhering the fans to the chipboard...

Then comes a tree! I cut the edges down to have a clean triangular look....and distress the edges again:)

This last one is a little thinner...I wanted a tall look so I cut the sides down a little more! I added more paint using the pouncing technique to the bottoms of the pieces.

I got the largest "lellow" star from the sticker sheet and stuck it on some scrap chipboard to create my own chipboard embellishment, then used an emery board to clean the edges and it also preps the piece so the paint will adhere better....again with pouncing of the paint! Looks snowed on!
I used this star to top my tree, and coated it with glossy accents!


I made some hanging ornaments for those circles you see on the sketch....and used the tinsel to hang them from. Basically I used the circle dies and cut 3 circles from each size, using scraps of chipboard for added dimension, I added them under the gray smaller circles. The top layer are from the chipboard sheets. I pounced paint on these too:) Then once dry, I coated them with glossy accents too!

I adhered the border frame to the gray cardstock on both sides leaving the top open for the tinsel to be glued down on the backside.  Then I put layers of chosen papers down and started to  embellish my page according to the sketch!

The shiny spots are what I coated with Glossy Accents. I used the red tinsel to hang the "Joy" banner under the picture for a color pop and some texture!
 

I did fussy cut some stockings from the paper that had borders  on it and cut some thin strips of papers from the  collection to simulate hanging stockings:) 
 

I added the double sided tape on the backside and adhered it to the canvas, then used hot glue to tack the entire edges down onto it to  make sure it sticks!
 

....and, here it is on the canvas!
 

And again.....the whole LO!
 

Thanks Jen for the sketch and Craft Warehouse for the kit!!  

So guys, head over to your Craft Warehouse and get yourself this collection! If you don't normally make layouts, you can totally just make a card or an altered project using the sketches for these last 2 posted here on the blog!  If you love a challenge, make something you haven't tried yet! You'll be surprised at what you can come up with if you just try!    
Thanks for stopping by and checking out my layout! 
xoxo and Happy Scrafting!!!   

LinkWithin

Related Posts Plugin for WordPress, Blogger...
Blogging tips