Thursday, October 31, 2013

Shamballa Style Bracelets

 Supplies

  • 1 strand of 6MM, glass pearls, 1 strand of 10MM glass pearls
  • Focal Bead(s), 6MM-14MM in size
  • TEX210 C-Lon cording
  • GS Hypo Cement
  • Tools:
  • Scissors
  • Foam core and T-Pins, or Clip board and tape.

Directions

(Refer to the Knot Terms, Definitions, and Abbreviations)
  1. Cut 2 lengths of cording 60 inches long and two 18 inch length of cording, set one of the 12 inch pieces aside.
  2. Pin a 12 inch piece of cording to your foam core or clip onto clip board and pin/tape the other end down so that the cord is taught. Slide the ends of the longer length of cording underneath the upper portion of the pinned down cord, then begin tying a square knot using the pinned cord as the filler cord.
  3. Square Knot(SK): To tie a square knot you must have two working cord and at least one filler cord on which to tie the knot.  Lay your left working cord (WC) over the filler cord (FC) (this will create what looks like the number “4”), bring your right WC over the top of the left WC, bring the right cord underneath the FC, and up through the uprights of the “4”, pull both WC until snug at the top.  You have just created the first half of a square knot, often referred to as a “half knot”.  Nexttake the working cord that's now on the right and curve it over the fillers, heading left. Take the left working cord and pass it over the right one, under the fillers, and out through the space on the right. Tighten the Square Knot by pulling on the ends. The Head of the knot will face left.
  4. Slide a bead onto the cord and up next to the knot. Repeat tying one knot and adding a bead.
  5. For adding a focal bead that you would like to have centered, measure the circumference of your wrist, subtract ½ inch, and then divide in two. This is the measurement to use from the first pearl to the focal.
  6. Continue adding beads and tying a knot after each until you have mirrored the first portion.
  7. To create the slide knot. Re-pin or tape, the bracelet, so that the two filler cords are side by side forming the round shape of the bracelet, pin of tape at the edge of the beads so that you can knot around the two filler cords.
  8. Using the last 18 inch piece of cording slide the end under the two ends that are pinned down, and begin tying a square knot. Tie five full square knots, around the filler cords.
  9. Carefully glue the ends of the slide knot cord to each side of the knot head using the GS Hypo cement, being careful not to glue the filler cords which would cause the knot to stay in place rather than slide to form the closure. *A lighter can also be used to melt the ends of the cord to the knot.
  10. To finish, adjust the slide closure to fit your wrist, and also so that you can remove the bracelet, slide a pearl on each end of the cord and tie an over hand knot, this will prevent the pearl and filler cord from sliding through the slide knot.

Wednesday, October 30, 2013

Wrapped Jump Ring and Crystal Zig Zag Bracelet

Supplies

  • 2 ½ yards of 1MM round leather cording
  • 1 package of 6MM split rings (or 80 split rings)
  • 1 package of 6MM jump rings (or 80 jump rings) optional *you could double the amount of either the jump rings or split rings for a uniform look.
  • 1 button
  • 160 (5 strands) Shimmer Crystal 6MM beads (we used three colors)
  • Clip board

Directions

  1. Slide your button onto one end and fold your piece of 1MM leather cording in half, with the button in the center bend.  Tie an over hand knot to keep button in place, clip you button under the clip of the clip board.
  2. Slide a bead onto the cord, then a split ring onto both cords, slide a bead onto the cord that does not already have a bead on it, slide another jump ring onto both cords. This will begin the zigzag pattern.
  3. Repeat step 2.), until you have reached desired length.  Our bracelet wraps around 3 times and then buttons.
  4. Pattern variations; for our bracelet we alternated split rings surrounding the translucent beads, and jump rings surrounding the purple beads.
  5. To finish, be sure to end with a bead, tie another over hand knot to secure.  To make the bracelet adjustable you will need to tie several consecutive with enough space between for the diameter of your button to pass through. We added a decorative bead to each end of the leather cording to finish.
***This bracelet also looks great as a single strand, and requires a third of the leather, beads and jump rings to make.

Tuesday, October 29, 2013

Trendy Filigree Earrings


Supplies :


Gold Ear Wire
Metal filigree pendants
Acrylic paint (colors used Americana Bluegrass Green and Razzle Berry)
Acrylic spray sealer (could also use Mod Podge)
Chain nose pliers
Stiff bristled paint brush (not pictured)

Directions:


1. Paint both sides of filigree pieces using a "pouncing" motion and stiff
brush


2. Let dry between coats, be sure to paint both sides


3. Spray with sealer and let dry again

4. Carefully open ear wire using the pliers and slip through opening at top of
filigree, close with pliers


That's it!

Monday, October 28, 2013

Micro Macrame Chevron Bracelet

Supplies:

  • 36 Round Gemstone beads 4MM
  • 3 10MM Joy Antique Silver Tierra Cast Beads
  • 6 Small Turkish Tierra Cast Beads
  • 1 tube Delica 11/0 Seed Beads
  • 1 Czech Rosette Tierra Cast Button
  • 4 colors of TEX210 C-Lon cording (I used Lavender, Pink, Maroon, and Dk. Purple)

Tools:

  • Scissors
  • Foam core board and T-pins / or Clip board to attach the bracelet to while working.

Directions:

    **Reference the Knotting Terms, Definitions and Abbreviations sheet with this project sheet.**
  1. Begin by measuring your C-Lon cording, you will need to cut 2 lengths per color that are 80 inches long each. 
  2. Thread one end of each cord through the button shank and center in half, clip button underneath you’re the clip of your clip board.
  3. Arrange your threads so that they are a mirror image of each other, with the same color thread next to each other as follows: Lavender, Lavender, pink, pink, Dk. purple, Dk. purple, maroon, maroon, (center), maroon, maroon, Dk. purple, Dk. purple, pink, pink, lavender, lavender.
  4. Once you have all of the strands arranged, you can begin the knot tying.  You will now begin tying your forward knots (F), and working toward the center strands.  Once you have gotten to the center, stop, and begin working from the right tying the backward knot (B).  Then once you have gotten to the center you will need to tie a forward backward knot (FB), with the two cords to complete the first row. This will in the next few passes create a chevron pattern.
  5. Repeat step 4.) with the next threads again starting from the left, and working toward center, then working from right toward center, and tying together at center. Repeat this until you have 6 rows of color in a chevron pattern (aprox. 1inch long).
  6. Using only the center four threads, load small Turkish bead onto the centermost two threads, then tie a SK around the FC to lock in the bead.  Slide a 10MM Joy bead onto the two the center most threads, and tie another SK around the FC, then load another small Turkish bead and tie another SK.
  7. Now section off the next three closest threads to the left of the center. Load a 4MM round bead onto the center or filler thread. Load the strand closest to the center with three Delica seed beads, and the thread closer to the outside with 5 Delica seed beads, tie a SK around the filler cord locking in the 4MM bead. Now tie 5 square knots and then load a 4MM round, three Delica’s on center most cord, and 5 Delica’s on the outer cord, tie a half square knot to hold in place.
  8. Repeat Step 7.) Next with the three cords to the right of center section you just tied.
  9. For the outer sections of beads (left), you will be using the three strands closest to the outside, and threading 5 of the 4MM round beads onto the center cord (tie a temporary knot at the end of the thread to keep them from falling off), load 5 Delica seed beads on the outer working cord, and three Delica seed beads on the inner working cord, tie a square knot to lock in the first 4MM bead. Do this portion of the step five times (because you are always loading three on the inside and 5 on the outside this section will curve towards the middle.
  10. Repeat step 9.) To create the outer section of beads (right).
  11. Start at the center (untie the half square knot so that you continue with the same chevron pattern as you started), and begin with a FB in the middle, continue to the left tying a B row of knots until you reach the outside of the bracelet. From center knot to the right begin tying a F row of knots until you reach the outside of the bracelet.  This will be forming the reverse chevron pattern you began with.  Continue in the same manner to form two rows of color.
  12. Once you have the two full rows of color, continue tying knots from center towards the outside, stopping short of the last thread each time, until you have come to a point at which you will need to tie FB knot.
  13. Repeat steps 6.)-10.) To create another section of beads, that matches the first.
  14. Repeat steps 10.)+ 11.) To create another small diamond shape of knotted bracelet.
  15. Repeat steps 6.)-10.) Once again to create the third and last section of beads.
  16. Repeat steps 10.)+11.) But rather than two rows of color, create 6 rows of color.
  17. To create the button holes. Divide strands in half at the center, using the threads on the right side, tie a square knot using the outer two threads and the inner two threads, around the filler threads in the center. Tie 5-8 SK’s, or enough to fit your button’s diameter.  Repeat on the other side to match. 
  18. Now with the two outer most strands of each side tie a SK around all of the other threads, tie 3 SK’s, then repeat step 17.), then 18.) , then 17.) , again to create three button holes. Rather and tie more square knots at the end tie an over hand knot to finish. Trim off remaining thread to 1CM.

Saturday, October 26, 2013

Whimsical Open Back Frames


Create your own piece of wall art by adding either paper, chicken wire, burlap, a photograph, or cork to our open back frames! Available in white, black, and red for an even easier project!


* 40% off regular prices until October 27, 2013 (reg $12.99-$29.99)

Friday, October 25, 2013

Chicken Wire Organization Boards


Paint our white frames with bold colors for a statement that matches, then just add chicken wire for a twist on an organization board! 


Directions:

1. Pick from our selection of White Ornate Open Back Frames.


2. Prime frame first. Spray with Design Master Spray Paint.


3. Staple gun our Chicken Wire to the back side of the frame. Not your typical barnyard chicken wire, this small scale chicken wire is perfectly suited to crafting.

4. Hang and enjoy!

* White Ornate Open Back Frames 50% off regular prices, Design Master Spray Paint $7.93 (reg $9.99), and Mini Chicken Wire 12x12 $2.99 (reg $3.99), 11x14 $3.99 (reg $4.99) and 16x20 $4.99 (reg $5.99) on sale until October 27th, 2013

Thursday, October 24, 2013

Hot Trend Chicken Wire!


Chicken Wire is all a hot trend this fall! But our chicken wire is not your typical chicken wire! This small scale version is perfect and easy to use for crafting! Here are some ideas to inspire your next fall project!


Wrap your candle holder with chiken wire and burlap ribbon for a country chic look at your table.


Wrap a mason jar with wire and add a chalk board clip. Reuse the clips and jars for your table decor year after year!


Place chicken wire in the lid of the mason jar as a floral frog. This will keep your stems upright and looking beautiful on your table scape!


Do the same at your beverage station! Add chalkboard labels for an even more classic look!


Our pre-sized 12x12 chicken wire slips right into a frame! Just add clips and photos to personalize it!

* Chicken Wire on sale 12x12 $2.99 (reg $3.99), 11x14 $3.99 (reg $4.99), and 16x20 $4.99 (reg 5.99) until October 27th, 2013

Wednesday, October 23, 2013

Trendy Jewelry Organizer


Customize your own Jewelry Organizer to match your personality or room decor! Create it in these simple steps!


1. Get our 12x24 Gemline Frame.

2. Pick out your favorite Deco Metal Sheet and spray with Montana Gold Spray Paint.


3. Place metal sheet in the back of the frame. Hang on the wall and hang your jewelry! 

* 12x24 Gemline Frames $19.99, Deco Metal Sheets 25% off regular prices, and Montana Gold Spray Paint $7.93 (reg $10.50) on sale until October 27, 2013


Canvas Banners


Decorate your holiday space with customizable Canvas Banners! Just add paper and vinyl for your title and you are ready to party!

Use chalkboard paper and treat it with chalk, then clean the space for your vinyl! It looks just like the real thing!

Great tip: Use Beacon's Fabric Tack Glue, it doesn't discolor your fabric pennant and dries really fast!


Use our Seasonal Vinyl Sayings to make creating your canvas even easier! 

* Six Pennant Canvas Banner 4 Feet Long on sale until October 27, 2013 for $8.97 (reg $12.99) & Vinyl Seasonal Sayings only $6.99!

Tuesday, October 22, 2013

Vampire Teeth Pumpkin Table Scape


Set a table your guests will be chomping to get to! It will by far be the most popular part of your party!


Vampire Teeth Pumpkins

Supplies:

Tall paper mache pumpkins
Black acrylic paint
Tim Holtz scissors
Vampire teeth
Glue gun

Directions:

Paint pumpkins with black acrylic paint.
Cut a rectangle into your pumpkin to make a hole for the teeth to go into.
Create notches so the teeth sit in the hole.
Use glue gun to hold teeth in position.

Another great tip: Use the plastic vampire teeth as napkin rings and place card holders! It will add even more spook to your table!

* Vampire Teeth $1.99 (12 pack reg $2.49) and Paper Mache Tall Pumpkins $1.99 (6" reg $2.99) on sale until October 27th, 2013

Seasonal Glass Blocks


These cute seasonal Glass Blocks are perfect to decorate any space for Halloween, Fall, Thanksgiving, Winter, or Christmas! 


Created By Dania Carson from Vancouver Craft Warehouse

FALL GLASS BLOCK

Ingredients:
glass block
Fall vinyl word block
E6000
fall floral pick
fall wired edge ribbon
artificial fall leaves
copper color Stickles glitter
20ct amber craft bright lights

Cut apart fall word block from Vinyl Words and space words on block. Put the amber craft bright lights and the artificial fall leaves inside the glass block with the opening at the bottom and the cord coming out of the bottom,  work the leaves around to the front of the lights so the wire doesn't show too much.  Lay the glass block flat, cut apart Fall vinyl word block, space words around on the front of the block. take the leaf from the vinyl word block and put it on the large glass nugget. Using the copper Stickles glitter trace stem lines on the leaf.  Using the E6000 glue the glass nugget to the front of the glass block.  Leave it flat until the glue is dry.  Cut a piece of wire edge ribbon long enough to wrap around the block and tie in a knot.  Make a bow for the top of the block and attach the fall floral/berry pick and the bow to the knot from the ribbon that goes around the block.  Plug it in and bask in the warm autumn colors.


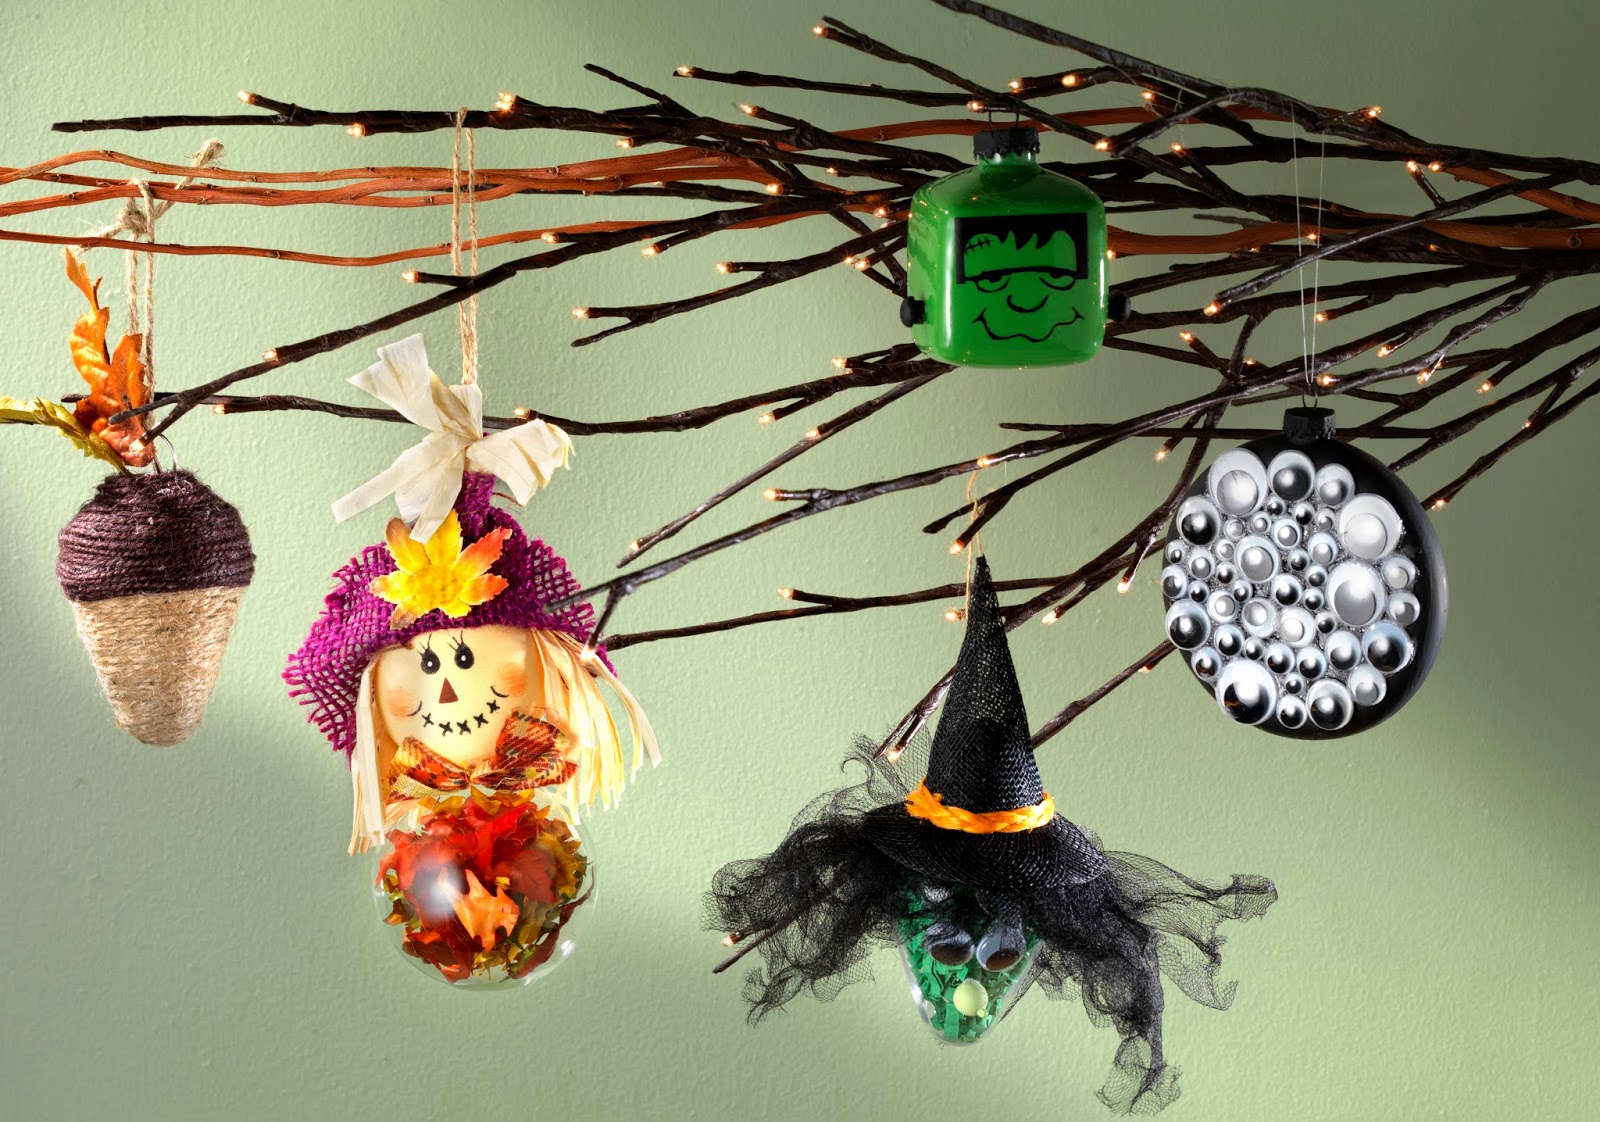
HALLOWEEN GLASS BLOCK


Ingredients:
glass block
beacons 3 in 1 glue
asstd size wiggly eyes
Halloween vinyl word block
E6000
Tangerine CeramCoat paint
mini frame
Halloween pattern paper
1 glass nugget
purple and black tulle
large glitter fly

Glue paper to back of block using Beacons 3 in 1 glue just along the outer edge of the paper.  Paint a mini frame bright orange, put paper on the back of it and fill the front side of the frame with wiggly eyes attaching with Beacons 3 in 1 glue. Lay the glass block flat. Glue the mini frame on the inside of the glass block with E6000.   Cut apart the vinyl Halloween word block, put the vinyl spider from the vinyl word block onto a large glass nugget, place the Halloween words where you would like them on the glass block, glue the glass nugget on the glass block with E6000 while the block is still laying flat.  When the glue is dried stand the block upright and put candy corn in the bottom of the block far enough down that its difficult for fingers to reach so they won't steal the display.  Wrap purple sparkle tulle and black tulle around the block and tie at the top with a knot.  Put a giant sparkle fly on top of the knot.

SCARECROW GLASS BLOCK

Ingredients:

Glass block
Hot glue and hot glue gun
burlap fat quarter
jute twine
fall pick
raffia - small package
excelsior
scarecrow face vinyl
bandana
woodland owl ornament

Fill the inside of the glass block with the excelsior leaving the opening at the top.  Rub on the vinyl scarecrow face onto the front of the glass block, roll the bandana up into a neckerchief and wrap around the bottom of the block.  Glue it into place with a few dabs of hot glue.  Cut some strands of raffia for hair and glue it around the top of the block with the hot glue gun.  If you have a sewing machine or needle and thread handy you can sew the burlap to make a hat or use the hot glue gun after cutting the burlap just about 1/2" longer than the circumference of the block and glue a seam up the back.  Fold the bottom edge up to create a brim and glue it to the top of the glass block over the top of the raffia hair. Tie the jute around the top of the burlap tube to create a hat.  Trim excess burlap if you wish. Glue the fall pick where the burlap is gathered with the jute and then glue the woodland owl ornament to the top of the block.

SNOWMAN GLASS BLOCK


Ingredients:
Glass block
hot glue and hot glue gun
crystal frost spray
squiggly face vinyl snowman face
red cuddle soft fat quarter
20ct white cord clear craft bright lights
1 bag Crystal Fiber shredded mylar
2 white birds
a small length of ribbon

Spray the inside of the glass block with the crystal frost spray. Let it dry, that's when the magic frost happens. Put the lights and crystal fiber inside the block with the cord of the lights coming out the top of the block.  It  is easiest to layer the crystal fiber and lights and put 1/3 of the fiber in the block then put about 1/3 of the strand of lights then 1/3 crystal fiber and 1/3 light strand and then the last of the fiber and lights.  Use a pen or skewer or something long and thin to help shift around the lights and fiber so not too much cord is showing.  Rub on the vinyl snowman face onto the front of the block (make sure the cord is still coming out of the top)  For the hat, measure the circumference of the block and add 1/2" then trim the cuddle soft fat quarter to that length. then again, if you want to sew it feel free or use a hot glue gun to glue the back edges together as a seam. Fold  the bottom edge up to hide the raw edge and glued it into place. Put the hat onto the glass block, put a few dabs of glue on the corners to hold it in place and tied the top to create a hat.  Clip on a couple of cute glittery white birds and take the leftovers of the red Cuddlesoft to create a scarf around the bottom of the block.

Santa Cones


These fun Santa Cones make a great mantel or table top display for the holidays! A great craft for kids and adults alike! 


Shopping List

• Paper cones Small, Medium & Large
• Red acrylic paint
• Martha Stewart glue & fine red glitter or Krylon Cherry Bomb Glitter Blast spray
• 1 yard 1” black ribbon
• 1/4 yard 1/2” black ribbon
• 2 yards of white Marabou feathers
• 2 Packs of Darice clear square rhinestones
• E6000 glue and glue gun
 
Directions

• Paint the cones with red acrylic paint. Set aside and let dry.
 
• Once completely dry...take the Martha Stewart glue and apply on cone. Then coat in glitter. Sprinkle off excess. Set aside and completely dry.
• Take your black ribbon. Wrap around the middle of each cone. Glue the ribbon with E6000. Let it dry.
• Place rhinestones on card stock paper in square formation. Cut paper around the rhinestones to create the buckle.
• Take white marabou (or a boa) and cut to fit the bottom of the cone. Use up top! Glue on and then dry!

* Paper Mache Cones on sale 40% off regular prices until October 27th, 2013!


Monday, October 21, 2013

Fall and Halloween Ornaments


Ornaments aren't just for Christmas! Ornaments are fun to decorate your home and also make great gift toppers! Cute and crafty, seasonal ornaments are right at home on our lighted branches! 

created by Dania Carson for Craft Warehouse

Think outside the holiday! Shaped ornaments allow for more creative ideas!

Glass Ornaments

Plastic Ornaments

ACORN

Ingredients:
light bulb plastic ornament
Beacons 3 in 1 glue
Darive 2 ply natural color jute
Canvas Corp chocolate color jute
Artificial fall leaves

Remove the silver ornament cap. Lay a bead of glue around the neck of the ornament and begin winding the natural color jute from the top of the ornament down toward the bottom adding glue as you go.  Keep the jute pushed tight up against the row above it.  Continue until the entire ornament is covered with natural colored jute.  Starting at the top of the ornament again using the chocolate jute lay a bead of glue and wind down a about 1/1/2 inches from the top gluing as you go to create an acorn cap.  Take the wire loop out of the ornament cap and slide it inside the ornament keeping the loop outside the top.  glue artificial leaves at the top of the acorn.

SCARECROW


Ingredients:
2 5/8" round ornament
1 pkg artificial mini fall leaves
1 pkg scarecrow heads
hot glue and glue gun

Remove the ornament cap and fill the ornament with the package of mini fall leaves.  Put the cap back on the ornament and hot glue the scarecrow head to the top of the ornament.

WITCH HEAD

Ingredients:
light bulb shaped ornament
green paper crimps
wiggly eyes
black tulle
green paint
small wooden ball
1 seed bead
Beacons 3 in 1 glue
sinamay witch hat

Remove the ornament cap and fill the ornament with green paper krimps then put the cap back on.  Glue the seed bead to the small wooden ball with the 3in1 glue and set aside to dry. Cut the black tulle into 4 5" lengths, stack them on top of each other and tie a knot in the center.  shred the tulle using scissors, glue the knot of tulle at the top of the ornament  about around the upper edgae of the ornament.  scrunch the tulle to create a fabulous frizzy look.  Glue the sinamay that to the top.  paint the mini wood ball with the green paint and let dry, glue the wiggly eyes to the ornament and glue the green ball nose to the witch face.

FRANKENSTEIN CUBE ORNAMENT

Ingredients:
glass cube ornaments
green paint
vinyl words
vinyl mini Frankenstein face
mini wooden screw covers
black paint
Beacons 3 in 1 glue

Remove the cap of the cube ornament.  Pour green paint inside the ornament and swirl to cover the entire inside of the ornament.  Turn the ornament upside down to allow the excess paint to drain out. (this works really well in an egg carton). Paint 2 of the screw covers and the ornament cap black and let dry.  After the ornament has drained of excess paint (its best to let it dry for a while). Put the cap that has been painted black back on top.  Rub on the vinyl face and then glue the screw covers to the sides of the ornament as neck bolts.

GLOW IN THE DARK MULTI-EYED ORNAMENT

Ingredients:
flat glass disc ornament
1pkg asst sizeglow in the dark wiggly eyes
black paint
Beacons 3 in 1 glue

Paint the outside of the flat disc ornament with black ceramcoat paint and let dry.  Be sure to paint the ornament cap as well.  After it has dried, using the 3 in 1 glue, glue the assored eyes covering the surface of the ornament.  Start with the largest sizes and place them randomly then work down in size to the tinier eyes filling in as many of the empty spaces as you can.

* Your choice of Clear Glass Boxed Ornaments only $5 (reg $7.99) and Plastic Ornaments only $1 each (reg $1.99) until October 27th, 2013

Wire Charm Bracelets


Show off who you are with our Charm Bracelets! All you have to do is slide on a charm. Collect them, tell a story, or change them out for the day!


Directions, as easy as 1, 2, and 3!

1. Open bracelet.

2. Slide on a charm or beads to complete your look.


3. Wear or give away!

* Wire Charm Bracelets $3.99 and Zim Pewter Charms 3 for $9 (reg $5 each) on sale until October 27, 2013


LinkWithin

Related Posts Plugin for WordPress, Blogger...
Blogging tips