Friday, June 3, 2011

Quilt Party in Vancouver...Recap!


Quilting writer, columnist and editor Barbara Weiland Talbert shows off her placemat creation
(the pattern was designed by her).

Have you ever been to Vancouver's Quilt Party (if not make sure to go to the next one, click here for more info).  Yesterday, Barbara Weiland Talbert, a sewing and quilting writer, columnist, editor and designer spoke to the group of quilting enthusiasts (talking about trends and tricks of the trade).  Afterwards, it was time for quilt show and tell.  Here's some pics the Quilt Party wanted me to share.


Quilt Party in session!


Can you imagine cozying up with this quilt?  Beautiful!


Gorgeous quilt, gorgeous colors!


Aww, it's the youngest quilter in the group, Adalyn!

Speaking of quilting, have you ever created a t-shirt quilt?  I can tell you, that I have no clue how to create one, but NAU student Cara Williams has one she wanted me to share with you.  Maybe she can give me a few tips to go off of.  Check back tomorrow to see it!

Thursday, June 2, 2011

Girls "Good Day Sunshine" 12 x12 Frame


Good day Sunshine Frame


Ingredients:


MDF 12x12 frame with 4x4 opening


My Minds Eye Good Day Girls Sunshine 12x12 paper pack.


My Minds Eye button packs, brads, key embellishments & stickers.


Tim Holtz Flower dye cut. (just send your burlap through the dye cut machine)


E6000 glue, pop dots & pioneer glue stick


Flag stick Pink Paislee “Soiree” collection

Family Memories Collage


Ingredients:

Unfinished 9 opening wood frame


My Minds Eye Stella & Rose Hattie 6x6 paper pack


“Family”, “Remember” & “Oh So Happy” dye cut


Hattie ribbon pack


Tim Holtz Vintage button & corners


"Family holds it all together” Vinyl


Cosmo Cricket Glubers (to make your flowers)


Brads & pearl embellishments


Pioneer glue stick


Large Pop dots & E6000 glue

Wednesday, June 1, 2011

Give your guest a warm "Welcome"

How to create your "Welcome" sign.....


The first step was creating a Chevron stencil. I downloaded a chevron pattered image and started to trace my pattern on to the stencil material.


After filling the stencil with the pattern I used a Fiskers fingertip knife and a cutting board.


I then took my oval wood plaque and painted it with acrylic paint.


After allowing my paint to dry I placed the stencil over the top of the wood plaque. To hold it in place a used small pieces of double sided tape.


Using a stencil brush I lightly tapped on white acrylic paint. I had to do a couple of coats to get enough color on without globing it on. If you have to much paint on your brush the paint tends to seep under your stencil.


Once your paint dries pull off the stencil.


My new favorite thing are these Glubers by Cosmo Cricket! The stores can't keep them in stock. This was how I created the flowers. The top 2 flowers I used two different ribbons and the bottom flower was made with Burlap. All you have to do is tie a knot in the burlap and start twisting and wrapping. Instructions are also on the packaging. I also added some decorative brads and embellishments to the flowers.


The last piece is placing on your vinyl word "Welcome"


Friday, May 27, 2011

Create a photo display to match your decor


Feeling the need to do something crafty, but dont want to spend the whole weekend to get to the finish line? Here is a fun project you can do in under 2 hours!

Choose colors and patterns to match your home decor, or mood. Make one for a friend to match her style!


Scroll down to see the supply list.

How To:
  1. Remove and discard the glass and any wrapping from frame. Remove and set aside the back panel of frame. Using a foam brush, paint the frame with craft paint the color(S) of your choice and set aside to dry. Meanwhile glue the pattern paper of your choice to the back panel of the frame and set aside.
  2. After the paint is dry wrap top portion of the open frame with the rope and tie off in a secure knot or bow. should be VERY snug fit around the still open frame. Cut off access rope and save to make a rope rosette with later. Now push the paper covered back panel back in place- over the rope. The rope will stretch to allow you to get the panel all the way back in and secure in place with the little metal levers on back of frame.
  3. Use 3 in 1 glue or Hot Glue to secure moss along the bottom edge, and maybe up one side a little on the front of your wood frame.
  4. Create flowers from remaining rope, the torn strip of fabric, and the burlap. For the rope rosestte- tie a knot in one end. Coil rest of rope around knot. Secure in place on your frame with 3 in 1 glue or Hot glue. For fabric flower- tie knot in one end, now twist the fabric a little and then coil around the knot. The loose threads and right and wrong side of fabric play peek a boo as you create your flower- looks cool! Secure in place with 3 in 1 glue, or hot glue. You may need to use some adhesive as you go so you flower holds it's shape. For the burlap flower- fold the 4in wide strip in half so you have a 2 inch wide strip. tie end in knot. Now repeat same as the fabric flower- twist and coil, twist and coil, twist and coil until you run out of burlap. Use 3 in 1 or Hot Glue to secure to frame. Finish off your 3 rosettes with vintage buttons, cluster of beads or pearls, maybe a decorative brad, maybe some silk leaves- whatever you like to enhance your flower!
  5. Adhere rhinestones, beads, or gems to your paper or frame where ever you like for added bling!
  6. Attach the butterfly clip (or glue a clip to a silk flower, or anything else you like) to the 'clothesline' rope.
  7. attach any little embellishments to the 'clothesling' rope like little charms. Attach with jump rings, or tie them on with twine or ribbon.
  8. add a clothespin or two- use these to hold and display family photos, post cards, whatever you wish.
Supply list:
  1. 12x12 craft frame (it's 9.99 and 40% off right now!)
  2. 1 12x12 scrapbook paper- pick anything that will match your decor, or mood!
  3. about 1 yd of jute or rope
  4. about 24 inches of torn 2 inch wide fabric strip (choose color to match your decor, or mood!)
  5. about 24 inches of a 4" wide piece of burlap (we have this in 4 colors right now)
  6. 1 butterfly clip (we sell a set of 4 of these, but consider anything you want and hot glue an aligator clip to it!)
  7. 1 clothespin
  8. your choice of beads, pearls, rhinestones, or gems - in a color to match your decor or mood.
  9. deorative moss
  10. craft paint (to macth your decor, or mood!)
  11. foam brush
  12. 3 in 1 Glue from BEACON is so AWESOME for this project, but if you want to use your handy hot glue gun- that will work too.
  13. Charms, pendants, beads, or whatever you have on hand to hang on the line. I used the metal charm from Tim Holtz, and a clear fragment charm also from Tim Holtz - to which I glued a piece of matching scratch paper to so it matched the look I was going for) but just choose 1 or 2 things you can dangle from the rope. A tag maybe?
Here is what the 3 in 1 Glue looks like:


Thursday, May 26, 2011

Mix media memory keeper


Why put your family picture in a frame when you can create a home for it?


I started out with a simple 8x8 pine box and painted it black with acyclic paint.


Then I took sand paper and distressed the edges.


I added an antique handle that we just received in scrap booking by Tim Holtz.


I love these curio knobs! I'm putting them on everything.


To make the "our" pendant. I cut 6 pendants and then sewed them together so that the fabric is double sided. Then I stenciled on the letters using Tim Holtz Distressed Ink. I also distressed the pendents. Next I spray painted the mini clothespins in black. Using jute twine and tacks I tacked up the pendant. Brads were placed in each corner of the photo and glued into the box.

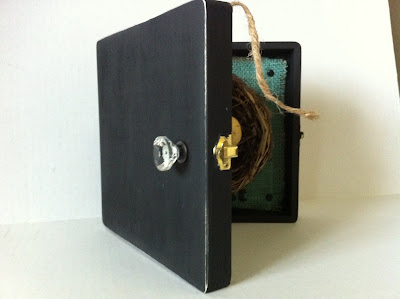
On this side of the box I cut a piece of burlap 71/2" x 71/2" when I used the Tattered Angels spray (Jazz Blue) to give it the bright blue color.


After the burlap dried I added 4 black brads to each corner and glue it into the box using E6000 glue. I used Thickers stickers to spell out nest and glued my nest in with E6000.


There you have it a home for you treasured photo!


Wednesday, May 25, 2011

SMASH...what a great idea!


I'll admit it...scrapbooking has never been my strong point.  I once attempted to start a scrapbook back in 2005 and I got two pages done.  Even though I bought a ton of product, I was completely intimidated and just didn't have that scrapbook creativity in me.  I wish I did...it's just never been my thing.

Okay and on that note...I think SMASH could be my thing.  Watch this video below and tell me how cool is this?


I really love how random it is.  A concert ticket of some kind, receipt from somewhere interesting, pictures, Metro Card (I have a few of those from trips to NYC),  I was even checking out the SMASH blog (yes, they have a blog).  There's a little kid who enjoys SMASHing.  Okay, if that little kid can do it I can do it too! 

The SMASH supplies are endless.  You'll have to decide what kind of book you want to start with, along with the stickers, embellishments, SMASH stick, SMASH tape and more.  I can see myself getting carried away...for sure!

If you're interested in SMASH you'll be happy to know that Craft Warehouse is now carrying all the supplies to get you started!  So...what are you waiting for?  Get shopping and get SMASHING!

LinkWithin

Related Posts Plugin for WordPress, Blogger...
Blogging tips