Hi there! My name is Steffanie and I'm your guest designer for Craft Warehouse today.
I have been given the wonderful privilege of playing with some new papers from one of my favorite manufacturers---Echo Park!! I'm so thrilled that Craft Warehouse carries nearly every collection created by them. This fits into my need to collect pretty paper very nicely! Shhhh...don't tell my husband, but I think I own nearly every one.... ;-)
I have been given the wonderful privilege of playing with some new papers from one of my favorite manufacturers---Echo Park!! I'm so thrilled that Craft Warehouse carries nearly every collection created by them. This fits into my need to collect pretty paper very nicely! Shhhh...don't tell my husband, but I think I own nearly every one.... ;-)
Today I am creating with the Everyday Eclectic collection.

I was given the freedom to create whatever I like. Since I am both a scrapbooker and a card maker, I wanted to do both. I will start with the card.
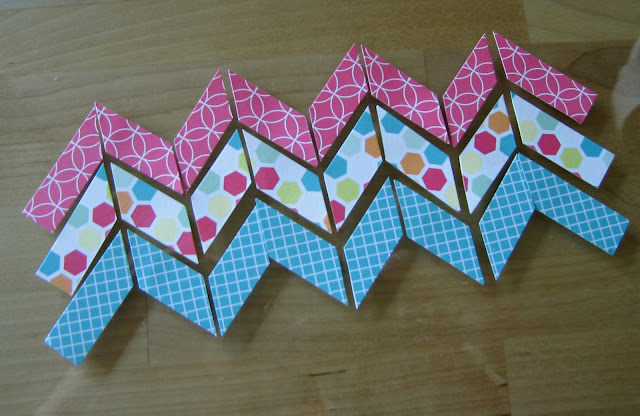
If you are alert to trends at all, you no doubt have noticed that chevrons (or zig-zags) are very big right now. I have lots of papers with the chevron print on them (this particular collection has several), but I really wanted to try my hand at creating my own chevron background by paper piecing. Here is how I did it...
- Select three complimentary pieces of patterned paper.
- Cut a 0.5"strip off of each 12"x12" sheet of paper, creating 3 different strips each measuring 12"x0.5".
- Further cut each strip into 1.5" pieces. This created 9 small strips of each print, all measuring 1.5"x0.5".
- Take 2 of the same print and overlap them to form an "L".
- Using scissors, cut from the inner corner to the outer corner snipping off two little triangles.
- Arrange cut pieces to form the beginning of your zig-zag.
- Place the next strip over one end, overlapping again to form the "L".
- Cut from inner to outer corner, snipping off the triangles as you did before.
- Repeat with each piece until the pattern reaches the desired length.
- Select next set of strips and repeat this process until all strips are trimmed to form your chevron pattern.
Then begins the process of arranging and adhering to your card base. I suggest finding your card center and also drawing a light pencil line horizontally across your card. This will give you a place to start for arranging your pattern. I decided on the position of my lowest chevron strip and began in the center working horizontally first, then vertically upwards. Really, once you get the first chevron strip down, the rest is easy.
Additional design notes:
- Hand-stitching was added on the "peaks" of my chevrons (white embroidery floss). I did this mostly for visual interest and texture but also to help conceal my mistakes with the paper-piecing.
- Dimensional adhesive used on the back of 2 of the cloud stickers. Tip: to "un-sticky" your sticker elements---sprinkle baby powder on the back, smear around with finger tip, brush off any excess and add your dimensional adhesive.
- Decorative border trim added beneath lower cloud. Choose one of your favorite border punches or use decorative scissors.
- Glaze pen used on title to create embossed effect (Sakura Glaze, clear).
- Adhesive pearl accents added (Kaisercraft Basics).
Make sure to check back tomorrow because Steffanie has a layout tutorial to share with us too!


Cute card and great tutorial! I love the extra step of hand stitching you added! :)
ReplyDeleteThanks, Mendi!
DeleteGreat tutorial!!!! Super cute card!
ReplyDeleteLove this beautiful card and thanks so much for the tutorial. I had already decided to try this technique on my next layout so the timing couldn't be better.
ReplyDeleteSteffanie, love your card and your tutorial is awesome.
ReplyDeleteSO CUTE! love it!
ReplyDeleteLove the card and can't wait to see your layout!
ReplyDeleteGreat card! I love the tutorial!
ReplyDeleteLove love love that card Steff!! Great tutorial!!!
ReplyDeleteCute card! Love the pretty colors, stitching, and super tutorial!
ReplyDeleteCute card! Love the pretty colors, stitching, and super tutorial!
ReplyDeleteBeautiful work!
ReplyDeleteThanks for sharing how you cut the chevrons, I wouldn't have thought of that! Cute card!
ReplyDeleteHow fabulous! I love your card, Steffanie!
ReplyDelete