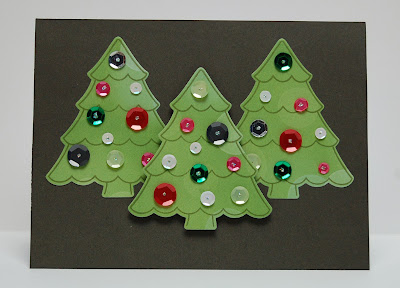
 Hey there, Michelle back again to share a couple more fun holiday cards. I am loving these fun stamps and coordinating die sets from Lawn Fawn.
Before you start you want to gently bend the individual pieces of the die to separate them. If you have some pliers you can trim the excess metal pieces off the edges of the dies but they do not effect the end results of the die cut.
Start by making a card base from card stock, trim cardstock to 9" x 6" and score down the middle of the 9" side to create a card that is 4 1/2" x 6". Trim a piece of patterned paper 4 1/2" x 6" for front of card.
On a piece of green patterned paper stamp several trees with the tree from Lawn Fawn's Trim the Tree stamp set.
Lind up the tree shaped die with the stamp image and run through a die cut machine such as the big shot.
Isn't it amazing! The die fits perfectly around the stamped image to create awesome stamped die cuts. Adhere two trees to the card base and attach the third in the center with a pop up adhesive.
Now to decorate the trees with this coordinating set of mixed sequins. There are a variety of sizes and colors, including some snowflakes.
Randomly attach the sequins to the trees with either a min glue dot or a small dab of a wet adhesive. Once attached put a little dab of stickles to add a little sparkle to the centers and to prevent any glue sticking to anything you don't want it to.
Christmas Mantel Card
And last but not least here is a fun Christmas scene card.
Start by creating your card base 4 1/4" x 10" and score down the middle of the 10" side. You want the opening on the bottom of this card so it opens up and not to the side.
To create the brick for the fireplace and mantel trim a piece of cardstock that is 4" x 3 1/2". With the 3 1/2" side parallel to the top score at 2 3/4" and 3" pre-fold these two score lines. With the same side up also score at 1/2", 1", 1 1/2" & 2 1/2".
Flip the cardstock so the 4" side is parallel to the top. Score every other row at 3/4", 1 1/2", 2 1/4", 3" & 3/4".
Now starting on the second row, score every other row at 3/8", 1 1/8", 1 7/8", 2 5/8" & 3 3/8".
This is what the front side of the cardstock should look like now.
Next stamp and die cut the stocking and garland pieces. These work the same as the trees earlier, just stamp and line up your die and you have perfectly die cut stamped images.
Fold your cardstock so the scored flap hangs over the front. I put some pop up adhesive in a few spots under the flap to help support it. Before this though I attached the garland and stockings with a dab of adhesive.
Here's what it looks like with a double stack of pop up adhesive to support the mantel piece.
Stamp, die cut and attach the gifts along the bottom and trim the Merry Christmas portion from one of the tags from the tag sheet. Attach the fireplace to the card and Merry Christmas piece to card base.
Happy Holidays and thanks for looking, I hope you are inspired to create some of your own holiday cards with this awesome collection from Lawn Fawn.


Both of these cards are SO cute! Especially love how you did the bricks and those little stockings are darling.
ReplyDeleteEEEk! Very adorable.
ReplyDelete